Tag: Paint

Teen Bedroom Design with Simple Painted Focal Wall and Succulents

Right after my 12-year old’s birthday, she started on about re-doing her owl-themed bedroom. It was painted light blue and had owl paintings and owl curtains. After 4 years, she had finally outgrown it. I still felt as though I’d only just finished decorating our ‘new’ house. Her room was one of the first I tackled after the builders fixed the nail pops a year after we moved into the brand new house. It was definitely time for an update for her. If you’re looking for some ideas for your own preteen or teen, you’d better follow along!

Before

For the previous owl theme, I had painted three pictures for her. She had porcelain dolls from my childhood collection on the wall shelves and a wire cage hanging in the corner with a stuffed owl. This child’s theme was no longer suitable for an almost teen.

Teen Bedroom Must Haves

So when my oldest said she wanted to update her room, I couldn’t blame her. It’d really been just about the same as the pictures above for the last 4 years. For her new room, she said she wanted it to be gray and white, to have succulents and LED lights. She wanted simplicity. It was right up my alley since gray was in other parts of the house and I’m definitely a succulent lover. It’s really too bad that I’m also a succulent killer. Anyway…

I saw photos of this main geometric wall feature and really liked it. My preteen was on board with it, so she chose her colors with some guidance. We went with three Sherwin Williams colors:

Feather bedspread from the previous theme.

We used flat paint because that’s all that was available in the quart sizes of super paint. I don’t tend to like doing flat paint because it’s harder to clean. I like eggshell or satin for bedrooms. That being said, I will definitely give it to this flat paint for how smooth and even it goes on the wall. That is the benefit of flat paint. For this wall feature, I used painter’s tape to create the sections. You can really put them wherever you want. I painted the pink section first. Then while it was drying, I started on the other walls. I moved the tape from the outside of the pink area to the inside of the pink area to start on the dark gray section. It took me about half a day to paint her entire room with two coats.

Teen’s Ultimate Must Have

Her ‘must-have’ was a string of LED lights. She couldn’t wait for me to put them up on the wall with her and ended up putting them up by herself. Unfortunately, it ended up being slightly crooked and wobbly because of it. She loves them regardless and tends to use those LED lights rather than her ceiling light. If you’re looking for a sure-fire win with your teen, I’d say this is it.

Curtains for the Teen Bedroom

I’m generally floored with how expensive curtains can be, so I tend to do quite a bit of looking before buying. We looked at Target, HomeGoods, Walmart, and Boscov’s (all local options) for something to match that wouldn’t break my wallet right after all the Christmas purchases. We came up empty. I ended up being at Big Lots on 20% off day and found thick white curtains that would match the room and weren’t so sheer people on the street below would be able to see through. It was a huge win in my book. I like the large grommet look as well.

Other Small Teen Additions

She moved her earrings from her Hello Kitty holder to my DIY framed earring holder. Be sure to check out my easy tutorial!

She hung her Fuji Instant photos on a string of clip lights. Then I re-positioned her previous wall decor around it. All hung courtesy of Command Hooks.

She emptied a large bookcase filled with books in order to free up this space. I questioned where she would put everything, but she made it happen. It was a blond composite bookcase as tall as the windows that we’d gotten from my sister. The shelves were sagging a bit from the weight of years of books. I ended up cutting in half to make lemonade and bakery stand for my two other daughters. It was a win for them all.
All those books came to fill the shelves of this inset bookcase I did for her. I’d wanted to do this for 5 years and finally made it a priority. We were both over the moon with the result.

Desk Update

We used the leftover Rosy outlook and Dustblu to paint her purple desk. My preteen used the roller for the top of the desk because it was faster. This sadly ended up being a mistake because it now has a bumpy surface. You can see my gray and white striped hallway through the doorway, click the link for my run through on how to get the look.
“Yuck!” is how I feel about this finish. She says she doesn’t care, but she has to put a hard surface under her paper to be able to write neatly. I’m pretty sure I will sand it down at some point and fix the issue.
She (and I) would love to paint these dressers white or get a different set. They were mine as a kid and still have a pristine finish. I love a good refinish project as you can probably tell from this blog.
Every teen needs a mirror to check out their outfit. This is her Command hooks closet door. Truly, this post could be sponsored by Command hooks with how much I love them. The mirror is held up by them, the purses and hats are hanging on the command hooks, the light strings are hung with the special light ones. We painted the trim of this cheap mirror with acrylic paint.

Succulents

My daughter is a girl after my own heart. I love succulents and buying them. Most often, I seem to be throwing my money away because I couldn’t keep a hen and chick succulent alive to save my life. So for this pretty setup, we went fake. 

A another hint of succulents from Michaels when they were on sale. This octagon shelf was a mommy-daughter project. I really liked how it all came together.

Completed Teen Bedroom Makeover

So that rounds out what we did to bring her kid’s room up to teen room standards. Even as I write that, I’m stunned that I’m old enough to be a mom to an almost teen. She’s still pestering for a full-size bed and new dressers and I’m still generating ideas on how to make the bed. My parents made several unique beds for us, so I know I could do it. I’ll have to make it an incentive to get her to control her teenage attitude. Ha. I don’t know that even that would work.

The new bed set big enough for a future full-size bed.

And that’s all she wrote…literally….I’m done. I hope you got some ideas out of it for your own teen’s room!

*This page contains affiliate links. This means if you use one of my links to make a purchase, I will receive a small commission at no additional cost to you. Thank you for supporting Cathartic Crafting!

Antique Hutch Refinish For an Outstanding Shabby Chic Focal Point

In a random search of the Facebook marketplace, I found this antique kitchen piece for less than $50. I LOVED IT! I find it truly exciting to find these kinds of things, even when I don’t need anything for my own house. Have you found any antique steals yourself?!  This kitchen hutch (as I deemed it) was located near my sister’s house, so after confirming she could pick it up for me, I snatched it up. Then, she lovingly dropped it off at my house for me. I was ready to take on this antique hutch refinish job. 

To do’s for this project:

  • Painting the wood 
  • Buy wood and new drawer handles
  • Cutting new shelves
  • Staining the shelves and the top
  • Cleaning the rust off the metal drawer bin
  • Replacing the metal 
  • Fixing the broken wood

Expenses

  • Annie Sloan paint: $12 for 4 oz
  • Fusion Paint: ~$22 for 16.9 fl oz
  • Pine board $16
  • 5 drawer handles, $15 
  • Metal sheet, $22
  • Wood Filler $7
  • Drawer/shelf liner (bought for a previous dresser refinish)
  • Time…priceless

Total $84

After having used Fusion paint on several projects, I wanted to give Annie Sloan paint a try with this project to be able to compare the two. I had found an Annie Sloan paint seller nearby at an antique barn sale, so I had gotten a 4 oz bottle of teal (named Provence and number B8100620). The bottle says “Absolutely anyone can use my paint. It’s easy.”

Normally, I’d say you need to sand or strip the wood before painting, but with this one, it wasn’t necessary. I had to fix a few pieces of wood that were loose or broken before painting. After those fixes, I did a single coat of teal on the back and a double coat of white fusion paint on everything else. This was likely the easiest paint refinish I’ve done to date. The single coat of teal was enough coverage to give it more of a rustic look. Of the 4 oz canister I bought, there was about a quarter of it left. I’d say that’s pretty good coverage for that small amount. It also went on smoothly without any brush marks. It was definitely a positive to have an easier paint job for this project given the other tasks needed. Annie Sloan got a thumbs up from me.

A Little Bit of Metal Work

With the top and the legs painted, it was time to start on the metal bins. I’d been told they were used to store flour, but I really couldn’t find any information on the internet to verify that. I would guess they were used to store onions and potatoes but that’s purely based on what I think would make sense to put in there. 

One of the bins was only slightly rusted, but the other side had a hole in it from all the rust. In order to fix this, it was easiest to replace it altogether. I bought a sheet of aluminum from Home Depot to cut to size. In order to get the old metal off, I had to remove the nails holding it in place. It took me quite a bit to push myself to start this task because I thought it was going to be quite difficult. Procrastination really gets me on some projects. It ended up being easier than I had thought, which was fantastic! Be warned that sometimes our fears end up falling flat. 

A little motivation for you…

“Take time to deliberate; but when the time for action arrives, stop thinking and go in.”

Napoleon Bonaparte

“If you put off everything until you are sure of it, you will never get anything done.”

Norman Vincent Peale

“The greatest amount of wasted time is the time not getting started.”

Dawson Trotman

Adding a friend to the mix

While I was working on the bins, my friend was working on her own dresser refinish with me in my garage. It was cold in there! I was helping her learn the refinishing ropes. Having a buddy definitely makes a project much more socially fun. 

Clean metal bins

Although part of what I love about crafting and woodworking is the solitary nature of it, sometimes it’s really nice to have company. You can still get lost in your own thoughts and mentally working through your own problems, but you also have the opportunity to get feedback on those thoughts. Normally, I do have social engagement even in my garage solitude due to the constant need for ‘mom’. For example, while trying to write this post, I’ve been interrupted no less than a million times from the three kids and husband. 

Anyway, back to business…

I placed the new sheet in place and then nailed it into place with some 1/2 in nails. After it was set in place, I pressed the edge down over the wood and used a hammer to flatten it as flush as possible against the wood. It was complete after that!

Rust, Rust, and more Rust

I used this same tool I had used to cut the metal. It had several different tips and this bristle brush was FANTASTIC at scrubbing off the rust. Since I hadn’t done anything like this before, I was really impressed with how well it worked.

Wood Fixes and Staining

This antique hutch refinish was well on it’s way to being complete. I ended up buying some pine to cut into two shelves because the hutch hadn’t come with all the shelves. The hutch had a removable cutting board that was in need of repair. I used wood filler to fill in the gaps. I did one round of it, let it dry, and then did another layer. If you put too thick of a layer on, it doesn’t seem to dry as well as it should. I’ve learned this from personal experience. I’m glad to fail to help you stay on a successful track on your journey. (Definitely not happy when it happens, but after the moment passes, I can be.)

Shelves cut, stained and ready for placement.

After the wood filler dried, I sanded it and the top smooth to be ready for staining. I employed the services of my oldest to help with applying the dark stain. I used the same stain as for my Paddle Platter

Look at how much she appears to love helping with this…Not at all. After the stain, came the three coats of polyurethane to protect the surface from frequent use. 

Antique Hutch Refinish Final Product

And after all that work and time, it was finally finished and ready for staging. If I had the space, I would love to keep it. Sadly, I don’t, so this beauty is ready for a new owner. 

Hard to see in this photo but there was nice detail on the top border.

I hope you enjoyed the run down of this antique hutch refinish and find it inspiring as you start on your own journey. Happy crafting!

Composite Bookcase Revamp into Unique Upscale Decor

Have you been hanging on to the affordable furniture you got when you were first married or moved into your first space? Is money still a bit to tight to buy nice stuff? The affordable option is to give that furniture an overhaul. In this post, I’ll show how to revamp a composite bookcase with just a few supplies. My bookcase was one of those items from good old Walmart. I’m sure I’m not the only one to have something like it. After use, these composite furniture items can even be hard to give away since many donation companies won’t take them. That leaves only a few options; the dump, a plea for someone to take it for free or to get into that happy mental space to give it a pleasing boost.

Getting to Work

First step is to give that shiny finish a really rough sanding with some low number grit sandpaper. I give a little more detail about the types of sandpaper in my wood paddle platter post as a reference. If you have an electric sander, you could use it for the outside and shelves. The inside corners will likely need hand sanding. I like the sanding blocks they sell now in stores, but in a pinch, you can use the method my dad always used. Fold the sandpaper sheet around a hand size scrap piece of wood. This makes it easier to hold and to sand. 

Supplies

  • 1/4″ plywood
  • 1×2 boards
  • Paint
  • Stencil
  • Paintbrushes
  • Wood filler
  • Wood glue

Tools

  • Nail gun and compressor (or nails and a hammer)
  • Kreg jig & screws
  • Wood glue
  • Dremel
  • Saw
  • Scraper

New Back Panel

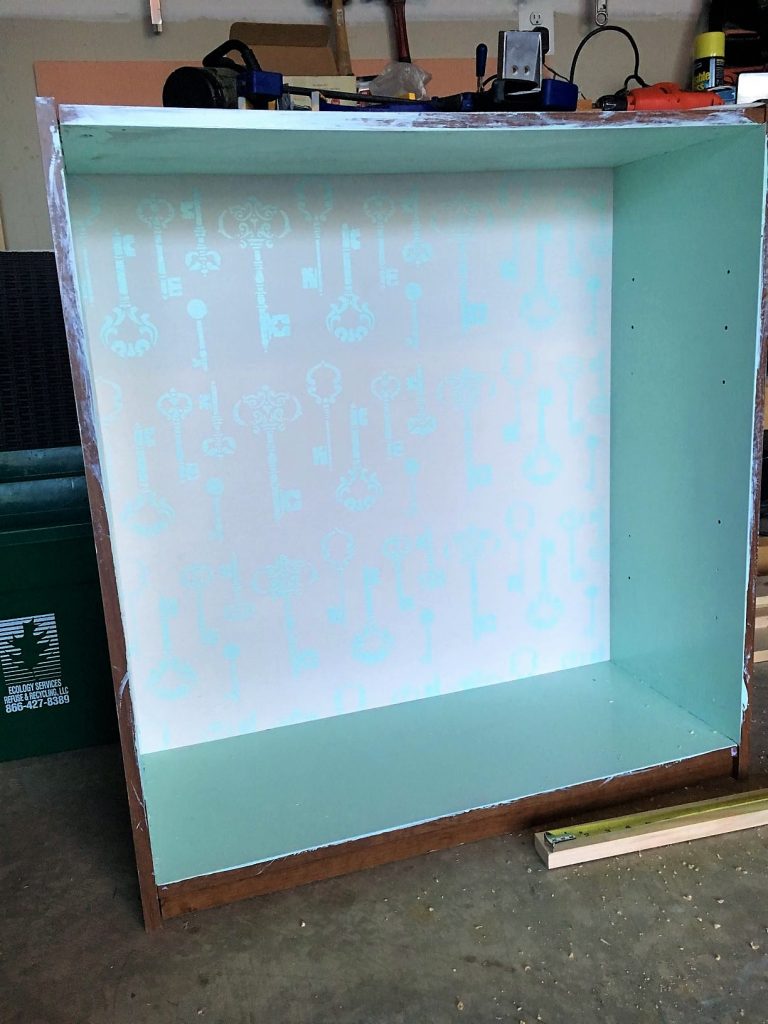
Cardboard backs are pretty much a given with these composite bookcases, so it’s a given that it should be replaced. Cut the 1/4″ plywood to size before starting to paint. Then paint your base color. I wanted to give mine a fun feature, so I went with key stencils in the same color I chose for the outside. I was slightly disappointed about how hard it was to see. If I were to do it again, I would do the stenciling in a slightly darker shade.

Next up is to use the nail gun to attach the plywood to the back of the bookcase. To ensure it stays secure, put wood glue on before nailing the back.


Well on your way now

Composite bookcase painted interior

If you look below, you might be confused as to why it’s painted here and not painted later. That is simply because I didn’t start with the sanding part. I sadly admit to you that I take the lazy way out at times and it normally comes back to bite me in the end. You’d think I’d learn better than I do. This ended up meaning that the paint was scratching off when I started to work with it. I also needed to fill the peg holes with wood filler to create a flat surface. You should definitely do both of those things if you will be securing the shelves in place.

The Wood Frame for this Composite Bookcase

The measurements for the cuts of the 1×2’s really depends on the size of the bookcase. My cuts were:

  • 2   28″ pieces for the front horizontal bars
  • 4   31 3/4″ pieces for the vertical beams
  • 4   8 5/8″ pieces for the horizontal beams on the side

Cut them to size and drill holes with a Kreg jig. When connecting them together, you should start with creating the front square and the side rectangles. After those are together, it’s time to connect the sides with the front through the pocket holes. 

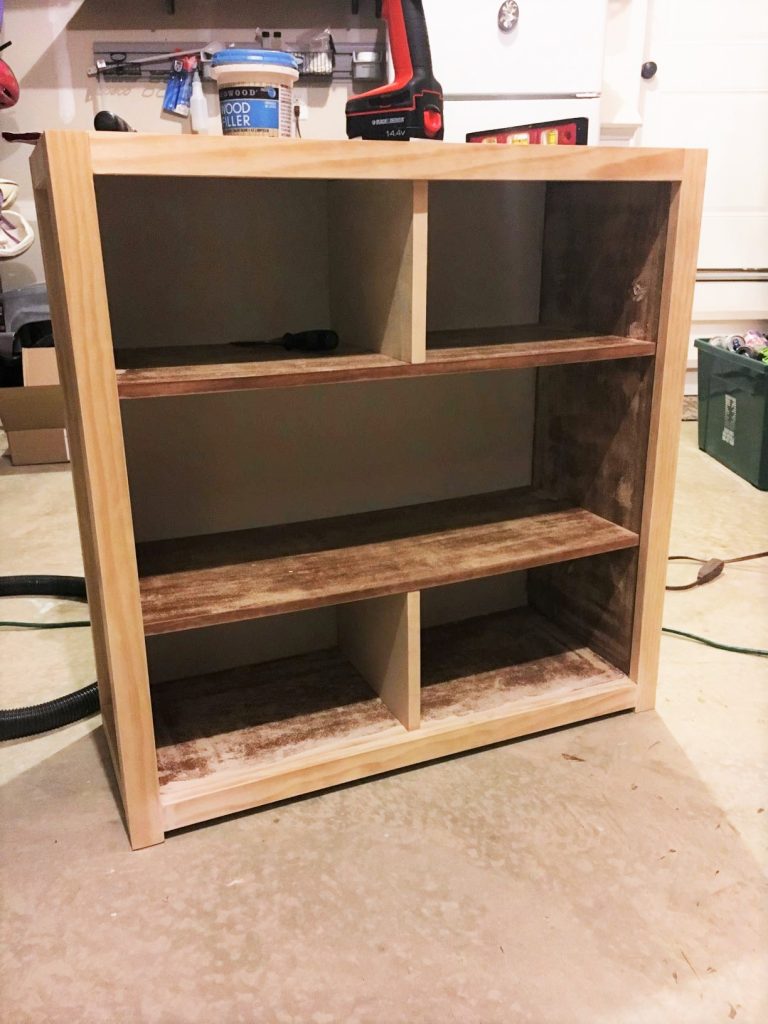
After the frame is completely built, it can be attached with glue and a nail gun. You should also attach the shelves with glue and a nail gun from the outside. There are a variety of nail guns out there. Mine is on the cheap side so doesn’t have any bells or whistles.

Even though I tried to keep the gun straight as can be, there were a few of the 1.5 inch nails that went askew. It meant they were sticking out of the shelves and needed to be cut. Talk about wanting to pull your hair out, I was completely annoyed. So be warned that it doesn’t always go smoothly. I chose to add vertical boards to support the sagging shelves, but you can leave without them if you like. Mine had experienced years of holding kids books. I used wood glue and nailed the boards from both the top and the bottom.

revamped composite bookcase with new frame
You can see here that the bottom board is not flush to the ground. That is with the intention of being flush with the bottom shelf and giving a bit of a gap with the floor. Be sure to measure where your bottom shelf falls before securing the horizontal beams to the vertical.
Composite bookcase with new frame

Time to Dremel for a Unique Touch

At the time, I hadn’t had a lot of experience with a dremel. I chose to add this touch to practice the skill. Obviously, you don’t have to go the same route, if you don’t have a dremel. If you are opting in, trace the stencil with pencil onto the wood before starting to cut it out. Take your time, go at it at a bit of an angle and you’ll be fine.

Paint

After all the cutting and drilling, it’s time to move into the home stretch with paint. I chose affordable paint from Michaels in Sea Glass. It went on easy and has held up perfectly well over the years.

For the top, cut a piece of wood or plywood that is an inch bigger on the sides and 1/4″ extra on the front than the bookcase measurements. The back of the top is flush (aka even) with the back. I used a white stain applied with a clean white rag on my piece to match more with my paint. If you don’t have much experience with stain, don’t worry. The important thing to remember is to go with the grain of the wood and not to allow large pools of stain to sit on the surface. Doing so will leave you with a spotty uneven look that can only be corrected with significant sanding. You can end it there with the stain or keep going as I did. 

DIY Rub-On Words

I came across this awesome tutorial on Pinterest on how to transfer images using wax paper and was pumped to try it with this project. If you are looking for a way to accomplish the task with materials you have at home, this is it. The hardest part is getting the printer to feed the wax paper without crumpling it. It was another one of those screaming in frustrating experiences. I found the best method was to tape the wax paper to a piece of computer paper to ensure 100% success every time.  I also had to learn how to get the words to be reversed for printing. This can be accomplished with 3-D Rotation of a text box in Microsoft Word. 

Reference below:


“Kind words are keys that fit in all locks.”

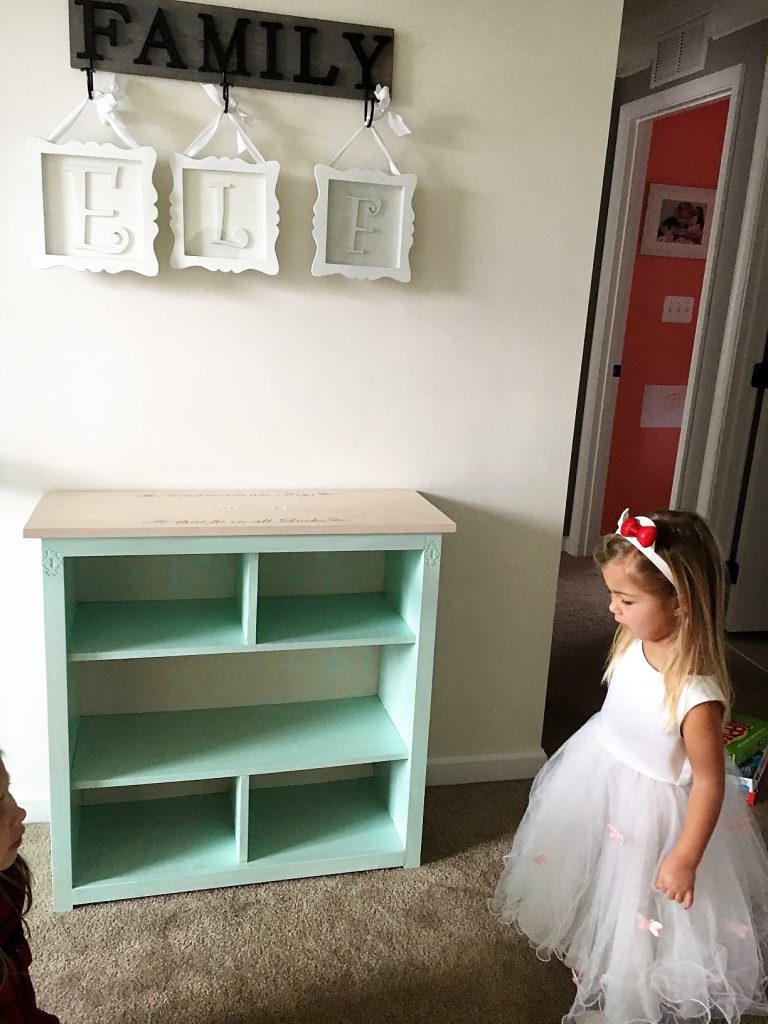
Revamped Composite Bookcase

The Final Look


It’s a bit hard to see here, but I added a white key and 2 lock stencils to the outside panels as well. 


Empty composite bookcase
I made the FAMILY hanger and placed the initials of my three girls to finish off the space.

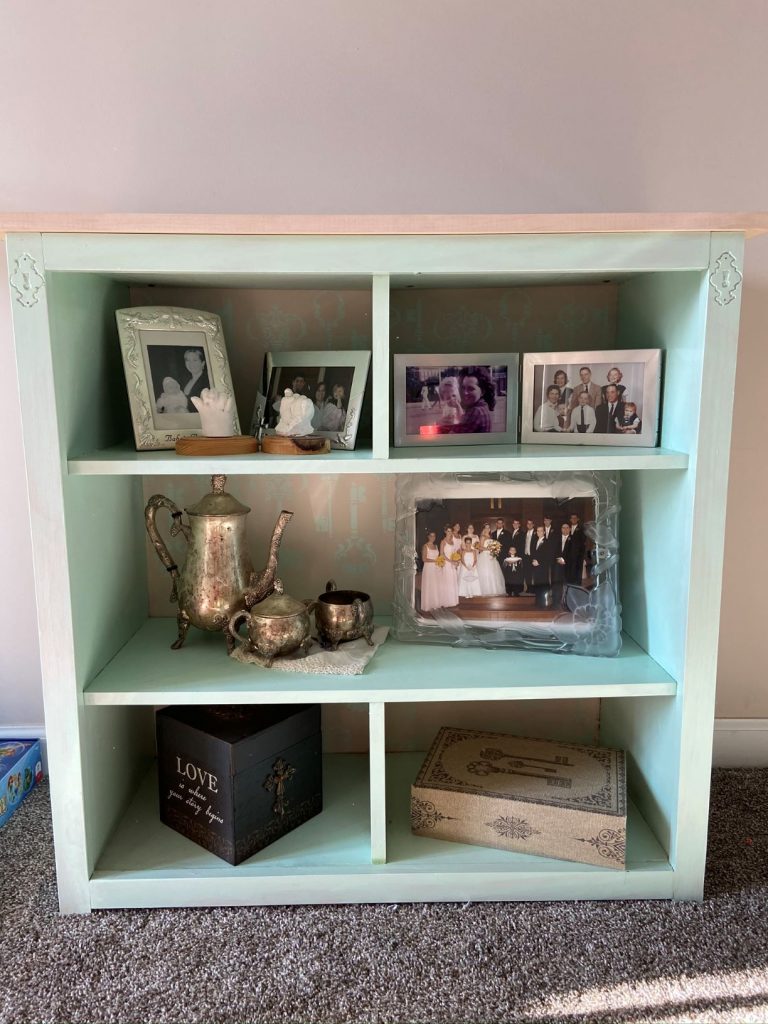
Filled with Family:

Finished composite bookcase

That’s it! Not a terribly difficult project to take that humdrum composite bookcase to a new posh look. I hope you are happy with how yours turns out!

Wide Stripes: Hallway Paint Idea for a Unique Look

Strip Hallway Paint Idea

Our first home was a three-bedroom house with no real hallways. When we moved into our new house, I was so excited by this long hallway. Whereas all three bedroom doors used to be right next to each other, we couldn’t even see the door of the 5th bedroom at the end of the hall. It felt gloriously spacious. I knew I had to something special with this long wall. I settled on wide stripes as the backdrop for the gallery of photos I had just put together for the old house. If you’re looking for a statement hallway, go and ahead and try this stripe hallway paint idea.

Hallway Paint Idea

While searching for ideas for the new house, I was inspired by a wall on Girl in The Red Shoes. I loved the gray and white color pallet. The wide stripes also seemed less time consuming and busy than thinner striped versions. 

Getting Started

Supplies:

  • Painter’s Tape
  • Measuring Tape
  • White Paint in your desired finish (I used Satin)
  • Gray Paint in the same finish
  • Lazer level (if you have one)
  • Paint brushes
  • Two Paint Rollers
  • Step ladder
  • TIME

Maybe your asking yourself, “what is my desired finish”? To answer that, check out this fun pictorial from Building Moxie.


Paint Sheen by Room via Renovate Your World


I generally stay away from flat for the simple reason that it seems to collect dirt. Our walls had year old builder grade flat white paint that was DIRTY from 3 little girls.  Satin was my paint finish choice. 

Blank Canvas needing a Hallway Paint idea

The first step was to paint the whole wall with satin white paint. I used Color Place paint in Candlestick Silver for this. A quick tip for those painting over builder’s flat paint; you need to buy more paint than you think. The flat paint absorbs a lot of it.

The long hallway that inspired this hallway paint idea
This hallway is soooo long!

The Stripes

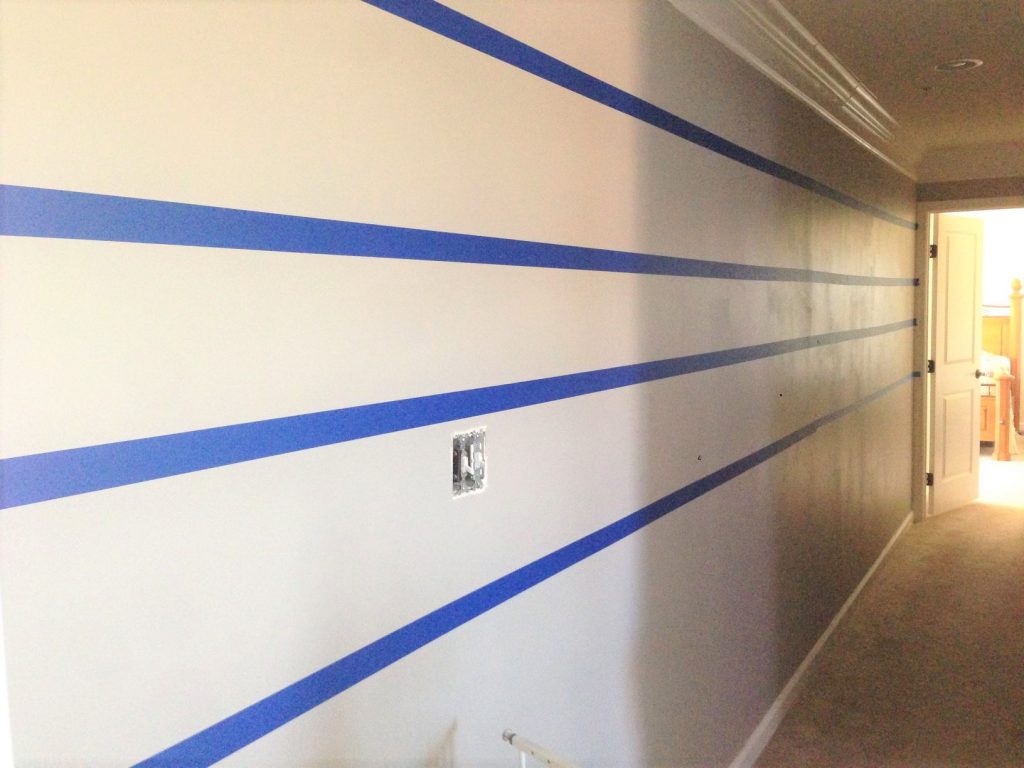
Using painter's tape for this hallway paint idea

Measure Measure Measure

To start, I measured the height of the wall (85 inches) and then determined an equal measurement for the stripes (7 stripes at roughly 12 2/16inches). As I said in my Stencil Coffee Table post, using those math skills tends to be necessary in my projects. This hallway paint idea was no different. Since I didn’t have a lazer level at the time, I initially measured from the ceiling and marked the height at several distances across the span of the wall. After the measuring and marking was complete, I started taping. 

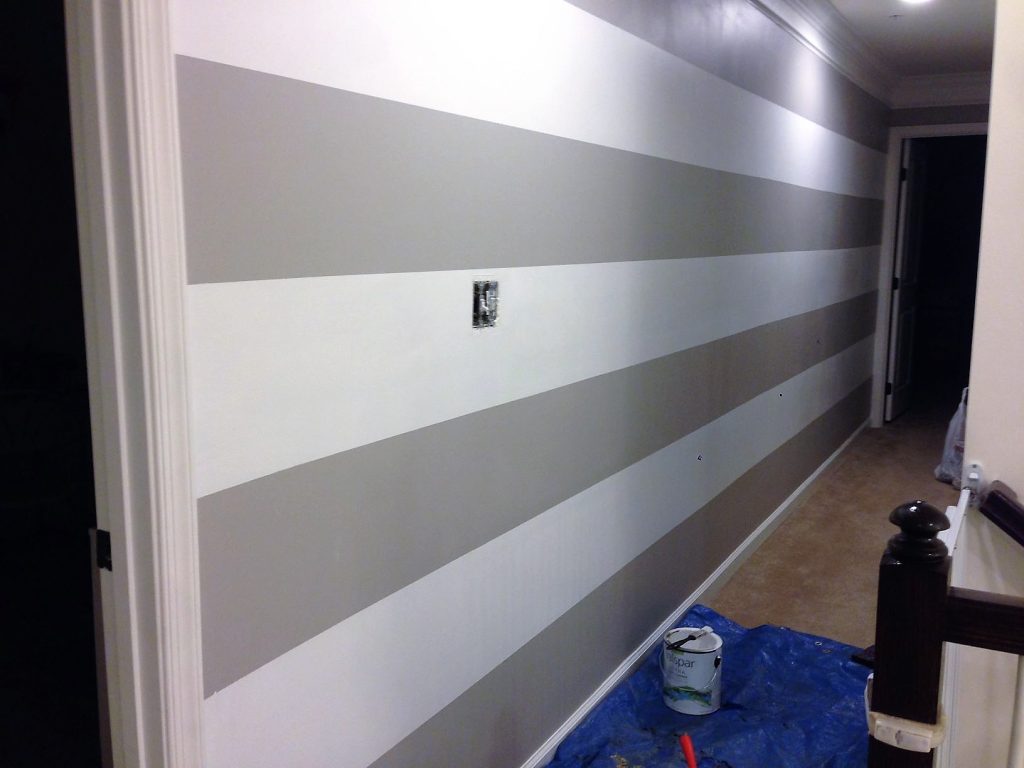
What I realized when I got to the end of the hallway was that the crown molding was not completely straight and even. This meant my last stripe was thinner on one end than it was at the other. AHHHHHH. I had to measure all over again but from the floor. This was why my husband was wondering why it was taking me so long to finish. From there, I painted two coats of gray from the top and alternating down the stripes. 


Alternative Method for this Hallway Paint Idea

If measuring seems too tedious, I would definitely recommend a lazer level. I tend to do things as cheaply as possible, which generally means I’m not buying the tools that will undoubtedly make my life easier. Easier in this case being also more time effective. Obviously, that’s not everyone’s cup of tea. For those looking to make the project easier, here’s a quick video to help you decide what kind to go with Top 6 Lazer Level Review.  Among some common uses of lazer levels could be hanging pictures in line and placing anchors for shelves. 

Finished Striped hallway paint idea

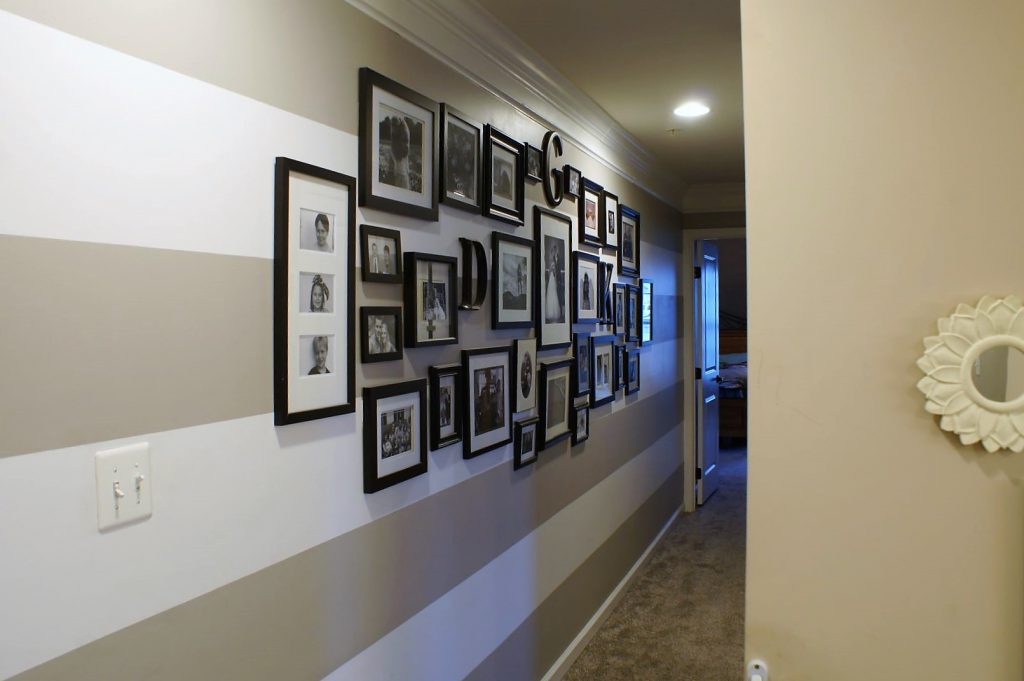
Harder than measuring and taping was figuring out how I wanted to place all the photos and choosing the photos. As a fan of symmetry,  I tried to maintain symmetry as best I could. I put the frames on the floor to figure out how I wanted them to be positioned before taking it to the wall. Then, I measured the wall to find the middle position to hang the middle picture frame of my husband and me. 

Strip Hallway Paint Idea

Gallery wall with our initials. I had the K and G for years before I found a D that was close enough in size and style.

For the other walls in the hallway, I painted them solid gray. The white trim and crown molding tied it all together nicely. I hope you enjoyed the rundown and tips. Happy painting!

Flip Coffee Table Stencil Refinish

Plain black coffee table or stencil refinished coffee table?!  Which would you choose? When a neighbor posted the black coffee table as free to whoever wanted it, I jumped at the chance to give it a new unique look. Free is fabulous in my book. It was a composite wood table, so definitely not as durable nor easy to alter as real wood. This wasn’t necessarily a bad thing, because it meant I had to stick with a simple paint job. For this refinish, less was more, and perfect for anyone looking to do something new.

Start of the Stencil Refinish

I started this project by sanding down the shiny finish to give the paint a fighting chance of adhering to the surface. Sanding is not my favorite thing in the world, so it tends to be what shines through as my weak point in projects. My proof of this is to come.

Painting

To make my life easier, I bought paint from Michaels, teal and white. I try to fusion mineral paint when I can, but have found it’s hard to find it locally. You can use the website https://fusionmineralpaint.com/where-to-buy/ to find it near you or order online. instead of searching around for fusion paint. I started with painting the outside teal. Unfortunately, it didn’t adhere properly to the spots that weren’t sanded as well, so I was kicking myself a bit for that. 

I decided to take a step back and spray paint the whole thing with white primer. It was easier than sanding it all again and helped hide the black from coming through the first coat of the teal paint. 

You can plainly see the spotty finish in the top right there. Blah

After spray painting a few coats of white, I repainted the whole thing with the teal. I was happy with the final finish. I painted the cubbies and the internal storage area with white to give it a more defined look. When the solid colors dried, it was time to give it a stencil detail.

Stencil Refinish

Calculating stencil refinish

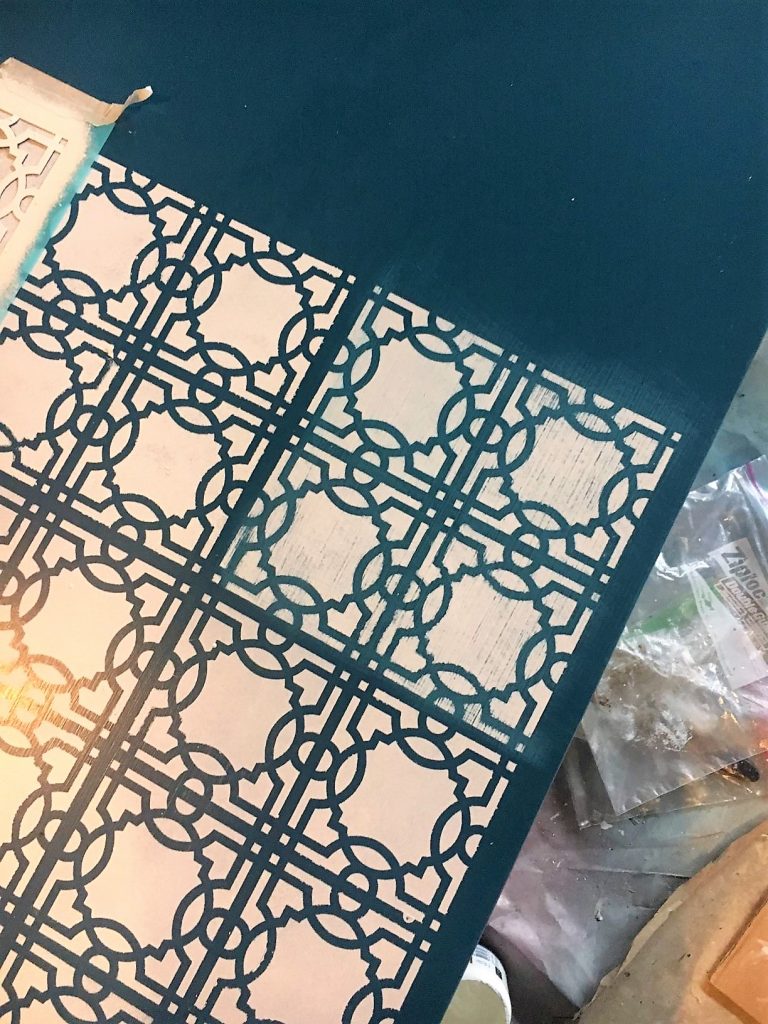
Then it was time to pull out the old pencil and paper. It’s crazy how many of my projects involve calculations. This tends to be my stuck point because of the fear of messing it up. I use the knowledge to reinforce the importance of understanding math with my three girls. For this stenciled top, I had to figure out the width of the border for the long side and short side by considering the width of the stencil and how many could fit across. This stencil was more of a challenge, because it wasn’t completely centered and square to the border. A Martha Stewart fail if you ask me.

First step Stencil Refinish

It’s a fine art

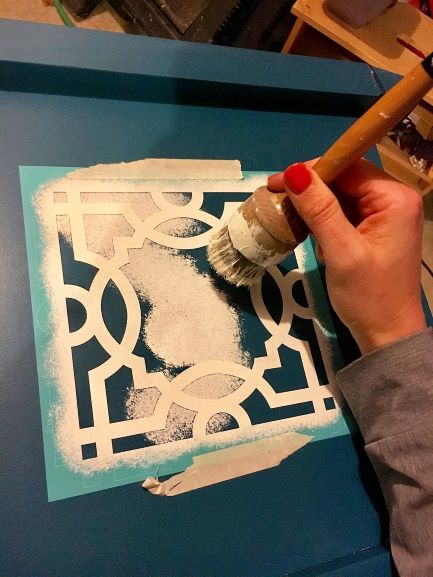
To be honest, I haven’t done a ton of stenciling. In the handful of stencil refinishing projects I’ve done, I have learned there’s a fine art to mastering it. It’s simply not easy to get it to be perfect. For instance, you have to have the exact amount of paint on your brush to keep it from seeping underneath the borders while still giving it a solid coat. I started by stamping/patting the loaded paintbrush on a paper plate to take off the excess and evenly distribute across the bristles. It’s best to start stamping the brush in the large open portion of the stencil to unload some of the paint there first before going towards the edges. 

Stencil Refinish preview
Be sure to use a square for repeating stencils to ensure everything stays even. This picture shows that the last stencil was slightly tilted to the left and was definitely visible to my OCD self.
Stencil refinish going off square
Some of the white coatings weren’t completely even and there was a bit of seepage. I decided to sand the whole top a bit to even it out and give it a very slight aged feel. This is a perfect example of how imperfect I can be and how you can hide mistakes if you think creatively.
Large Stencil in progress on refinish
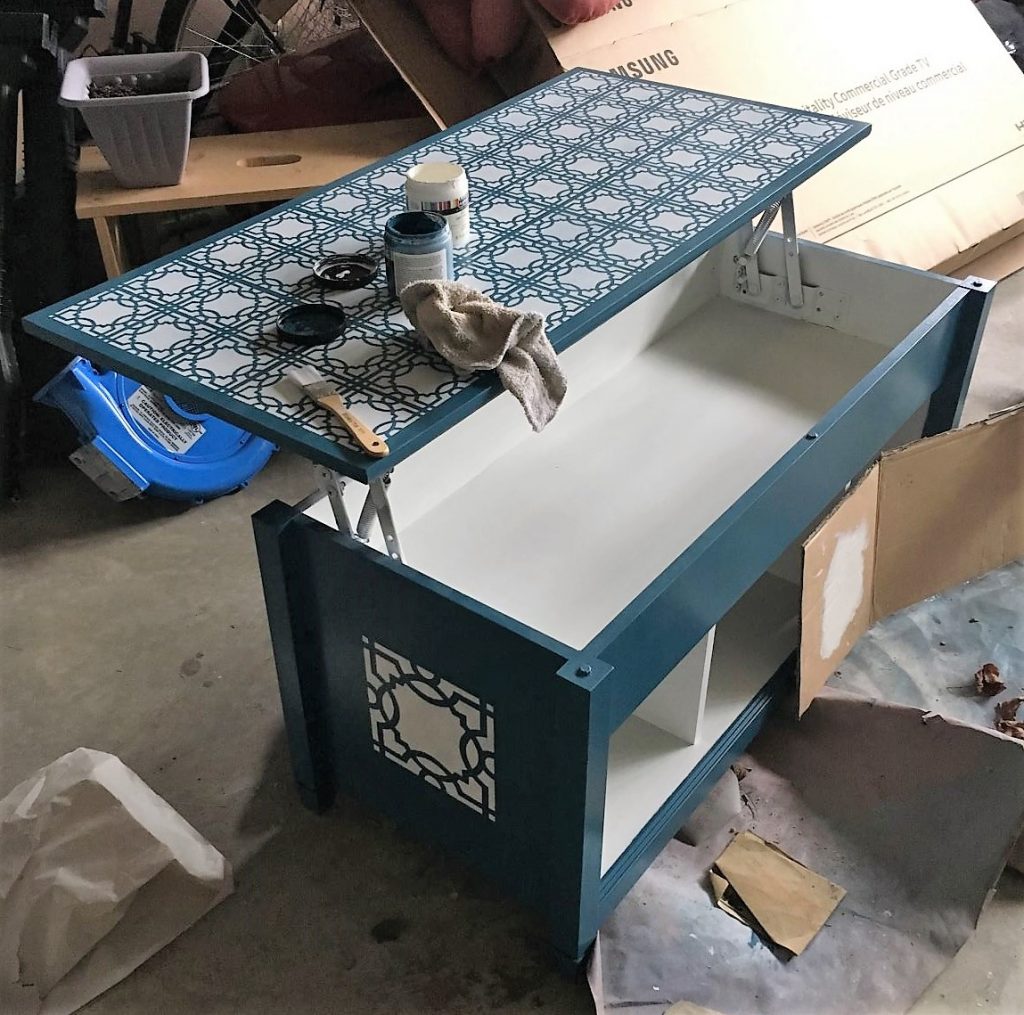
After I completed the top, I finished it off with a large stencil on both ends to tie it all together.

Final Touches

Stencil Refinish almost complete

Then, I painted the cubbies and inside with white paint to finish with the painting portion of this project. I wanted to ensure the paint wouldn’t scratch or peel with frequent use so sealed it with polyurethane. Some polyurethane has a yellowish tint to it. Here’s a tip; if you use that on white paint, it will cause the white to go slightly yellow. If that’s alright with you, go for it, but if not go for a clear coating.

Major tips for patterned stenciling; Measure measure measure and a square (the tool, not the shape) will be your BFF.

The End Product:

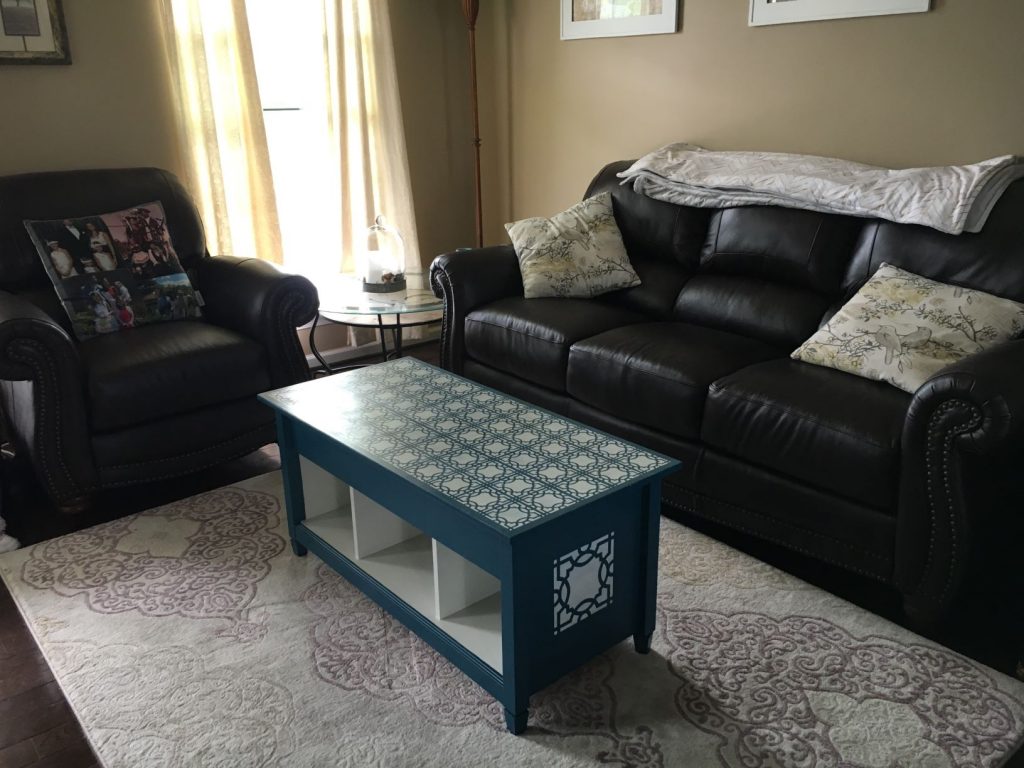
And that’s a wrap on this Flip Coffee Table Stencil Refinish Project. Only a few supplies and a limited number of steps to a completely new look!

Stencil Coffee Table Refinish Final Product
Stencil Coffee Table Refinish in living room

Dresser Makeover into a Surprising Shutter Buffet

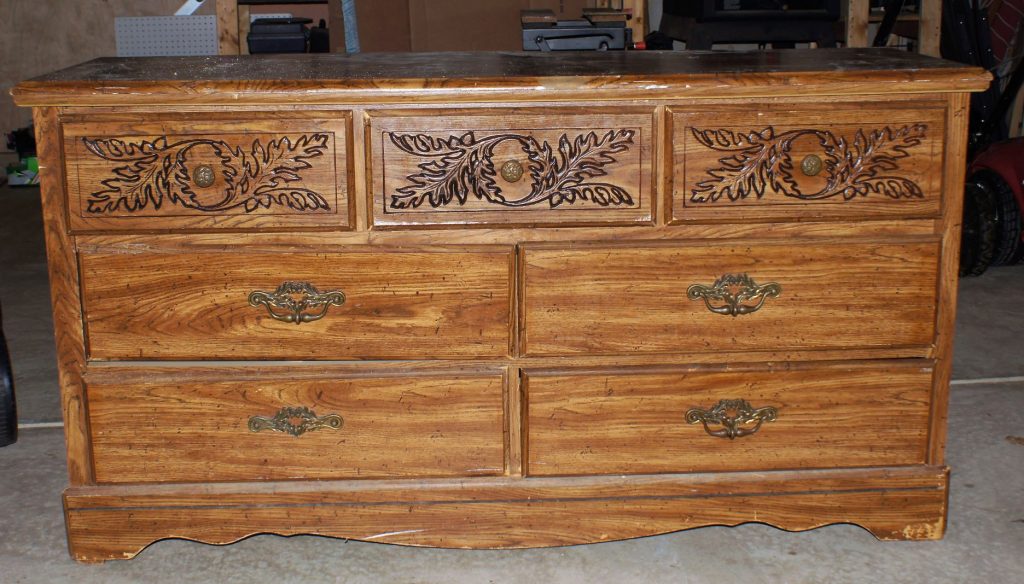
So one day I was surfing the Facebook marketplace as I often do and saw a free dresser posted nearby. I already had an antique kitchen hutch, old windows, a bunch of shutters from my mother-in-law, a tall dresser, and a huge log taking up property in my garage. The picture wasn’t great but it looked worth a dresser refinish project since it was free. My husband agreed to pick it up for me while I was at work. The next text I got was that he had indeed gotten it, but the dresser was in terrible shape.

free dresser ready for dresser refinish

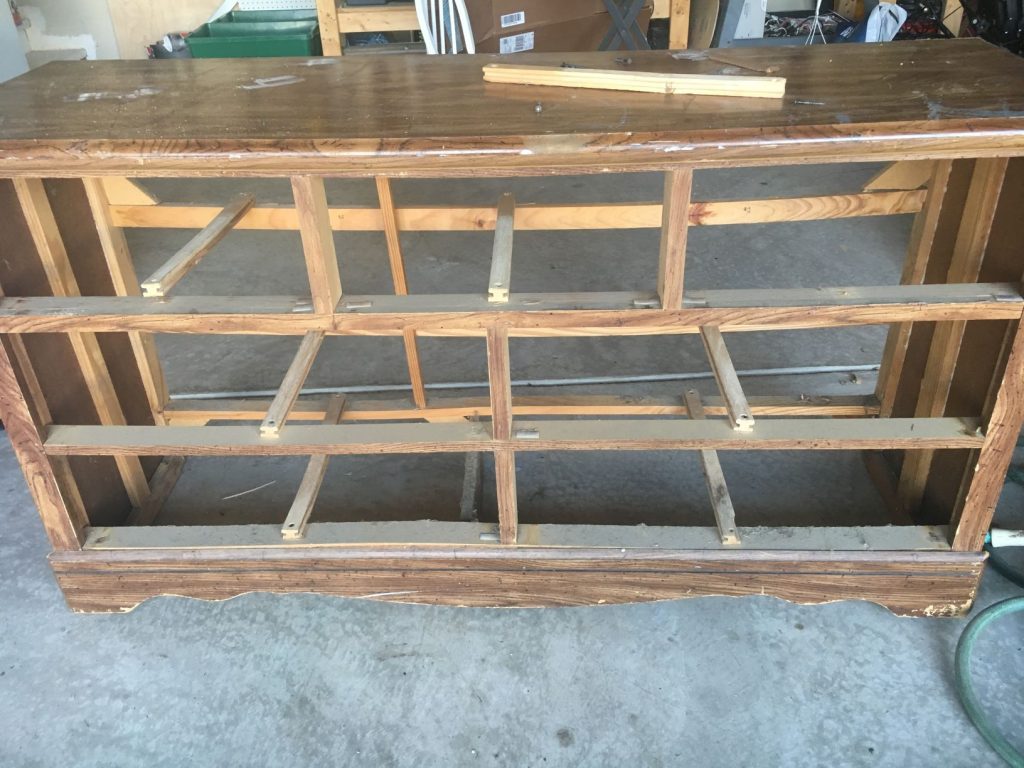
I figured he was being a bit overdramatic, but when I got home to look, saw he wasn’t kidding. The previous owner’s cats had taken up residence inside the drawer, shredding many of them and leaving behind a lovely aroma. It was gross and I didn’t feel like having to get the scent out and replace the drawer bottoms. He asked if I was going to toss it, but I decided to gut it instead.

Start of this Dresser Refinish

Time to Gut It

dresser refinish after gutting

I pulled out the drawers and tossed all but one, which now holds roller skates in my garage. I pulled off the disgusting back panel, the drawer bars and was left with a fresh canvas. The stack of small shutters inspired me and lead the whole dresser refinish after I decided to nix the drawers.

Dresser refinish gutted
Dresser refinish in progress
My messy garage only seems to stay clean for short periods of time.

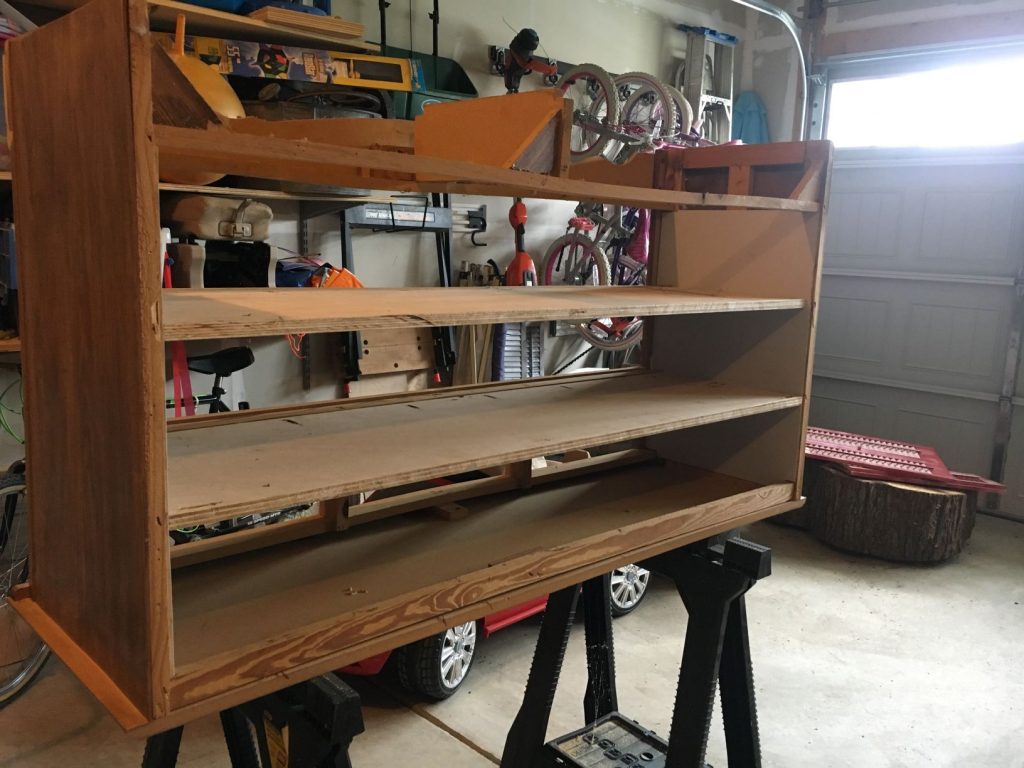
After gutting it, it was time to cover the inside and add the shelves. I used 1/4″ plywood for the sides. (As seen below) I used a circular saw and a jigsaw to cut it to size and make the notches for the front crossbars.

Next up: Shelves

Dresser refinish with shelves

For the shelves, I used some 3/4″ plywood that I already had leftover from another project. After measuring it to size, I used a circular saw with a guide to cut it more easily. As I said in another post, I lack a lot of the tools to make tasks easier. I would love to get a new table saw at some point, because I find cutting a completely straight line with a circular saw quite difficult.

I used a Kreg jig I ‘borrowed’ from my parents years ago to create the screw holes to be able to attach the shelf to the supports.

This is what a kreg jig looks like for those who don’t know. Thought I’d save you a google search. 😉

Dresser refinished with all shelves
Yep, in the background are the shutters and log I referenced. I had been desperately trying to find someone who would be able to cut it into two pieces and coming up empty.
After getting all three shelves screwed into place, it was time to paint the shelves and outside. I used a light gray chalk paint I had leftover from a dresser refinish for the inside. I liked the slight variation in the gray and white. (Anyone recognize that carpenter benchtop?! Referenced here in my platter post . I get tons of use out of it.)
To begin with, the shutters were too long. I used an arm saw to cut off length on the end. I ended up having to wood glue and nail the middle bottom wood pieces back into place. Time to use some white Rustoleum to spray paint those bright red shutters. It took 3ish coats of spray paint to get an even finish.

Time to Include Pallet Wood

For the Shutter anchors/separators, I used pallet wood cut to size. I had four cut and ready to attach another day. When I came back out the next day to complete it, I’d found that the fourth board on the right end had been taken. None of my girls confessed to it, so I had to assume it was a neighbor boy who tended to find his way into my garage…or backyard. I was pretty annoyed because of the extra work to rip a new board.


What I don’t seem to have taken a picture of was the routering I had to do on the top edge of that bottom front panel. The dresser had a rounded edge that needed to be flat for the shutters to rest on for a finished look. If I hadn’t cut it off, it would have looked quite odd. One of my first routering projects was an Wood Platter. I’ve come a long ways since then.


After I attached the pallet wood strips with wood glue and a nail gun, I was ready to paint.

Bring on the Paint

Typically, I use Fusion Paint, but decided to give this milk paint a try. I used my Michael’s coupons to get a good deal (I can’t not) on a surface primer and a white milk paint for the outside. I wasn’t impressed with the way it coated, so I haven’t used it again.

Hinges from good ole Lowes came only in gold and silver. I decided to use some spray paint I had on hand for a more bronzey brown color.

Not pictured was the drilling of holes in the shutters to place the spray-painted dresser knobs. I had old knobs from a previous dresser refinish that were perfect for this look. You can see them in the photos below.

After hours and hours of work, there came a day that I was ready FINALLY ready to finish by screwing the hinges into the last two shutters.
All there was left to do was bring it in and set it up! I was really surprised by how much my girls liked it and pleased with how impressed my husband was with the end result.
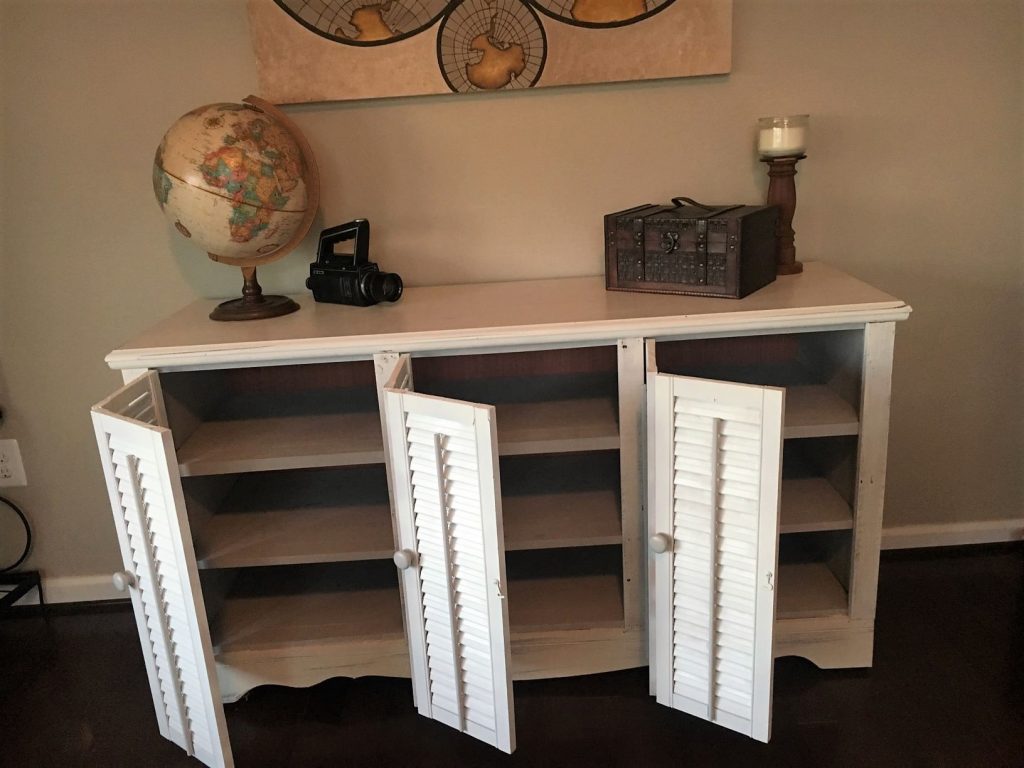
Dresser refinished into shutter buffet with doors open
Refinished Dresser
I made a shutter shelf to match but we kept the map up there for a more polished look.

Dresser Refinish Before and After

Isn’t it crazy how much you can transform an object just by generating an idea in your mind and putting your body into action?! The added bonus of woodworking and crafting is that it’s helping your mind escape and practice focus. It’s flexing those mental muscles you may not get to use at work or when you’re running around with your kids. If you are anything like me, you also feel more at peace when you are able to check out in this way. Here’s to finding inspiration and time to ‘check out’ for some you time. You’ll be happier when you do.

*This page contains affiliate links. This means if you use one of my links to make a purchase, I will receive a small commission at no additional cost to you. Thank you for supporting Cathartic Crafting!

Antique Trunk Refinished into Side Table


I referenced my grandparents in my paddle platter post and plan to include them a bit here as well. Within their property, are several treasure trove sheds I thoroughly enjoy rooting through when I visit. During this particular visit, I found an antique trunk my grandmother said was hers from her younger years. I was ecstatic when she granted me the honor of giving it new life. I had actually been on the lookout for a trunk to use as the coffee table in our living room, so it felt quite serendipitous to come across it.

This old barn holds many memories and treasures. If you find there are barn sales near you, I bet it’s worth a look!
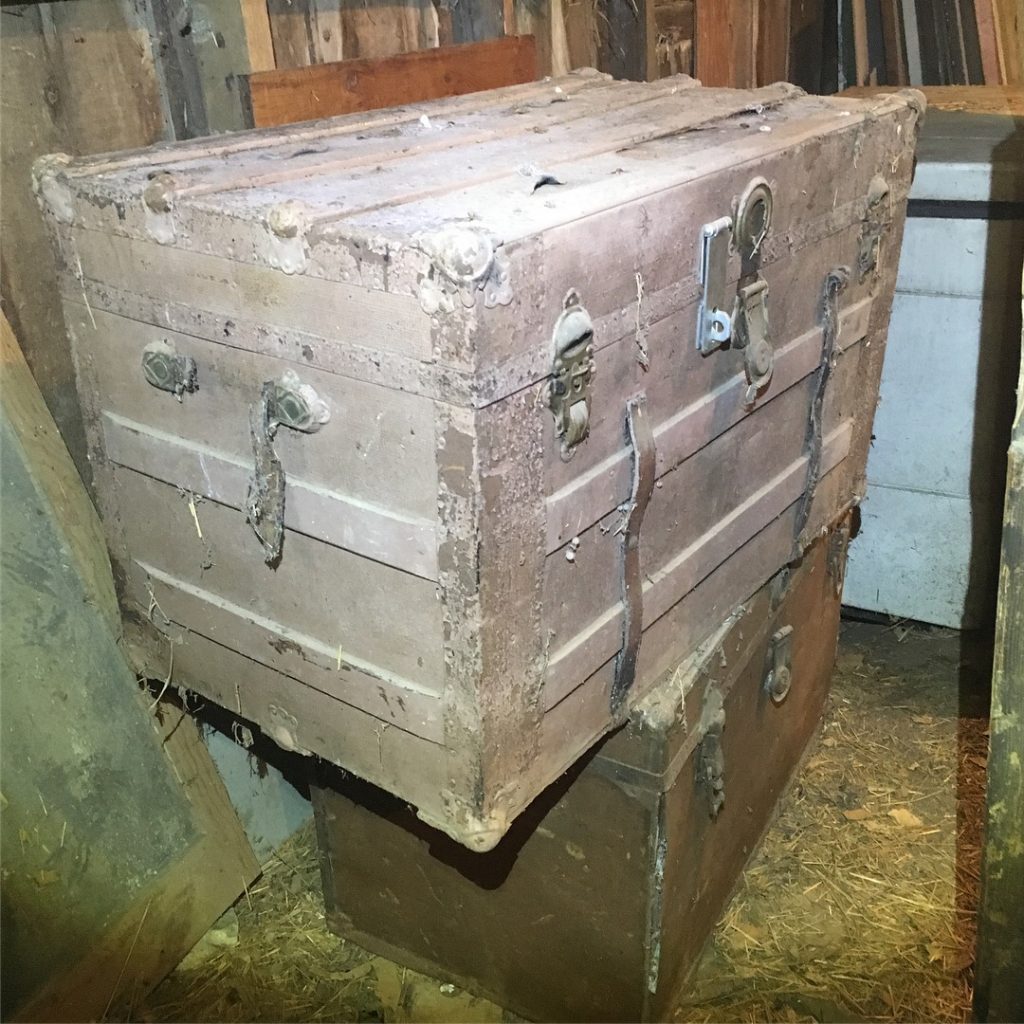
There it was, just sitting there amongst some other trunks.

The Before of the Antique Trunk

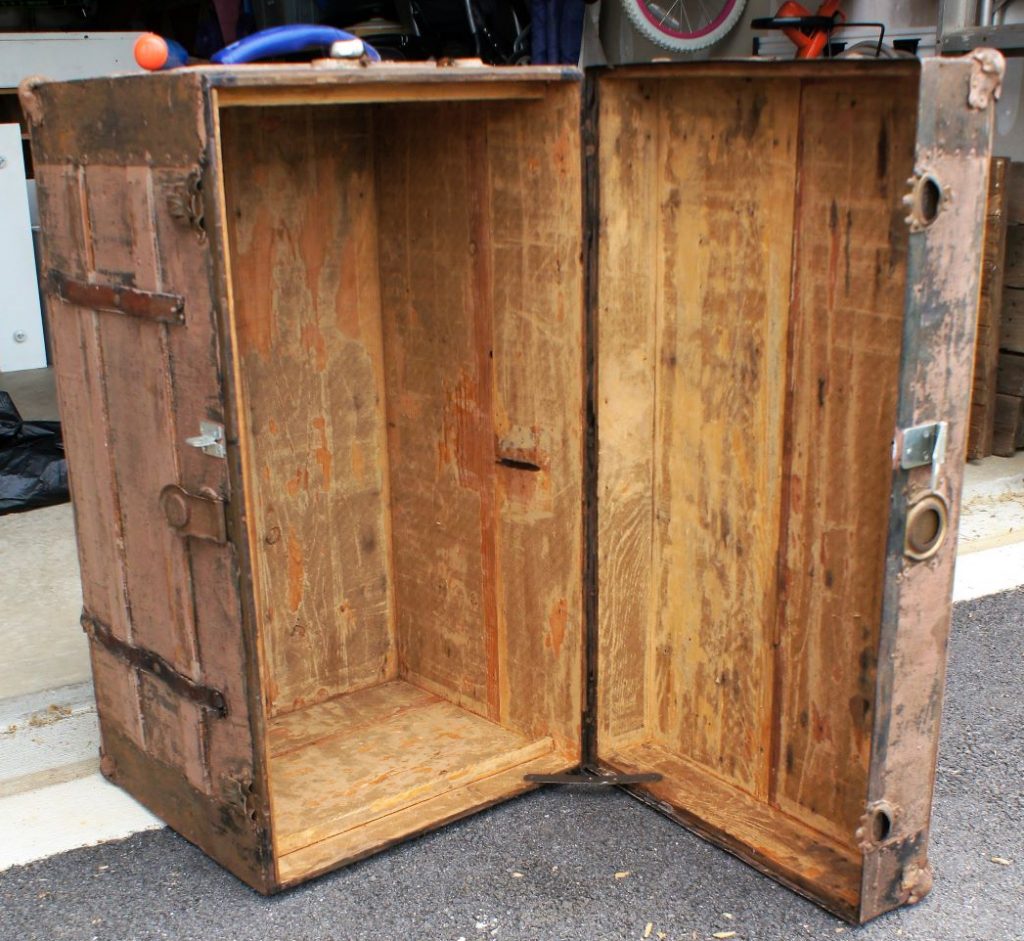
My grandmother had painted the trunk at some point, but much of the had worn away over the many years. It was in fair enough shape apart from the broken leather straps and some peeling of the metal.

The inside was covered in old paper and desperately needed to be removed.

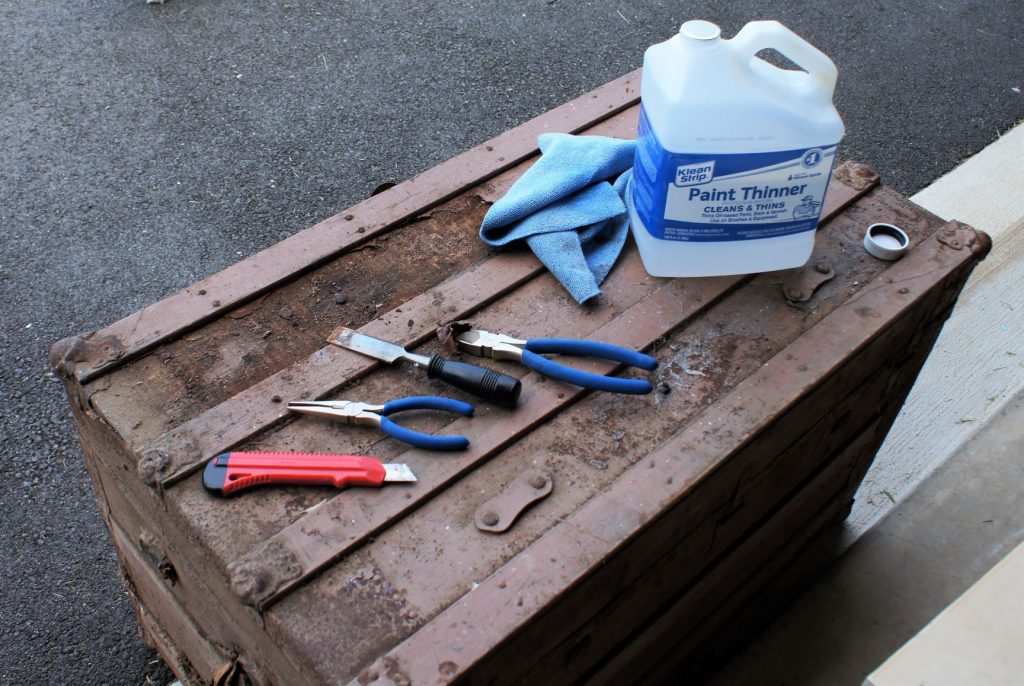
Tools to Refinish the Antique Trunk

I went at the project with just a few tools to start cutting away the jagged metal coating on the top and scraping the paint away. These included:

  • Needle nose pliers
  • Metal cutters
  • Razor
  • Scraping tools
  • Paint Thinner to clean it up
Simple tools for the antique trunk refinish

The Outside

With tools in hand, it was then time for an intense arm workout.

To start: chipping paint and rusty metal. The scraper and elbow grease got the paint and rust off while the paint thinner was pretty effective at cleaning it up. If you’re not looking to scrap your life away, there are definitely products out there that will make this process of paint removal easier. I typically tend to stick with the least inexpensive route.

I ended up cutting away the entire metal panel to expose the wood underneath as seen in the right photo. I scored the edges with the razor to make it easier to pull up with the pliers and metal cutters. If I were to have gone 100% at it, I would have had to get some new aluminum to replace the metal I had cut away. Given that the metal was textured, it didn’t feel worth the effort to go the extra mile.

Scraping the antique trunk

With every flip of the trunk, there was more and more scraping to do. It felt like it would never end. If I were to do this again, I would choose to go at it with a wire wheel rotating brush to save the soreness in my arms.  

Antique trunk scraped clean
Having scraped off all the chippy paint, I was ready to start painting.

Additional materials

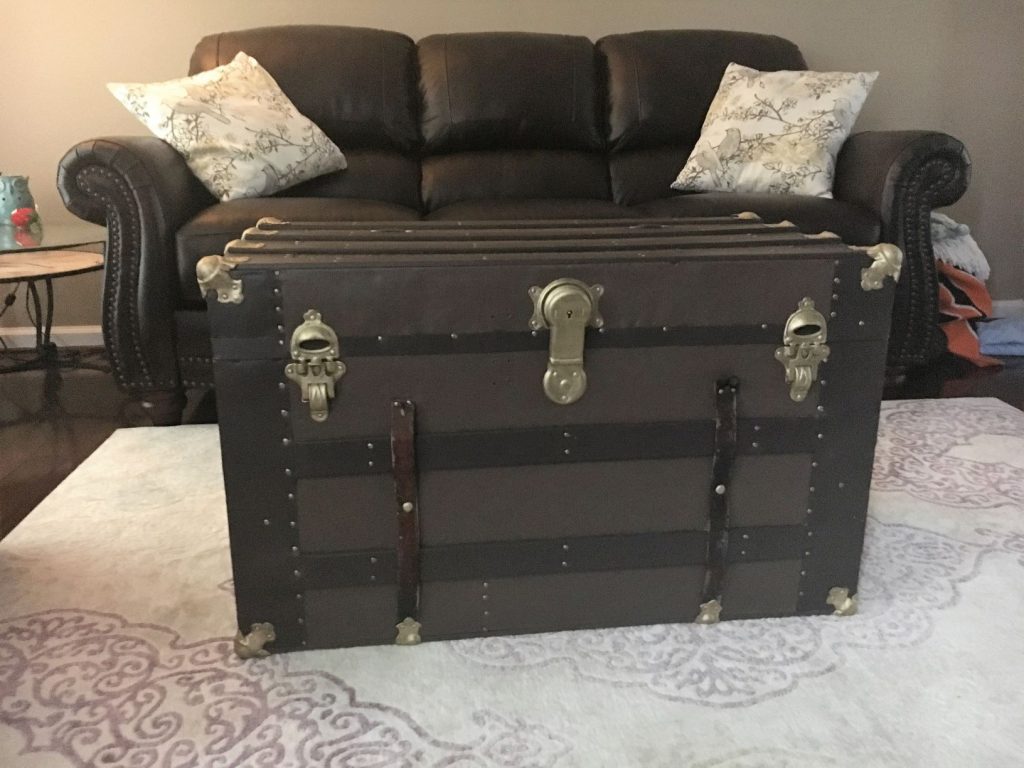
I used two shades of Valspar paint from Lowes to paint the trunk. The lighter brown went on the majority of the metal covering.

Antique trunk painting

I used blue painters tape to cover the freshly painted light brown to be able to paint the wood strips and corners with the dark brown. This color pallet matched with the leather couches in our living room.

Inside the Antique Trunk

The next step was to clean out the inside paper. I used the technique described by Antique Chests and Trunks instructing to spray the insides with 1 part vinegar and 3 parts water solution and soaking for 15 minutes. I ended up spraying and soaking it twice with the vinegar/water solution to get the majority of the paper and glue off. It definitely helped with the musty odor. Then I had to start with the scraping again. “When is this going to end?!” was what kept running through my head. Being sick of it doesn’t begin to describe how I felt by the end. I dreaded the continuation of the project.

Antique trunk with cleaned out insides
Antique trunk storage and inside material

Joann Fabrics happened have the perfect material on clearance, which always feels like a huge win. I love finding a deal when I need something (another generational aspect). After I cut the material to size, I used a wide paintbrush to brush Mod podge on the inside of the trunk to get the material to adhere to the wood. 

Another Completed Refinished

Antique trunk finished product

I finished the outside by painting all the gold ascents to include all the many grommets. Tedious doesn’t begin to describe doing that, but I felt it needed the distinction. You can determine what you prefer if doing your own.

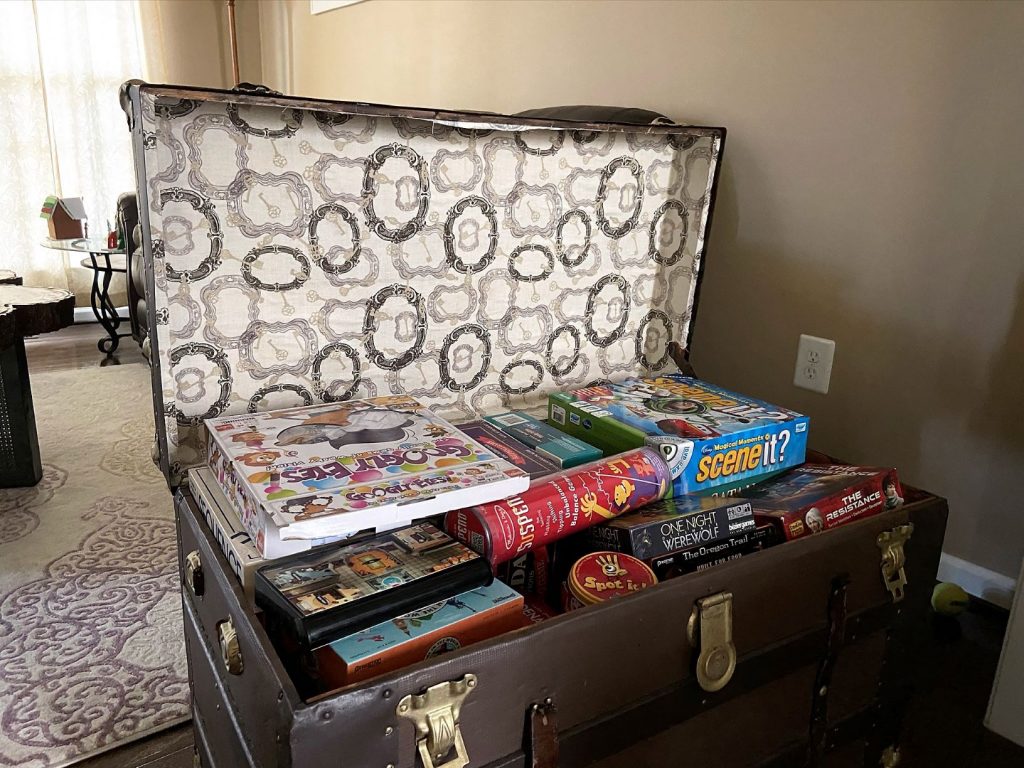
With all the scraping, painting and gluing complete, the antique trunk refinish was finished. It now stores a ton of family games that used to be in the unfinished side of our basement.

Antique trunk as coffee table
I took the photos on the wall after we moved into our new house. They were the only things in the room for more than a year as we tried to decide what direction to take the room.
Antique trunk used as side table

I had initially decided it would be a coffee table but ended up preferring it as the side table. If I were to go the extra mile with it, I would buy new leather to replace the missing straps. I didn’t (and still don’t) feel pressed to do that. As you see it here is as it remains.

Antique Trunk Before and After

My husband liked the final look, which is always the true test. I hoped you enjoyed the tutorial! If you’re looking for other refinishing ideas, check out my refinishing page.

More Fun with Upcycled Frames

As I was rooting through some of the remaining boxes of stuff from our old house, I came across a few items that inspired me to do a little upcycling/crafting. I found childhood frames in need of a facelift to get with the times and my current decor. It was a very simple project aside from deciding what I was going to do and it’s definitely a project anyone could handle. I hope my makeovers inspire you to have a little fun with some of your own frames and you can decide on a direction to take! From drab to fab frames in no time flat try your hand at some upcycled frames.

My Upcycled Frames supplies included:

  • Craft Paint and/or Spray paint
  • Paintbrushes (a wider one for the frame and a thin one for details)
  • Sandpaper (depending on the look you are going for)
  • Scrapbook paper
  • Glue or double-sided tape
  • Razor or scissors or paper cutter
  • That’s it!
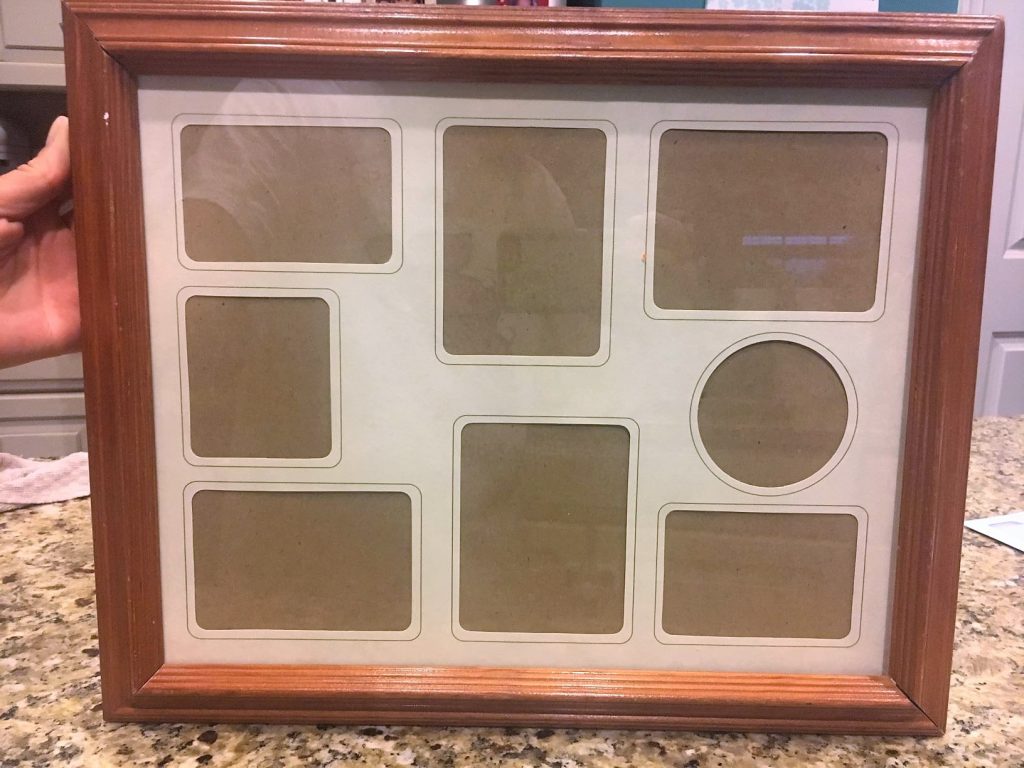
Upcycled frame 1 before
The Before: classic 80’s/90’s gold opening border mat and a stained oak frame.

To keep the glass clean of paint, you should definitely start off by taking the glass out and painting everything separately. I painted the frame with inexpensive craft paint from Michaels. There’s a Michaels 1.3 miles away from me, so I tend to get everything I need there.

upcycled frames painted

I painted a full coat, so I couldn’t see any of the wood underneath. Then since I was going for a shabby chic look, I took a piece of sandpaper and lightly rubbed randomly around some edges.

upcycled frames painted mat

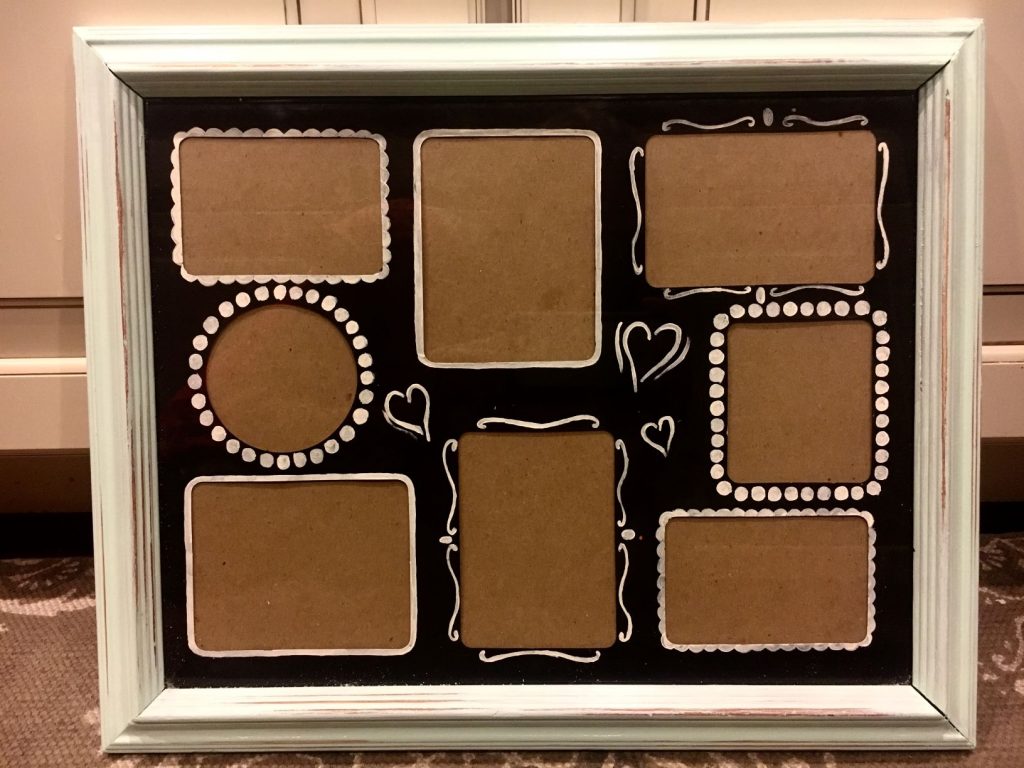
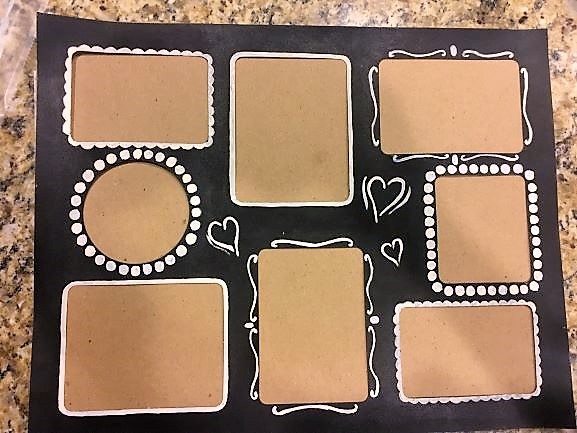
I took the mat out to paint it with cheap chalkboard paint from Michaels. It didn’t seem necessary to better paint since it wasn’t going to be used for writing. I used wax paper to paint on to save my kitchen counters.

Accents make the mat

black and white upcycled frames mat

After the paint dried, I used a thin brush to paint some white accents around the photo openings. Feel free to let your creativity come out here! When everything was dry, I put it all back together so it was ready for some pictures of loved ones. It doesn’t get much easier than that.

A close up of some of the sanded parts.

A refinished frame in half an hour (or so)

Frame 2

Before

For my second frame, I took the same concept with the frame. I painted it with a coat of paint and sanded it in a few areas. Instead of painting the mat, I tore vintage 12 x 12 scrapbook paper into pieces and glued the pieces onto the mat. I didn’t worry about cutting the paper around the ovals while gluing. After the glue was dry, I flipped it over so the back was face up. I used a razor to cut the paper overhang around the oval and voila, another finished frame refresh.

After (aka Drab to Fab Frame )

The last frame I redid was a metal gold frame. I took the glass out of each frame and sprayed a few layers of rose spray paint. For those who haven’t had much experience with a spray can, it’s best to do multiple thin layers rather than soaking it with a thick layer that is likely to drip.

Frame 3

upcycled frames spray paint

I had printed 4×6 photos which ended up being too small for the openings. Probably a good idea to measure before you print, but as it turns out, I liked the end look better than if the picture filled the frame. I decided to make due by taping the photos to white cardstock paper and adding a border from scrapbook paper.

I used my paper cutter to ensure I cut straight lines. There’s a range of paper cutters you can get. Mine, in particular, was pretty inexpensive and is two-sided for different types of blades. If you should not happen to have a paper cutter, a ruler to draw a straight line and scissors will do just fine.

upcycled frames mat
I used the sliding blade to cut the scrapbook paper for the border.

I used double-sided tape to adhere the photo and paper to the white back paper.

upcycled frames supplies
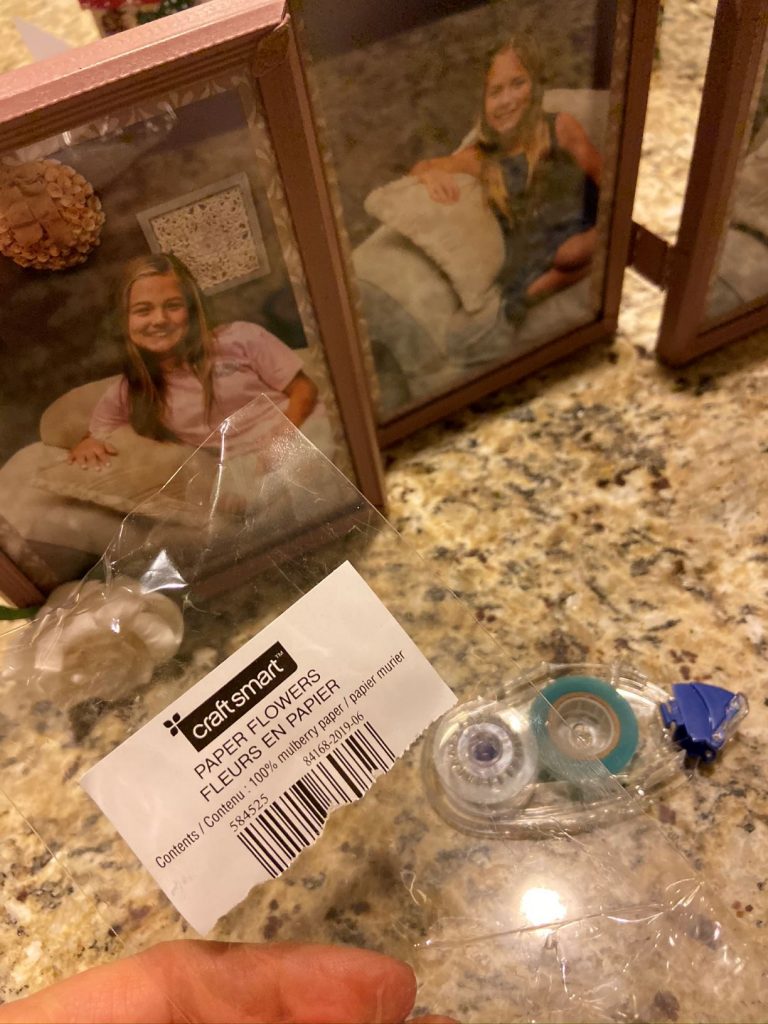
The double-sided tape dispenser is shown here. I, unfortunately, found it difficult to use.

I happened upon some paper flowers at, you guessed it, Michaels, that felt like the perfect touch to add to this frameset.

Drab to fab Upcycled frames

3 slot UPcycled frames
Final Product with my three girls to showcase it! I did a quick photoshoot in my bedroom with the girls to get this together.

That’s a wrap on these quick and easy revamps to take them from drab to fab frames. If you are anything like me, you likely already have all the materials. While you’re watching your favorite show tonight, go ahead and let your creativity out.

And if you’re looking for more ideas on how to use those frames, check out Framed Earring Holder

RSS
Follow by Email
Pinterest
Pinterest
fb-share-icon
Instagram

Are you interested in getting alerts and information on all things coming out of Cathartic Crafting?! Then go ahead and submit your info below:

Verified by MonsterInsights