If you aren’t one for cutesy Halloween decor, these 25 scary ideas are for you. These DIY Halloween decorations are hauntingly outstanding! I hope they scare the pants off you and your visitors.
I hope some of those DIY Halloween Decoration ideas struck your scary bones. What’s the point of the holidays if you can’t use them as an excuse to craft!
Sometimes, it feels difficult to come up with unique holiday decor. While I was trying to come up with an idea for some such unique Halloween decor, I thought about the old throwback movie “Little Shop of Horrors”. I was excited about the idea of coming up with my own way to make a man eating plant. When doing a search for popularity on the internet, there weren’t too many ideas on how to make one, so the holiday was a solid one. I was excited to try to make my own from there.
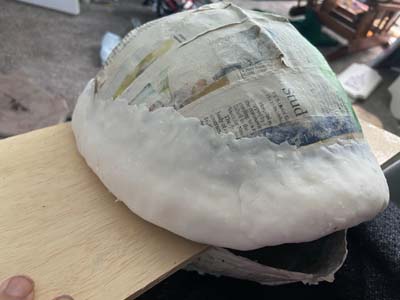
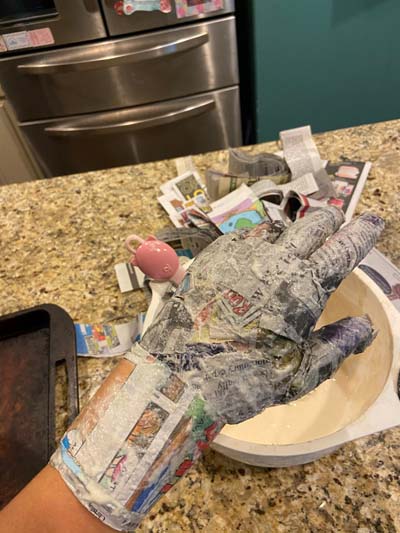
My first step was to create the plant head using handy dandy paper mache. You are free to use whatever paper mache recipe floats your boat for this. I tend to go the easiest and cheapest route with a flour and water mixture. It admittedly isn’t quite as strong as a glue-based mix, but it certainly does the job. I used this same technique for my Witch Cauldron. Ultimate Paper Mache‘s site is a great source for recipes. There are five recipes here from which you can choose. After making the paste, cut or tear the newspaper into 1-inch strips. I placed the strips on the balloon in about 3 layers to get the egg shape.
Clay Covering
Given that it would have taken forever to give the plant head a thick coating with the paper mache, I opted to try to use clay I had made for some other projects, including my witch cauldron Halloween decor. I went through some rough patches with this project, that is for certain. The home made clay I used cracked after drying. I tried to pull some of it off but it was going to take the paper with it some areas.
I ended up covering the clay with more paper mache to smooth it out. It ended up working out in the looks department but was quite heavy after it was all said and done. I would recommended going another route for the thickening layer; something like foam or quilting fabric.
Inside the Mouth
Time for spray insulation! I filled the cavity with the insulation to what I thought it should be with some growth. Be warned, it really grows!
After a little too much expansion, I had to saw it down to a manageable working place. It was pretty easy to cut through, so I was pleased in that regard. I used a utility knife to cut down more in the middle to make room for the tongue. Something to be aware of is the insulation loses it’s shinier smoother texture when you cut into it.
The veins on one side were added during the paper mache phase. The other side ended up being better as the top, so I opted to use hot glue to create some veins there. I used my airbrush to give it a few coats of different shades of green and some purple for the outside. The inside of the mouth needed a few coats of red to give it a nice deep color. The cut insulation kept the spray paint well.
Time for the Detail!
I used cereal box cardboard as the base/structure and the same clay to craft my tongue. The cracking this clay did after drying ended up being a perfect pairing for a gnarly tongue. I set it to dry on top of two paint bottles to give it dimension, aka an in motion look.
After some red and purple paint, this tongue was ready to taste some prey! White clay teeth were the last to throw together. Hot clue did the trick to get the clay teeth to stick to the insulation gums.
I used a plastic pipe covered in paper mache as the stem.
Man Eating Plant Body
The man eating plant wouldn’t have been complete without the leaves and tentacles to attract it’s prey. I was running out of time at this point because of the headache the clay had given me. There was no choice but to make quick work of the tentacles. I sprayed newspaper with spray glue and rolled it up. Then, I coated it in paper mache paste to get it to harden. From there, it was just a matter of waiting for them to dry in position and painting them.
The leaves were put together with flower wire, tissue paper, spray glue and some spray paint.
Watch Out, this Plant has Quite the Bite
I loved the look of the inside of the mouth and the head. If there had been more time before Halloween, I would have take the leaves and tentacles up a notch, but they were enough for the Halloween night decor. As first tries go, there were some successes and some fails. Overall, it was a learning experience. Maybe I’ll try another technique this Halloween. Or maybe I’ll be too pregnant and tired to care about giving it another go. We shall see! Happy Holiday Crafting to you!
*This page contains affiliate links. This means if you use one of my links to make a purchase, I will receive a small commission at no additional cost to you. Thank you for supporting Cathartic Crafting!
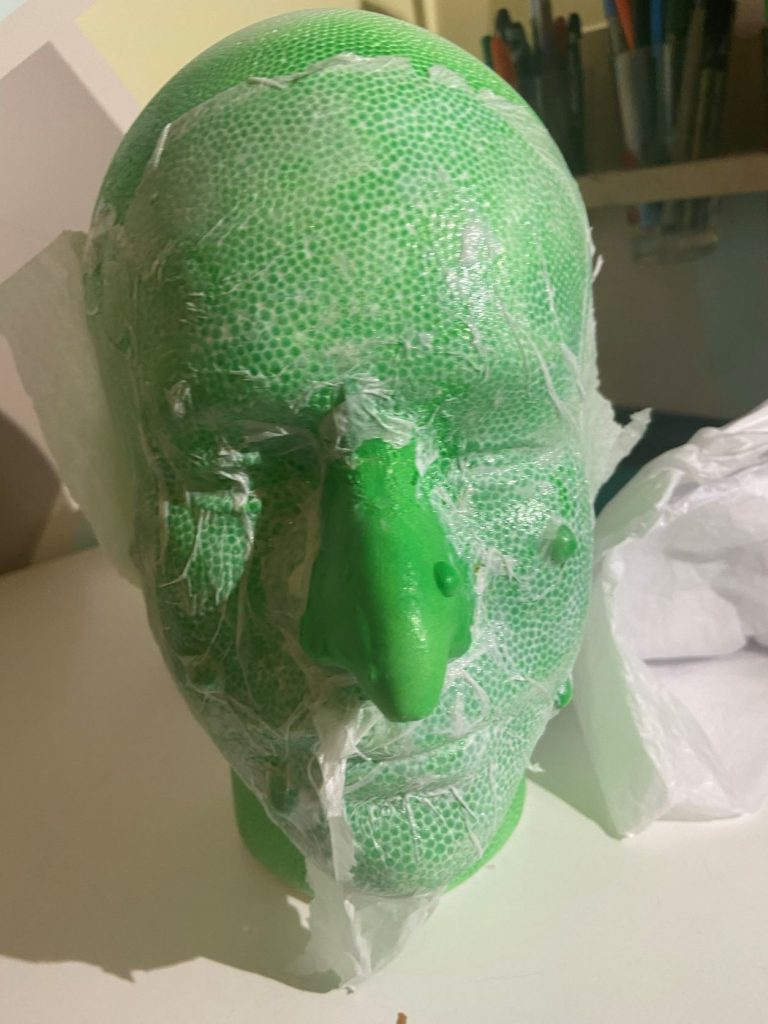
I don’t know what it is, but I love the chance to get my creepy on with Halloween decor. I’m definitely not a ‘blow up’ decor user and prefer to take more of an authentic route. I’d love to have my own mini haunted house for trick or treaters at some point. If this resonants with you, then you’re at the right place. This witch head project was spurred by a broken skeleton figure. I’d already bought a styrofoam head, which I’d planned to use for a witch cauldron I was making. After some thought, I shifted gears and chose to use the head in another way.
The styrofoam head came from Michaels, which had just one option. I used this clay recipe from The Kitchen Table Classroom for the nose and warts.
I didn’t use glue or anything to adhere the clay to the face. Some of the warts did fall off, so I glued them back on with craft glue.
I used my airbrush to paint the head and realized the styrofoam bumps were a problem. I didn’t like the look of them at all so had to come up with a way to try to hide them.
Quick Fix
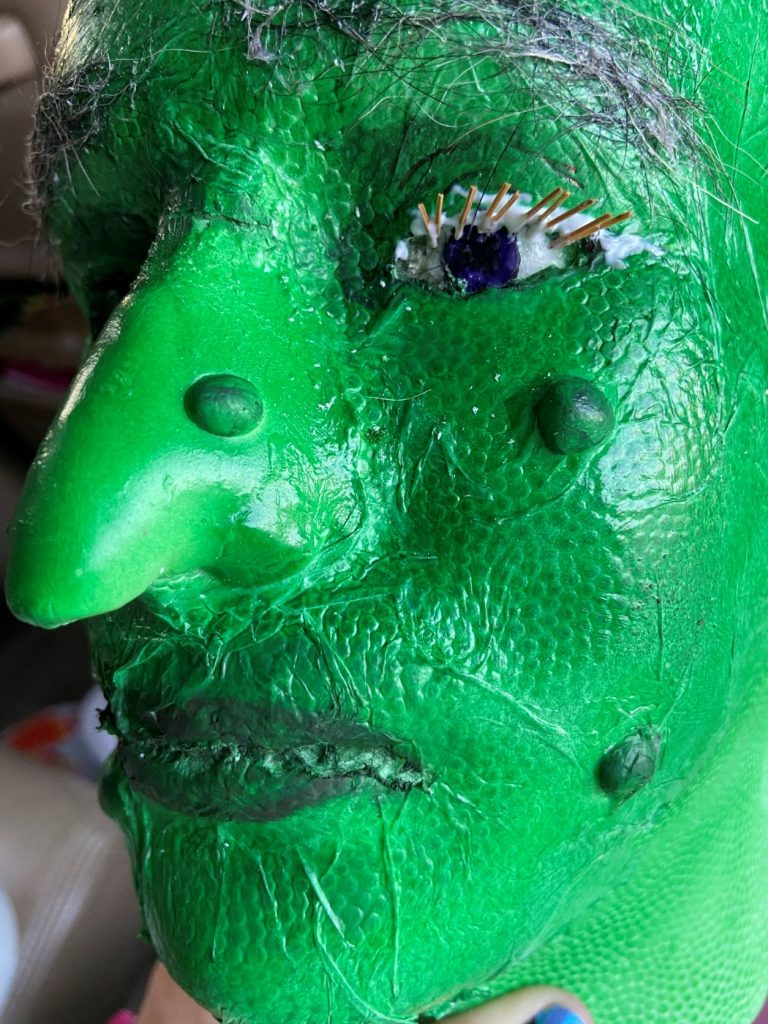
After some contemplation, I opted to cover the face with Mod Podge and some tissue paper. My thought was it would help to smooth out the bumpy texture.
After giving it another coat of paint with the air brush, it looked a bit better. I was keen on the wrinkles it gave the face.
The Face Details
I painted the eyes with acrylic paint and layered over with glue to give it a glassy rounded look. While at a softball game, I found some stick like things I decided to glue on as eyelashes. My dog’s hair served as the eyebrows. It admittedly looked rough, so I used some purple fuzzy material to cover it up.
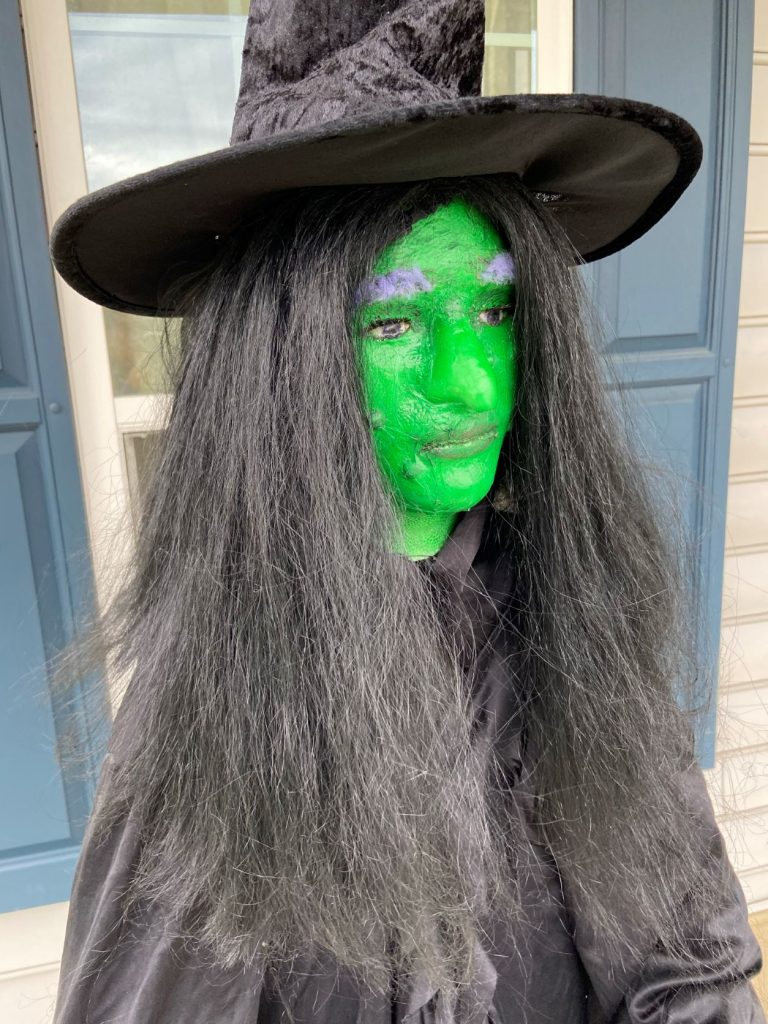
After the fun of crafting was complete, I drilled a hole for my dowel and glued the dowel in it. The dowel fit right inside the hole of my broken skeleton body.
The Final Look
With the simple addition of a black wig and a witch hat, this simple DIY witch decor was complete.
*This page contains affiliate links. This means if you use one of my links to make a purchase, I will receive a small commission at no additional cost to you. Thank you for supporting Cathartic Crafting!
Bubble bubble toiling trouble. Holidays always get me excited for decorating. I think Halloween provides the best opportunity to try something new. This past Halloween, my mind was in over drive thinking about decorations I wanted to make. I really loved the bubbling cauldron look, so was excited to put my own spin on it. Follow along with this witch cauldron tutorial to make your own!
To save on the amount of spray foam needed, I cut a piece of cardboard to fit the inside rim of the cauldron. I usually have a stock of cardboard (supported by the increase in online purchases, thanks to the pandemic). As can be seen in the photo, small gaps are okay. I had to bend the cardboard in the middle a bit to get it into the inner rim.
Paper Mache
My element of uniqueness was to hand a hand reaching out of the potion, which was scaling it back from the thought of using a styrofoam head sticking out as well. My first step was to create the hand using handy dandy paper mache. You are free to use whatever paper mache recipe floats your boat for this. I tend to go the easiest and cheapest route with a flour and water mixture. It admittedly isn’t quite as strong as a glue-based mix, but it certainly does the job. I used this same technique for my Candyland Lollipops for Christmas. Ultimate Paper Mache‘s site is a great source for recipes. There are five recipes here from which you can choose. After making the paste, cut or tear the newspaper into 1-inch strips.
If you have a willing volunteer, I’d definitely recommend using a hand that is not your own. I completed this on my left hand, so only had my right hand to do the work. Anyway, using the paper strips, dip them into the paper mache mixture and scrape off the excess. Wrap the paper mache strips around each finger and the rest of the hand. I recommend putting a solid layer all over.
It may be necessary to stuff it a bit to keep the shape while it dries.
Bubbling Potion
After using this “Great Stuff”, I definitely agree it’s great stuff. It could also be called “Super Easy” or “Crafting Gold”. My 10 and 7 year olds enjoyed giving it a try. I started with spraying the base and spilling it over the sides.
My little soccer player helped me out by holding the hand in place to look like it was reaching out of the cauldron. An argument could be made for the odd proportions, but I wasn’t worried about it. I guess I could have easily used one of my daughters’ hands. Live and learn. I sprayed the foam around the hand to get it to hold in place. With that, the bubbling was complete.
Weather Protection
I was worried about the paper mache standing up to the weather outside, so I decided to use clay I made for another craft. To be honest, I shouldn’t have used this diy clay recipe and should have shifted to store bought clay. It was definitely a bit mistake on my part. It was too wet and loose, so it ended up making the paper mache hand soggy and saggy. I had to prop it up and use more clay than desired to give the saggy hand more shape. So, if anything, learn from my mistake and opt for the better store bought clay or maybe just a better recipe than I used that doesn’t included ingredients like baby oil.
Using my airbrush, I painted the bubbling potion a lime green and gave it a second coat with darker green. I used my dremel to give the hand a more realistic look. Then, painted the hand and called it a day. To make this project even easier, you could quite honestly use a store bought Halloween hand. The path is yours to choose as far as how much DIY you want to do.
Can Mistakes Be a Threat to Your Mental Health?
“Most people don’t like to make mistakes, but some people are more sensitive to errors than others, and that can make them more prone to anxiety…”
I’m like anyone else and don’t care for making mistakes, especially when it effects my end results. I was kicking myself when I used the clay that I already had concerns. Sometimes, apathy and laziness get the best of me when I just want to knock things off my too long list of to dos. Apparently, there’s a region of the brain called the anterior cingulate cortex that is stimulated by the recognition of mistakes and when it’s stimulated, the increase in activity is called error-related negativity (ERN). I found this particular paragraph from When Mistakes Are a Threat to Mental Health pretty interesting,
“What makes some people prone to higher ERNs and therefore anxiety? The ERN is somewhat heritable; for instance, healthy individuals who have immediate family members with anxiety and obsessive compulsive disorder tend to have a larger ERN. But situational factors also affect ERN. In lab studies, Proudfit has shown that it’s possible to induce a higher ERN by “punishing” participants for errors, for example by playing a very loud and aggravating sound after the participant makes a mistake.”
I think it’s definitely something to keep in mind when considering how you respond to your own mistakes and the mistakes of others, particularly children. As the article goes on to describe, hostile responses to mistakes can increase the ERN tendency, which will lead to higher anxiety levels. Give yourself and others grace for those mistakes. If they can be overcome, then there’s always a lesson to use for the next time.
*This page contains affiliate links. This means if you use one of my links to make a purchase, I will receive a small commission at no additional cost to you. Thank you for supporting Cathartic Crafting!
My oldest daughter and I were super excited to do a Harry Potter themed birthday party for her 11th birthday. As I started on the plans, I knew I wanted a Monster Book of Monsters to be apart of it. From there, it was only a matter of finding the supplies and finding time.
“It is our choices, Harry, that show what we truly are, far more than our abilities.” Albus
Materials
Wooden Box
Fur
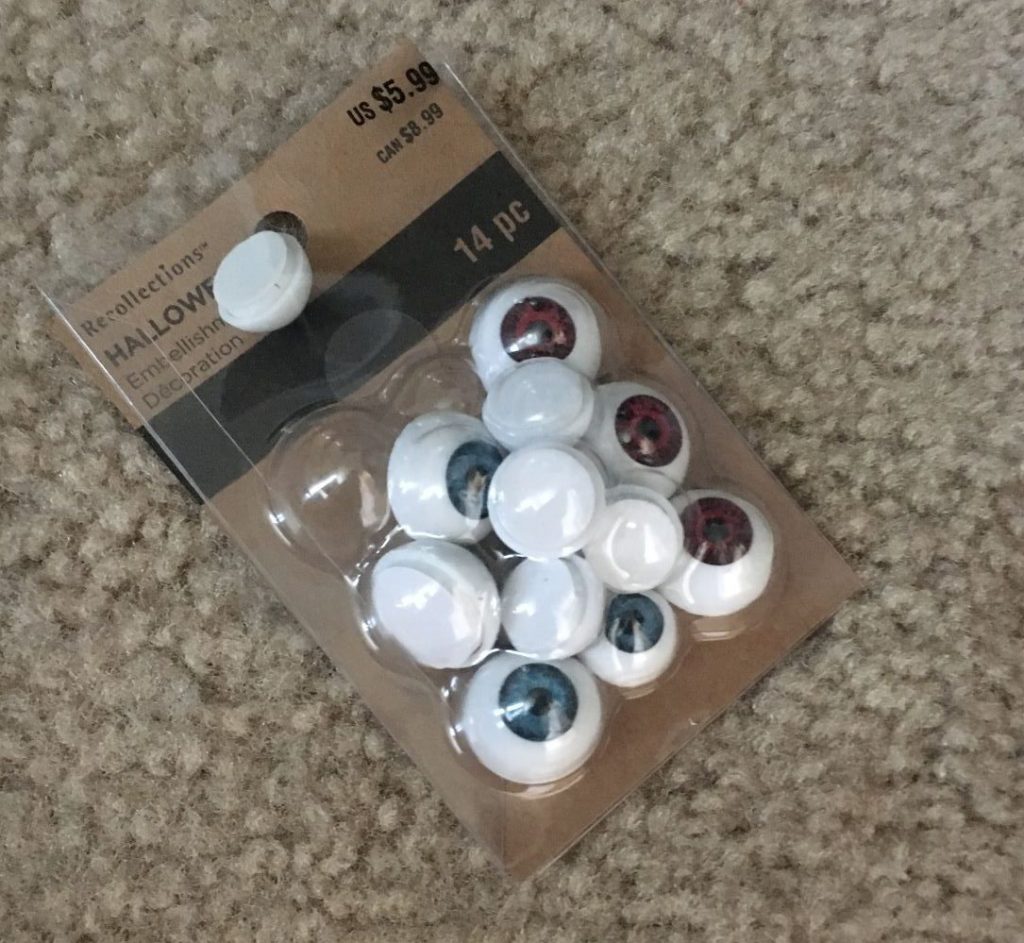
Eye Balls
Clay
Paint and Brushes
Craft Glue
Hot glue and glue gun
Scissors
Paper and Printer
Mod Podge
Ready, Set, Go
I found a perfect wooden flip lid box at Michaels. I’m not sure if they still have this one, so here’s a different wooden book box that is currently available there.
I used light brown, red, and white clay for the fangs, teeth, tongue, and gums. First, the teeth were constructed into points. After flattening the red into a strip, I positioned the teeth to lie on the red strip. I layered the back with another red strip before pushing the red down around the teeth to show the ‘root’. The only thing you need to be careful of is not touching the white after touching the red. The picture shows that I did a bit of that. The fangs were super easy. Roll them to be smaller on one end and then curve them and presto!
After baking the clay parts, it’s time to kick them up a notch with some paint to add dimension. I painted a bit of dark red and black onto the gums and tongue. Yellowish-brown served to give the teeth a gnarled look. Next, I painted the box with tan and dark brown to give it the look of pages as well as I could. Given that much of it is covered, I didn’t feel like I needed to give it much attention.
Monster Book Fur Cover
For the cover, I used two fur pieces I happened to find on clearance at Michaels. Crafting doesn’t get much easier than this step. Here it comes; glue the fur to the wood. Then….wait for it to dry. After that, I trimmed the length of the fur, because it was definitely too much. I also cut the perimeter into points and extra shagginess.
Those Eyes are Looking at You
Now onto the eyes. I also got the eyeballs at Michaels, but you’re not likely to find them in a store if it’s not around Halloween. To be honesty, I wasn’t sure what to do with creating the eye mount. I thought about using oven-bake clay but was afraid it would melt the eyes. At the end, I went with a mountain of hot glue instead. After I piled it up, I painted it brown. I didn’t have enough red eyes, so I also painted the irises red.
The book label was created in Microsoft Word and printed on computer paper. I trimmed the fur shorter in the spots where I was going to put the label before gluing the labels down. I put Mod Podge on the label to stiffen the paper.
From there, it was just a matter of gluing on the fangs, teeth and tongue. I used hot glue initially, which worked just fine. Over time, the fangs have gotten knocked off a few times, so I’ve recently used super glue to get them to hold. As my girls would say, this DIY Monster Book of Monsters is easy peezy lemon squeezy.
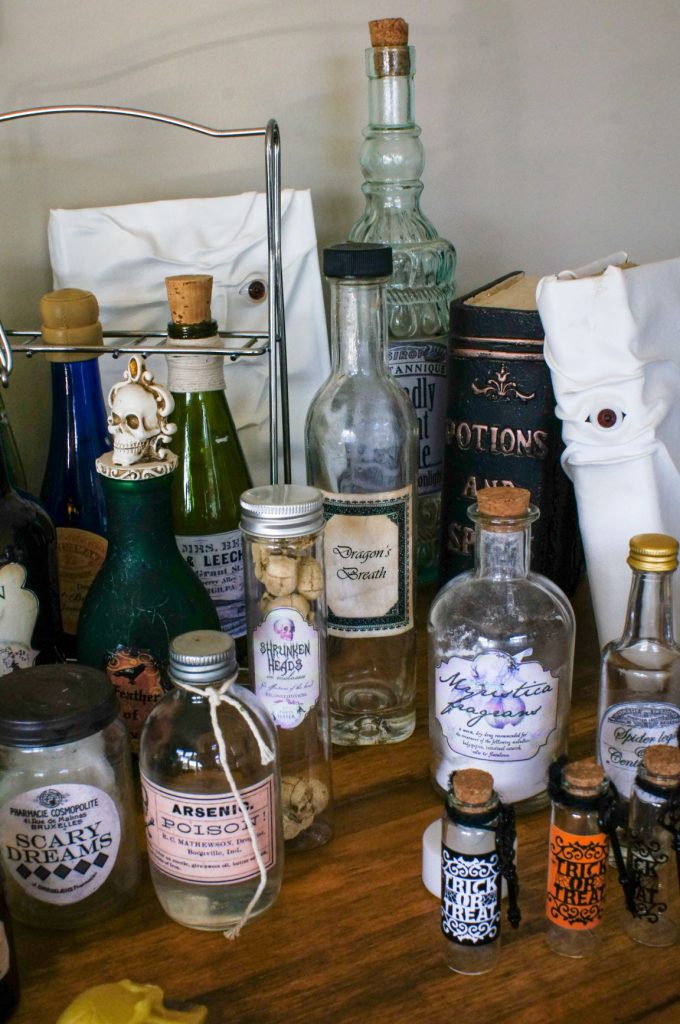
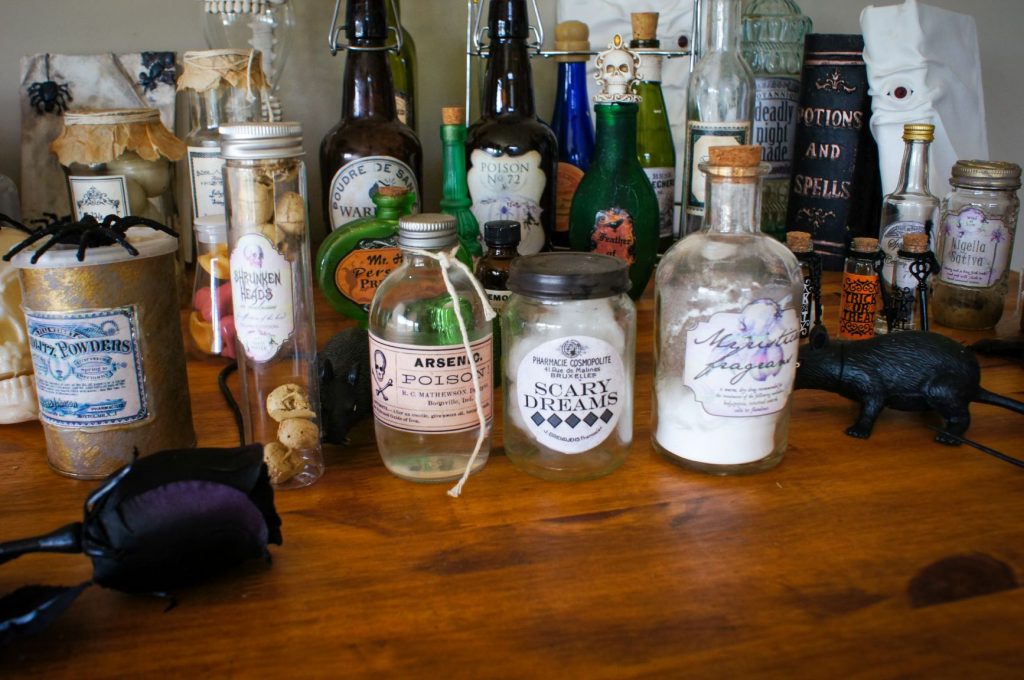
A few years ago, I couldn’t wait to start a collection of Halloween apothecary jars to add to my holiday decor. I started off with collecting regular food jars and random Goodwill finds to change into new and creepy decor. It doesn’t take much more than some simple materials to really get started.
Halloween Apothecary Jar Ideas
Materials:
Coffee Filters
Printer and Printer Paper
Clay
String
Paint
Mod Podge
Glue gun and Glue sticks
Food items: egg shells, Cantaloupe rind
Store bought creepy crawlers
Corks
Sandpaper
Saw
For this Ear of Troll I used the rind of some eaten cantaloupe. I gave it a week to dry out in the garage before closing it into the jar. I used a blank label in Word to type in the name. Mod podge was my go-to glue for all of these labels to get them to stick and to give it a coating for longevity. For this jar, in particular, used coffee filters served as the lid covering with string and craft glue decorating the jar curve.
Similar techniques were used for these Rattle Snake Eggs Halloween Apothecary jar. The eggs were from a friend with chickens laying eggs in a variety of shades. Using a needle, I poked holes in both ends with one end being slightly larger to allow for the egg innards to be expelled. It’s also a lot easier to break up the yolk using the needle poked repeatedly through the holes. Once all that was done successfully without breaking the egg, I blew into the smaller hole to force the contents out the larger hole. Then I was ready to eat some scrambled eggs! I also gave the eggs a day to dry out a little more before coating them in Mod Podge.
Jellyfish Stingers
The same techniques are applied here for the outside. For the jellyfish stingers, I used hot glue on a baking pan. When it was cool, I was able to peel it off and stick it in the jar.
Store bought creepy crawlers are center stage in this jars: Worms, mice and cockroaches anyone?
Clay Creations
Next up, for these three Halloween Apothecary jars, I used baking clay for the unicorn horn and bat wins and model magic for the fingers. I quite enjoy crafting clay creations. For the horn, I first rolled two equal ropes of clay. Then I twisted them together and rolled them on the counter to get a narrower pointed end. Presto! A lovely unicorn horn. I didn’t finish it off with glitter but it could definitely be a nice add.
Model magic is really easy to shape but doesn’t hold fine details like a real clay does. I used press on nails to give the real nail effect here. These lady fingers were complete with some painted on blood. You could really go grotesque with this if you want!
Pill Bottle Makeovers
These 5 bottles were all crafted from empty pill bottles. I used a saw to cut the tops off before sanding the smooth surface. The next step was to draw the label and image with hot glue. I used matte/satin paint in grays, browns, and black to paint all the bottles. Then, I glued on labels and string.
Two Minute Snake Skin
For this lovely Halloween Apothecary jar of Snake Skin, I painted the jar with a few different colors of cheap acrylic paint that matched with the coloring of the label. (The color of the label being the result of a malfunctioning printer. The Lord knows the amount of angst that printer caused me at the end of its life.) Generally for painting all the lids, I sanded them first to ensure the paint would adhere.
The actual innards of the jar were a combination of plastic wrap and hot glue. I cut a rectangle of the plastic wrap and laid it over the foil to protect the counters. From there, I glued a snake skin-esk pattern onto the plastic wrap. I noticed that as the glue got hotter, the plastic wrap shrunk more, which I was not so much a fan of seeing happen. If I were to do this again, I would do a portion, then unplug the glue gun for a 15 second cooling. Then repeat until finished.
I hope you gathered some of your favorite ideas for crafting some of your very own Halloween Apothecary Jars. If you’re looking more spooky Halloween decor, check out my Spooky Halloween Book Covers.
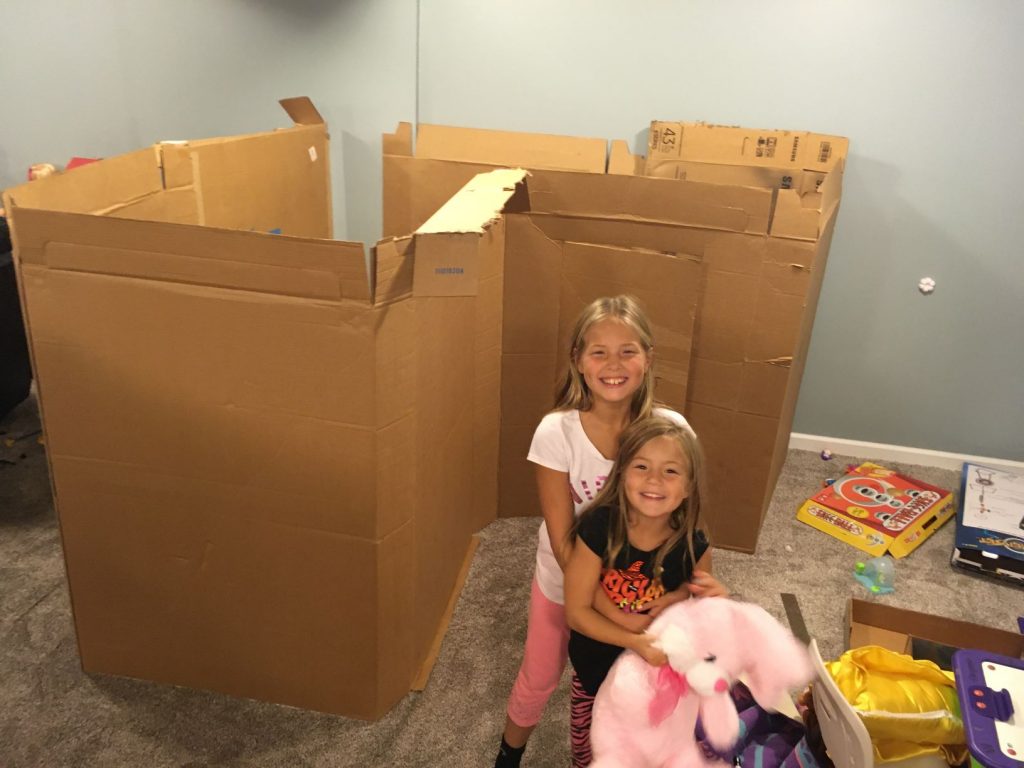
Those who know me, know my love of cardboard. It’s such a versatile and cheap product to craft with, which leads me to have stockpiles of it at times. My youngest daughter’s birthday is October 29th, so while brainstorming ideas for her birthday party, we thought about how we could make it a true Halloween birthday party. I’d previously done an indoor cardboard gingerbread house that my girls loved. It seemed perfectly logical to do a Haunted cardboard house for her spooky birthday party. She had grand ideas for how she would make it haunted and couldn’t wait to have her friends over.
Starting a Haunted Cardboard House
The request from my daughter for this haunted cardboard house was that it be bigger than the gingerbread house. We have quite a bit of free space in our basement, so I was okay with accomodating that request.
For these larger-scale houses, larger boxes make things a lot easier than piecing together smaller ones. The size and shape of the house can really depend on what you have to work. I didn’t have a plan going into making this and allowed the box shape and size dictate how it would work best.
My neighbor had large furniture boxes out for recycling, which I happily took off their hands to get moving on the wall frames. I typically use hot glue to glue the pieces together because it dries quickly and works well with the paper surface. Sometimes, it doesn’t hold together well enough if I’m not quick to get it together. For those times when it wasn’t holding together, I used some wood glue and weights while it dried.
In order to set the frame, I decided to utilize some small clamps to hold it while I moved things around to find the right shape and size. I was able to do a fair bit of gluing in the garage to remove the fear of getting hot glue on our basement carpet. Folks, hot glue can only really be cut out of carpet (from previous experience). While in this planning phase, I was also able to cut the door out with a razor and a square on the cement floor.
The birthday girl and her pup overseeing the work being done.
Time to Move to the Final Destination
With the plan in place, it was time to move all those cardboard pieces to the basement to get this Haunted Cardboard House structure together. With the pieces standing, it was a bit like a maze down there. The girls loved it.
I had to put a call out for more cardboard to the neighborhood and thankfully the call was answered. I was then able to construct the roof. That was the hardest part of the whole thing. The cardboard was heavy and shifted while I tried to glue it together by myself. I had to get my helpers on board to hold it while I glued it. For this part, the glue didn’t work as well. I ended up using a drill to make holes and piecing the heavy pieces together with screws, bolts, and washers. They made for a very sturdy structure.
Safety Warning!!
Hot glue is, shall we say, Freakin’ HOT! It was about during this part of the build that I got myself with the glue while trying to get the heavy roof together. As I quickly tried to “stop the burn” (as we say in American Red Cross) by rubbing the glue off, it took a layer of skin with it. I’ve burned myself quite a number of times while working with hot glue, but this was by far the worst. We go through quite a lot of types of bandaids in this house. I’ve got to hand it to these NexCare waterproof bandaids. They maintained through a lot of movement. Investing in heat protection gloves is probably a good prevention idea though.
The structure was thankfully set. My daughter said she had envisioned it being bigger than this, but I was unfortunately out of any larger pieces of cardboard. It would have to do.
Faux Scalloped Siding, Ghostly Windows and Shingles
The structure was thankfully set. My daughter said she had envisioned it being bigger than this, but I was unfortunately out of any larger pieces of cardboard. It would have to do.
Now was the fun part of adding the details for a haunted house. Using printer paper, a razor, and my circle cutter, I went about cutting a ton of circles to create a scalloped look on the front panel. I wanted to hide the seam that was there from joining separate pieces of cardboard. I used Loctite Spray Adhesive to make this quick work. That spray didn’t work so well with the cardboard to cardboard gluing but worked here. I spray painted them gray after that.
For the windows and shingles, I cut cardboard to size and drew details or spray painted. If you haven’t tried spray painting cardboard, be warned. It takes a lot of spray paint to cover it. It felt like it would have been a better plan to paint the whole cardboard piece before cutting shingles. For the windows, I painted the cardboard with cheap acrylic paint before gluing on the frames and shutters.
After a quick google search, I found the images I wanted for the ghosts in the windows. I enlarged them and altered their colors in Microsoft Word. If you don’t have a picture editing program, Microsoft Word can be surprisingly handy for this kind of need.
With the addition of some Halloween decorations, spooky lights and sound, the outside of this Haunted Cardboard House was ready!
Stepping Inside
I put the big bubble wrap (the kind that comes in packaging) under the Frozen rug, so it would pop when the kids walked on it. I think this would have worked better if it had been a hardwood floor as opposed to carpet. It took a fair bit of jumping to get them to pop. I had a dollar store spider that drops every so often hanging from the ceiling to give a good scare.
There were some body parts and skulls along with an electrolyzed skull and Frankenstein’s head. My main attraction was the spooky touch and feel center. I had a pumpkin bucket full of eyeballs (peeled grapes), a pumpkin bucket full of brains (cooked spaghetti), a box of witches fingers (carrot sticks), a witch’s tongue (sliced banana), and a box of teeth (popcorn kernels).
When I brought the group of kindergartners down into the dark basement, they were already on edge. I took one little one into the house to have her do the feeling activity. As soon as the spider dropped, she ran out of the house scared to death. I ended up having to turn on the lights on and encourage my daughter to lead them through the houses. After that, they had a ton of fun!
Party Fare
Of all the things I do, I think I find using candy melts and molds, one of the most difficult to get right. I’m not sure if it’s something I’m doing wrong or if it’s just tough in general. I made these little oozy cake pop brains as a party treat to be placed along side the Cauldron Cake. The design of the cake was all the birthday girl’s ideas. She was quite happy with the end result and the taste of the Oreo cookie cakey insides.
This project was inspired by a family visit to the Renaissance Festival, a wonderful place of creativity and imagination. My oldest was enthralled with so many of the crafts there and wanted them all. This was much the same feeling I had as a child going to the Renaissance. As a mother, I would have loved to buy her all the things, but my pocketbook definitely didn’t allow for that desire. For many of the crafted items, I put a pin in the idea in my mental board to create later. One of those wares was the leather-bound books with the intricate faces deftly shaped into them. They seemed like the perfect at-home project. And thus, this spooky Halloween Book Cover craft was born into being!
Spooky Halloween Book Cover Materials & Tools
Book
Leather-like Material
Hot Glue
Paint
Eyeballs
Scissors
Xacto knife
Tissue Paper (Optional)
Mod Podge (Optional)
For my first two books, I went ahead with using some old books I had but didn’t care much about. For the next two, I took a trip to Goodwill and happened to come across two books with topics that were a perfecting pairing with Halloween; bugs, and strange stories. I was pretty tickled by the finds!
Easy Crafting Steps for the Eyeball Look
Cut the material to size. With the book open, you want it to be about an inch and a half bigger on all sides. You can definitely make it a little bigger if you’re worried about it being too small.
2. Use the razor to cut small slits for the eyeballs. For my first attempt, I went with one eye on the binding of the book.
Being careful not to burn yourself, hot glue the outside of the material to the surface of the eyeball to give it eyelids. I ended up using a large tongue depressor to keep from burning myself.
5. Glue the rest of the cover to the outside of the book. As it cools, squish the material together to create ripples.
6. Trim the outside edges and notch the corners so when they are folded in, you get a clean diagonal seam.
7. Leave as is or add whatever shading or darkening you prefer to age the material.
I was not quite happy with the end result, so I decided to add a little brown shading.
8. Set it up to show off.
Spooky Bug Halloween Book Cover
Shading
HOT GLUE!
Much of this cover consisted of piling on the hot glue. I honestly don’t know what I would do without my hot glue guns and stock of sticks. Hot glue is truly versatile when it comes to crafting. My first attempt was to create the centipede on the underside of the leather. It didn’t work so well, so I ended up adding it to the top of the leather. And then I added more…. and then a little more to each bug. Let’s just say I went through a lot of sticks.
Cheap acrylic paint served me well to paint the bugs and do the shading. It stuck to the hot glue pretty well with several coats.
A sharpie was an easy and permanent way to add a few details.
Complete Spooky Bug Halloween Book Cover
Tissue Paper Flare
To create a wrinkled appearance, follow the easy steps:
Apply Mod Podge to the surface.
Then press small squares of tissue paper into the glue.
Get a little extra Mod Podge onto a paintbrush before pushing into the tissue paper.
Add additional layers of Mod Podge based on your desired look.
e
Happy Halloween Crafting!!
Are you interested in getting alerts and information on all things coming out of Cathartic Crafting?! Then go ahead and submit your info below: