Tag: Holiday

20 Lovely and Crafty Valentines Decor Ideas to Make Today

In general, any holiday can evoke feelings of stress and anxiety, from the anticipation of interactions, the glaring absence of relationships, and/or the added list of tasks the holiday brings with it. I’d venture to say Valentine’s Day is the least favorite holiday for some. Way back before my husband and I got together (in high school), I saw it as a holiday pointing out the absence of love as it’s traditionally celebrated in a relationship. I was definitely young and tunnel visioned in that way, but as a teenager it’s what glared out at me. Currently, as a married adult, my husband and I still don’t celebrate it to any large degree, mostly because he hates the ‘hallmark’ holiday idea. To brighten the day up, I think the best way to celebrate the idea of love, is to craft your way into a Valentines decor infused space.

If you’re with me, follow along for a collection of lovely and crafty ideas you could do with or without your loved ones. If may just provide you with some meditative moments and a boost of confidence at seeing what you are able to create!  

Valentines Decor Collection

  1. Cupid’s Arrow Valentine’s Day Wall Hanging by Charleston Crafted 

I’ll happily admit I’m partial to arrow decor, so this Cupid’s arrow wall hanging hits me in just the right spot. One of the best parts is the simplicity and ease to create it. I also just saw Joann Fabrics has felt on sale right now, so it’s a match made in heaven. 


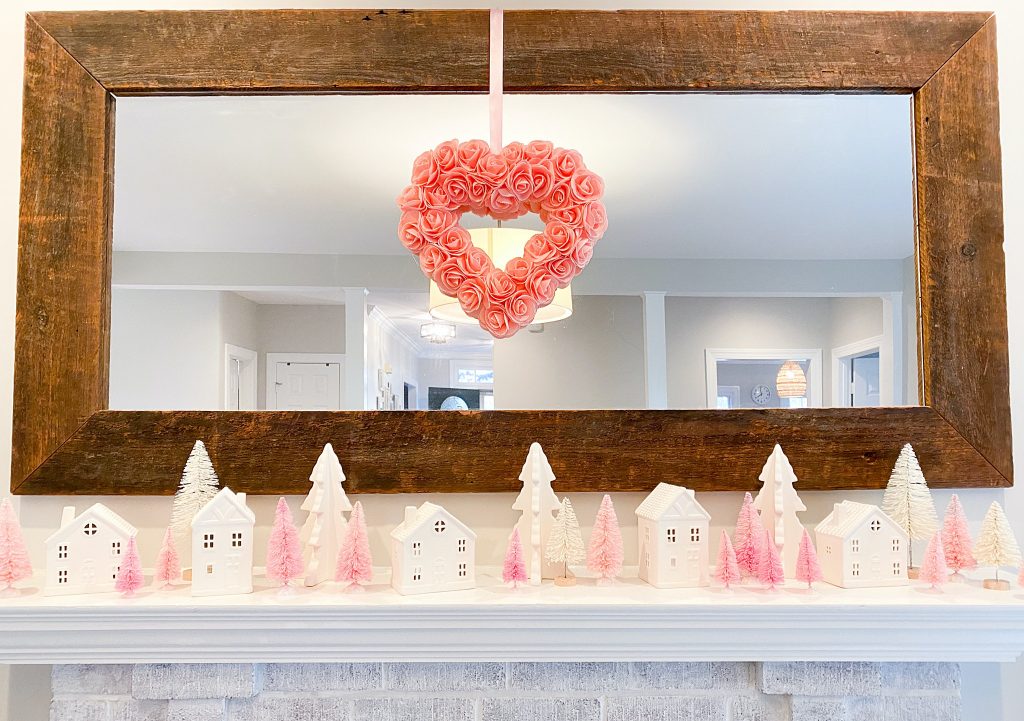
2. DIY Dollar Store Heart Wreath by South Lumina Style

This homemade wreath definitely comes off as having store bought quality and would look great with lots of different decor.  

Valentines decor heart wreath

And then there’s this other version of a heart wreath using the same wire frame but with material scraps. Totally farmhouse chic and a great way to use up any scraps you might have. 

3. Rag Heart Wreath by Simple Simon and Co.

Valentines decor rag heart wreath

4. Thumbprint Heart Glass Gem Magnets by Rhythms of Play

I’m smitten with this idea as a way to capture the kids’ fingerprint sizes for years to come, because the kids are only small for so long. A reality I’ve been living as my oldest is now taller than I. I could also use some more magnets to hold up pictures on the fridge, so that’s a win in my book. 

valentines decor thumbprints

5. Heart Garland by My Sanity Project 

After having posted about my Christmas mitten garland, I couldn’t pass up on this heart garland. It’s equally as cute as the mittens. 

valentines decor heart garland

6. Valentine’s Day Trail Sign by Stow and Tell U

Which path would you choose on this Valentine’s day hike? I’m partial to Cupid’s Arrow Peak myself.


7. Valentine’s Table Runner by H20 Bungalow

While perusing ideas, I liked how unique this concept was among the bunch of wreaths and wall decor. There weren’t any other table runner ideas I saw and burlap gives it the added farmhouse look. I ‘love’ it!

Valentines decor table runner

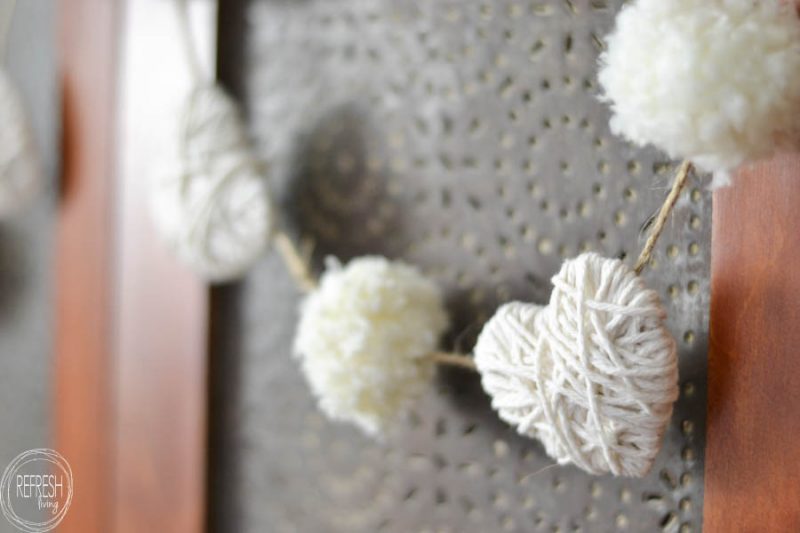
8. DIY Farmhouse Garland by Refresh Living

Sometimes, you just can’t beat a little simplicity. The toned down color and ease of this garland is oh so lovely. Stringing beads definitely provides an opportunity to meditate as well!


9. Canvas Heart Art by Design Improvised

I couldn’t go without including some canvas wall decor. My girls love painting on canvas, so the image really sparked a fire in my to break out the paint and glitter. The variety in texture definitely adds a nice dimension to the collection. 


10. Lavender Sachets by Beauty for Ashes 

Given that smells can be a great way to ease stress and recall memories, I thought this heart sachet idea was superb. If you’re planning a lovely night or holiday season, give your olfactory sense something to spark memories in the years to come. 


11. Yarn Wrapped Hearts by Fynes Designs

Simple yarn can come pretty cheap, so this idea also stood out to me as affordable and a nice kid friendly idea. It’s also a nice pairing to idea 8 in this list. 


12. Valentine’s Gnomes by Follow the Yellow Brick Home

Gnomes seem to be all the rage these days. These Valentine gnomes look easy enough for anyone to accomplish and add a cute gnome splash to a Valentine decor vignette. 


13. No Sew Valentine Pillows by Moms and Crafters

I could spend forever rooting through fabrics to find just the right pattern and feel for these cute pillows. Personally, I would go bigger than these appear to be and save money by stuffing them with the cruddy looking cotton snow left over from Christmas. Who doesn’t love a good repurpose?


14. Kissing Booth 

The dollar tree can supply all the materials to create this absolutely adorable kissing booth. Big tongue depressors could also be an alternate option for material. It definitely provides a way to add your own creative flare. 


15. Heart Envelopes by I Heart Crafty Things

I’m pretty sure most folks have extra paper lying around whether decorative or not. Here’s an easy peazy way to make a folded heart into the actual envelope! Write your message and fold away!


16. Heart Frame by Fluster Buster

In my previous house, I had wanted to make a similar year round wall hanging with braches in a large frame. I never did end up doing it but still love this Valentines decor version. There are plenty of frames ready for repurposing at Goodwill for just such a purpose. 


17. Tissue Paper Rosette Ball by the Idea Room

I tend to have left over streamers from my girls’ birthday morning ‘surprise’ decorations. When I saw this idea, I couldn’t get over how simple of an idea it was using something I already had. I can’t wait to make my own!


18. Valentines Day Table Decorations by Cathartic Crafting 

Create some Valentine’s Day table decorations with materials you can likely find around your house, like acorns and wine bottles. I know I enjoyed it!


19. Bead Board Heart Vase by Simply Country Life

Here’s another idea I’ve done something similar with to hold my paint brushes, mason jar wall hangings. Most of the work lies in going to the store for supplies. 


20. DIY Dollar Tree Sign Makeover Using Craft Sticks by Lizzy and Erin

This Valentines decor is true farmhouse magic in a wooden frame. The combination of all the different ribbon material is the star here.

So that’s it, that’s all I wrote. I truly hope you found a few must do ideas here from all these creative bloggers. Hopefully, it helps you to slow down and focus your mind, or maybe lets it wonder aimlessly, if that’s what you are needing. Holidays certainly seem to put the pressure on, but if we take a step back to allow for some ‘me’ time, all things can be manageable. Here’s to current and future love!

Valentine’s Day Table Decorations using Found Materials

At our new house this fall, we experienced an onslaught of acorns on our back porch from the nearby tree. Given that there were thousands of them, and more than the squirrels could handle, I felt like I needed to figure out some way to repurpose them. With all the baby and Christmas prep and festivities complete, it was time to refocus on the next holiday, Valentine’s Day. These thoughts boiled down to creating Valentine’s Day table decorations with the acorns and a collection of other materials I had on hand. It feels great to be able to repurpose items, especially to spruce up the living environment. 

Supplies

  • Acorns
  • Acrylic Paint
  • Paint Brushes
  • Craft Glue
  • Wine bottle (click the link for a wine company I love, Traveling Vineyard)
  • Contact Paper
  • Wood
  • Sand Paper
  • Spray Paint

Valentine’s Day Table Decorations Run Down

I don’t think many instructions need to be included here, except to say, go forth with creativity! One note on acrylic paint. I, generally, buy cheap acrylics, because my kids go crazy with it and waste it. This means the paint doesn’t always have great surface coverage and needed multiple layers of paint to cover the brown. If waste isn’t a concern, I suggest you choose your paints wisely. 

Using leftover 5/8″ x 2″ strips, I cut some rectangles to make into tiny envelopes. 

Wine Bottle Valentine’s Day Table Decoration

Whether you are drinking away your sorrows or celebrating with loved ones, save the empty wine bottle for an easy repurpose. A little trick I learned recently is to use WD-40 to get the sticky remnants off the surface. What I also learned in trying this method is the WD40 doesn’t get the heavier sticker off, so soak the label first to get off as much as you can. 

From there, I cut hearts from contact paper to use as a stencil on the wine bottle. I used the folding method to ensure it was equal on both sides. If I were to do it again, I would make the hearts a little smaller. This would allow for the viewer to see the whole heart when looking at the bottle from one spot rather than having to rotate it. 

Finished Valentine’s Day Table Decorations

Thankfully, I took these pictures prior to our Siberian Husky poaching them off of our entry table to chew on. She’s now chewed on my live edge coffee table, my resin coffee table, multiple shoes, and our new porch couch. I’m about ready to boot her out of the house! Anyway…….

Now it’s your turn to go ‘nuts’ crafting your own Valentine’s Day table decorations with whatever you have available. Have fun!

*This page contains affiliate links. This means if you use one of my links to make a purchase, I will receive a small commission at no additional cost to you. Thank you for supporting Cathartic Crafting!

How to Make the Best Halloween Apothecary Jars

A few years ago, I couldn’t wait to start a collection of Halloween apothecary jars to add to my holiday decor. I started off with collecting regular food jars and random Goodwill finds to change into new and creepy decor. It doesn’t take much more than some simple materials to really get started.

Halloween Apothecary Jar Ideas

Materials:

  • Coffee Filters
  • Printer and Printer Paper
  • Clay
  • String
  • Paint
  • Mod Podge
  • Glue gun and Glue sticks
  • Food items: egg shells, Cantaloupe rind
  • Store bought creepy crawlers
  • Corks
  • Sandpaper
  • Saw

For this Ear of Troll I used the rind of some eaten cantaloupe. I gave it a week to dry out in the garage before closing it into the jar. I used a blank label in Word to type in the name. Mod podge was my go-to glue for all of these labels to get them to stick and to give it a coating for longevity. For this jar, in particular, used coffee filters served as the lid covering with string and craft glue decorating the jar curve.

Free label sites I used:

Spooky Apothecary Labels from Brooklyn Limestone

Free Halloween Bottle Labels from Holidappy 

Apothecary jar Labels from Halloween Forum

Rattle Snake Eggs

Similar techniques were used for these Rattle Snake Eggs Halloween Apothecary jar. The eggs were from a friend with chickens laying eggs in a variety of shades. Using a needle, I poked holes in both ends with one end being slightly larger to allow for the egg innards to be expelled. It’s also a lot easier to break up the yolk using the needle poked repeatedly through the holes. Once all that was done successfully without breaking the egg, I blew into the smaller hole to force the contents out the larger hole. Then I was ready to eat some scrambled eggs! I also gave the eggs a day to dry out a little more before coating them in Mod Podge.

Jellyfish Stingers

The same techniques are applied here for the outside. For the jellyfish stingers, I used hot glue on a baking pan. When it was cool, I was able to peel it off and stick it in the jar. 

Store bought creepy crawlers are center stage in this jars: Worms, mice and cockroaches anyone?

Clay Creations

Next up, for these three Halloween Apothecary jars, I used baking clay for the unicorn horn and bat wins and model magic for the fingers. I quite enjoy crafting clay creations. For the horn, I first rolled two equal ropes of clay. Then I twisted them together and rolled them on the counter to get a narrower pointed end. Presto! A lovely unicorn horn. I didn’t finish it off with glitter but it could definitely be a nice add.

Model magic is really easy to shape but doesn’t hold fine details like a real clay does. I used press on nails to give the real nail effect here. These lady fingers were complete with some painted on blood. You could really go grotesque with this if you want!

Pill Bottle Makeovers

These 5 bottles were all crafted from empty pill bottles. I used a saw to cut the tops off before sanding the smooth surface. The next step was to draw the label and image with hot glue. I used matte/satin paint in grays, browns, and black to paint all the bottles. Then, I glued on labels and string. 

Two Minute Snake Skin

For this lovely Halloween Apothecary jar of Snake Skin, I painted the jar with a few different colors of cheap acrylic paint that matched with the coloring of the label. (The color of the label being the result of a malfunctioning printer. The Lord knows the amount of angst that printer caused me at the end of its life.)   Generally for painting all the lids, I sanded them first to ensure the paint would adhere.

The actual innards of the jar were a combination of plastic wrap and hot glue. I cut a rectangle of the plastic wrap and laid it over the foil to protect the counters. From there, I glued a snake skin-esk pattern onto the plastic wrap. I noticed that as the glue got hotter, the plastic wrap shrunk more, which I was not so much a fan of seeing happen. If I were to do this again, I would do a portion, then unplug the glue gun for a 15 second cooling. Then repeat until finished. 

I got the free label for this jar from: 

http://suzyhomemaker.co.uk/halloween-apothecary-with-9-free-potion-bottle-labels/

I hope you gathered some of your favorite ideas for crafting some of your very own Halloween Apothecary Jars. If you’re looking more spooky Halloween decor, check out my Spooky Halloween Book Covers.

Frightfully Spooky Halloween Book Cover for your Next Craft Project

This project was inspired by a family visit to the Renaissance Festival, a wonderful place of creativity and imagination. My oldest was enthralled with so many of the crafts there and wanted them all. This was much the same feeling I had as a child going to the Renaissance. As a mother, I would have loved to buy her all the things, but my pocketbook definitely didn’t allow for that desire. For many of the crafted items, I put a pin in the idea in my mental board to create later. One of those wares was the leather-bound books with the intricate faces deftly shaped into them. They seemed like the perfect at-home project. And thus, this spooky Halloween Book Cover craft was born into being!


Spooky Halloween Book Cover Materials & Tools

  • Book
  • Leather-like Material
  • Hot Glue
  • Paint
  • Eyeballs
  • Scissors
  • Xacto knife
  • Tissue Paper (Optional)
  • Mod Podge (Optional)

For my first two books, I went ahead with using some old books I had but didn’t care much about. For the next two, I took a trip to Goodwill and happened to come across two books with topics that were a perfecting pairing with Halloween; bugs, and strange stories. I was pretty tickled by the finds!

Easy Crafting Steps for the Eyeball Look

Cut the material to size. With the book open, you want it to be about an inch and a half bigger on all sides. You can definitely make it a little bigger if you’re worried about it being too small.

2. Use the razor to cut small slits for the eyeballs. For my first attempt, I went with one eye on the binding of the book.

Being careful not to burn yourself, hot glue the outside of the material to the surface of the eyeball to give it eyelids. I ended up using a large tongue depressor to keep from burning myself. 

5. Glue the rest of the cover to the outside of the book. As it cools, squish the material together to create ripples.

6. Trim the outside edges and notch the corners so when they are folded in, you get a clean diagonal seam.

7. Leave as is or add whatever shading or darkening you prefer to age the material. 

8. Set it up to show off.

Spooky Bug Halloween Book Cover

Shading

HOT GLUE!

Much of this cover consisted of piling on the hot glue. I honestly don’t know what I would do without my hot glue guns and stock of sticks. Hot glue is truly versatile when it comes to crafting. My first attempt was to create the centipede on the underside of the leather. It didn’t work so well, so I ended up adding it to the top of the leather. And then I added more…. and then a little more to each bug. Let’s just say I went through a lot of sticks.

Cheap acrylic paint served me well to paint the bugs and do the shading. It stuck to the hot glue pretty well with several coats.

A sharpie was an easy and permanent way to add a few details.

Complete Spooky Bug Halloween Book Cover

Tissue Paper Flare

To create a wrinkled appearance, follow the easy steps:

  1. Apply Mod Podge to the surface.
  2. Then press small squares of tissue paper into the glue.
  3. Get a little extra Mod Podge onto a paintbrush before pushing into the tissue paper. 
  4. Add additional layers of Mod Podge based on your desired look. 

e

Happy Halloween Crafting!!

RSS
Follow by Email
Pinterest
Pinterest
fb-share-icon
Instagram

Are you interested in getting alerts and information on all things coming out of Cathartic Crafting?! Then go ahead and submit your info below:

Verified by MonsterInsights