Sometimes, it feels difficult to come up with unique holiday decor. While I was trying to come up with an idea for some such unique Halloween decor, I thought about the old throwback movie “Little Shop of Horrors”. I was excited about the idea of coming up with my own way to make a man eating plant. When doing a search for popularity on the internet, there weren’t too many ideas on how to make one, so the holiday was a solid one. I was excited to try to make my own from there.
Man Eating Plant Material List
- Balloon
- Flour
- Water
- Newspaper
- Clay
- Paint
- Tissue Paper
- Spray Insulation
- Cardboard Snack Box
- Pole
- Floral Wire
- Glue
Man Eating Plant Build
My first step was to create the plant head using handy dandy paper mache. You are free to use whatever paper mache recipe floats your boat for this. I tend to go the easiest and cheapest route with a flour and water mixture. It admittedly isn’t quite as strong as a glue-based mix, but it certainly does the job. I used this same technique for my Witch Cauldron. Ultimate Paper Mache‘s site is a great source for recipes. There are five recipes here from which you can choose. After making the paste, cut or tear the newspaper into 1-inch strips. I placed the strips on the balloon in about 3 layers to get the egg shape.


Clay Covering
Given that it would have taken forever to give the plant head a thick coating with the paper mache, I opted to try to use clay I had made for some other projects, including my witch cauldron Halloween decor. I went through some rough patches with this project, that is for certain. The home made clay I used cracked after drying. I tried to pull some of it off but it was going to take the paper with it some areas.
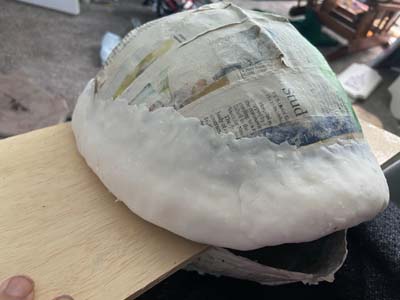


I ended up covering the clay with more paper mache to smooth it out. It ended up working out in the looks department but was quite heavy after it was all said and done. I would recommended going another route for the thickening layer; something like foam or quilting fabric.


Inside the Mouth
Time for spray insulation! I filled the cavity with the insulation to what I thought it should be with some growth. Be warned, it really grows!


After a little too much expansion, I had to saw it down to a manageable working place. It was pretty easy to cut through, so I was pleased in that regard. I used a utility knife to cut down more in the middle to make room for the tongue. Something to be aware of is the insulation loses it’s shinier smoother texture when you cut into it.


The veins on one side were added during the paper mache phase. The other side ended up being better as the top, so I opted to use hot glue to create some veins there. I used my airbrush to give it a few coats of different shades of green and some purple for the outside. The inside of the mouth needed a few coats of red to give it a nice deep color. The cut insulation kept the spray paint well.


Time for the Detail!
I used cereal box cardboard as the base/structure and the same clay to craft my tongue. The cracking this clay did after drying ended up being a perfect pairing for a gnarly tongue. I set it to dry on top of two paint bottles to give it dimension, aka an in motion look.

After some red and purple paint, this tongue was ready to taste some prey! White clay teeth were the last to throw together. Hot clue did the trick to get the clay teeth to stick to the insulation gums.


Man Eating Plant Body
The man eating plant wouldn’t have been complete without the leaves and tentacles to attract it’s prey. I was running out of time at this point because of the headache the clay had given me. There was no choice but to make quick work of the tentacles. I sprayed newspaper with spray glue and rolled it up. Then, I coated it in paper mache paste to get it to harden. From there, it was just a matter of waiting for them to dry in position and painting them.


The leaves were put together with flower wire, tissue paper, spray glue and some spray paint.


Watch Out, this Plant has Quite the Bite
I loved the look of the inside of the mouth and the head. If there had been more time before Halloween, I would have take the leaves and tentacles up a notch, but they were enough for the Halloween night decor. As first tries go, there were some successes and some fails. Overall, it was a learning experience. Maybe I’ll try another technique this Halloween. Or maybe I’ll be too pregnant and tired to care about giving it another go. We shall see! Happy Holiday Crafting to you!


*This page contains affiliate links. This means if you use one of my links to make a purchase, I will receive a small commission at no additional cost to you. Thank you for supporting Cathartic Crafting!


1 Comment on DIY Man Eating Plant for Your Halloween Decor