Those who know me, know my love of cardboard. It’s such a versatile and cheap product to craft with, which leads me to have stockpiles of it at times. My youngest daughter’s birthday is October 29th, so while brainstorming ideas for her birthday party, we thought about how we could make it a true Halloween birthday party. I’d previously done an indoor cardboard gingerbread house that my girls loved. It seemed perfectly logical to do a Haunted cardboard house for her spooky birthday party. She had grand ideas for how she would make it haunted and couldn’t wait to have her friends over.
Starting a Haunted Cardboard House
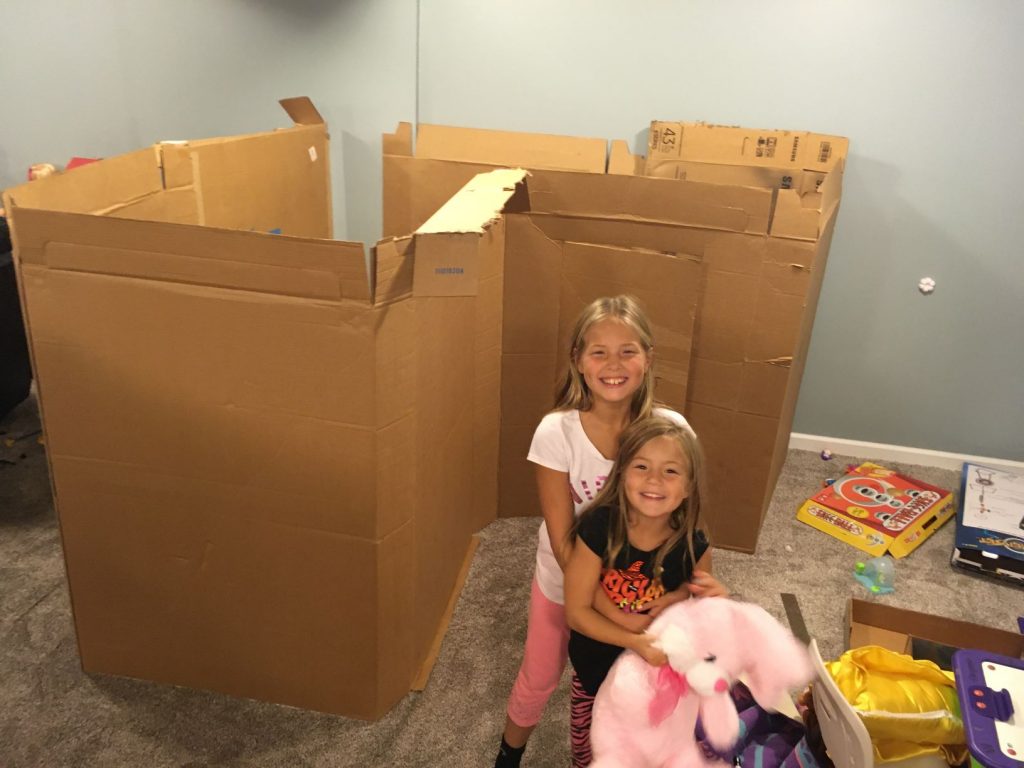
The request from my daughter for this haunted cardboard house was that it be bigger than the gingerbread house. We have quite a bit of free space in our basement, so I was okay with accomodating that request.
For these larger-scale houses, larger boxes make things a lot easier than piecing together smaller ones. The size and shape of the house can really depend on what you have to work. I didn’t have a plan going into making this and allowed the box shape and size dictate how it would work best.
My neighbor had large furniture boxes out for recycling, which I happily took off their hands to get moving on the wall frames. I typically use hot glue to glue the pieces together because it dries quickly and works well with the paper surface. Sometimes, it doesn’t hold together well enough if I’m not quick to get it together. For those times when it wasn’t holding together, I used some wood glue and weights while it dried.

In order to set the frame, I decided to utilize some small clamps to hold it while I moved things around to find the right shape and size. I was able to do a fair bit of gluing in the garage to remove the fear of getting hot glue on our basement carpet. Folks, hot glue can only really be cut out of carpet (from previous experience). While in this planning phase, I was also able to cut the door out with a razor and a square on the cement floor.


Time to Move to the Final Destination
With the plan in place, it was time to move all those cardboard pieces to the basement to get this Haunted Cardboard House structure together. With the pieces standing, it was a bit like a maze down there. The girls loved it.

I had to put a call out for more cardboard to the neighborhood and thankfully the call was answered. I was then able to construct the roof. That was the hardest part of the whole thing. The cardboard was heavy and shifted while I tried to glue it together by myself. I had to get my helpers on board to hold it while I glued it. For this part, the glue didn’t work as well. I ended up using a drill to make holes and piecing the heavy pieces together with screws, bolts, and washers. They made for a very sturdy structure.
Safety Warning!!
Hot glue is, shall we say, Freakin’ HOT! It was about during this part of the build that I got myself with the glue while trying to get the heavy roof together. As I quickly tried to “stop the burn” (as we say in American Red Cross) by rubbing the glue off, it took a layer of skin with it. I’ve burned myself quite a number of times while working with hot glue, but this was by far the worst. We go through quite a lot of types of bandaids in this house. I’ve got to hand it to these NexCare waterproof bandaids. They maintained through a lot of movement. Investing in heat protection gloves is probably a good prevention idea though.


The structure was thankfully set. My daughter said she had envisioned it being bigger than this, but I was unfortunately out of any larger pieces of cardboard. It would have to do.
Faux Scalloped Siding, Ghostly Windows and Shingles
The structure was thankfully set. My daughter said she had envisioned it being bigger than this, but I was unfortunately out of any larger pieces of cardboard. It would have to do.
Now was the fun part of adding the details for a haunted house. Using printer paper, a razor, and my circle cutter, I went about cutting a ton of circles to create a scalloped look on the front panel. I wanted to hide the seam that was there from joining separate pieces of cardboard. I used Loctite Spray Adhesive to make this quick work. That spray didn’t work so well with the cardboard to cardboard gluing but worked here. I spray painted them gray after that.


For the windows and shingles, I cut cardboard to size and drew details or spray painted. If you haven’t tried spray painting cardboard, be warned. It takes a lot of spray paint to cover it. It felt like it would have been a better plan to paint the whole cardboard piece before cutting shingles. For the windows, I painted the cardboard with cheap acrylic paint before gluing on the frames and shutters.


After a quick google search, I found the images I wanted for the ghosts in the windows. I enlarged them and altered their colors in Microsoft Word. If you don’t have a picture editing program, Microsoft Word can be surprisingly handy for this kind of need.


With the addition of some Halloween decorations, spooky lights and sound, the outside of this Haunted Cardboard House was ready!


Stepping Inside
I put the big bubble wrap (the kind that comes in packaging) under the Frozen rug, so it would pop when the kids walked on it. I think this would have worked better if it had been a hardwood floor as opposed to carpet. It took a fair bit of jumping to get them to pop. I had a dollar store spider that drops every so often hanging from the ceiling to give a good scare.

There were some body parts and skulls along with an electrolyzed skull and Frankenstein’s head. My main attraction was the spooky touch and feel center. I had a pumpkin bucket full of eyeballs (peeled grapes), a pumpkin bucket full of brains (cooked spaghetti), a box of witches fingers (carrot sticks), a witch’s tongue (sliced banana), and a box of teeth (popcorn kernels).
When I brought the group of kindergartners down into the dark basement, they were already on edge. I took one little one into the house to have her do the feeling activity. As soon as the spider dropped, she ran out of the house scared to death. I ended up having to turn on the lights on and encourage my daughter to lead them through the houses. After that, they had a ton of fun!
Party Fare
Of all the things I do, I think I find using candy melts and molds, one of the most difficult to get right. I’m not sure if it’s something I’m doing wrong or if it’s just tough in general. I made these little oozy cake pop brains as a party treat to be placed along side the Cauldron Cake. The design of the cake was all the birthday girl’s ideas. She was quite happy with the end result and the taste of the Oreo cookie cakey insides.


1 Comment on Haunted Cardboard House for your Kids who Love a Little Scare