If you’re anything like me, you likely see creative possibilities all around you. Sometimes in comes in the form of more random options. For this easy woodworking project, I was inspired by an oar shape. After some brainstorming, I came up with this wood serving platter idea.
“She believed she could so she did”
My parents both grew up in the great state of Kansas before moving to Maryland, where I was raised. During my younger years, we would make the long drive once or twice a year to visit our many relatives. I now try to get out there every few years to spend a week visiting with as many in the area as we can. We made the trek to join in the family reunion with the family from these two fabulous people below, my paternal grandparents. They are a crafter and carpenter extraordinaire among a great many other things. The line of DIYers is obviously pretty long. In 2017 when this photo was taken, they were 91 and 94 years old. I can only hope to live as long and fruitful a life as these two.

During this particular reunion, the family was making carpenter stools to match my grandfather’s well-used one. My grandmother was also providing instructions on how to cut a chicken down to make her fried chicken. It was quite a unique and memorable affair. My family knows how to do it right.


Great Horned Owl
It wouldn’t be a trip to my aunt and uncle’s house in Missouri without an exotic animal sighting. Missouri seems to have laxer animal rules, so there’s quite a bit of animal variety in the area.
Now on to the Project
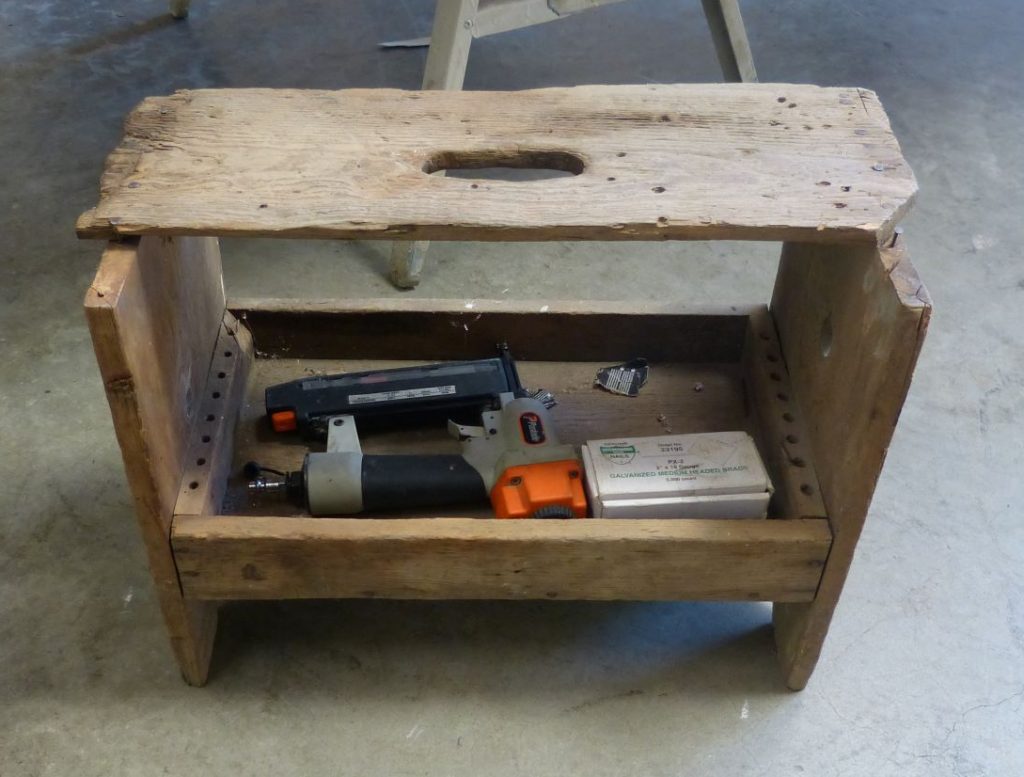
Part of this particular Kansas trip included cleaning out my parents’ old shed, which happened to have a couple of boxes of ready-made wood forms. That wood was calling my name, so I had my pick of the stock along with my younger sister. I dragged my selection back to Maryland with me and piled them up to wait for creativity to strike. Some ideas came more easily but those oar shapes nagged at me to figure out what to do. Then it hit me all of a sudden; I’d practice my raw routering skills by making a food platter. I took a trip to Goodwill, found three perfect glass cups, and to my garage I went.

I traced the bottom of the glass cups on the long portion of the oar and measured around the base to ensure I had an even border there. Then I used an older router to start cutting out the inside of my markings. It’s important to lock it tight when using a router. If you don’t, the blade will move deeper than you plan on it going. Unfortunately, the router I was using did not stay put and started digging in a little deeper than I’d planned. I can’t begin to describe the disgust I felt with this, so I ended up quitting it for quite a while and picking it back up when I got a handle on my frustration.

Quick Fixes
Wood filler and a scraper solved the problem of evening out the spots that happened by accident. After the wood filler was dry, I sanded it down as best I could using a medium grit (80 grit) sandpaper. Medium grit (60-100) helps with smoothing the rougher areas. For more significant marks, you’d go for coarse grit (40-50). It’s typically best to sand with a fine-grit paper (120-220) to create a really smooth even surface before staining.
I’ve since started using a much better router thanks to my parents, which makes completing projects soooo much easier. This Ryobi router serves me well now. I can’t say enough about having the right tools. Many of the ones I have are hand-me-downs or are older because I can’t spend the money on better versions of everything. If I had my druthers, I’d get a bunch of new tools to speed up my projects and save my sanity. You get the benefit of seeing you can still accomplish things without all the best tools.

Staining
After the routering was complete, I did two layers of stain with a dark stain I had on hand. I keep old cotton white shirt strips handy for staining just like my mom used to do. My parents were avid woodworkers and often built cabinets, tables, or trailers, among the list. My siblings and I helped complete many of the projects when extra hands were necessary. I’ve said many times as an adult now that although I wasn’t so keen on it as a kid, I’m thankful for the skills gained by having had to help.


The stain ended up being inconsistent in the wood filler spots. I decided the oar server would look better to do chalkboard paint on the inside. If you are looking for other simple projects with chalk paint, check out this easy frame project. Then I painted “Bon Appetit” with white acrylic paint and finished it off with two coats of polyurethane to seal it for food and washing. The clear coating really gives it the finished look as well.
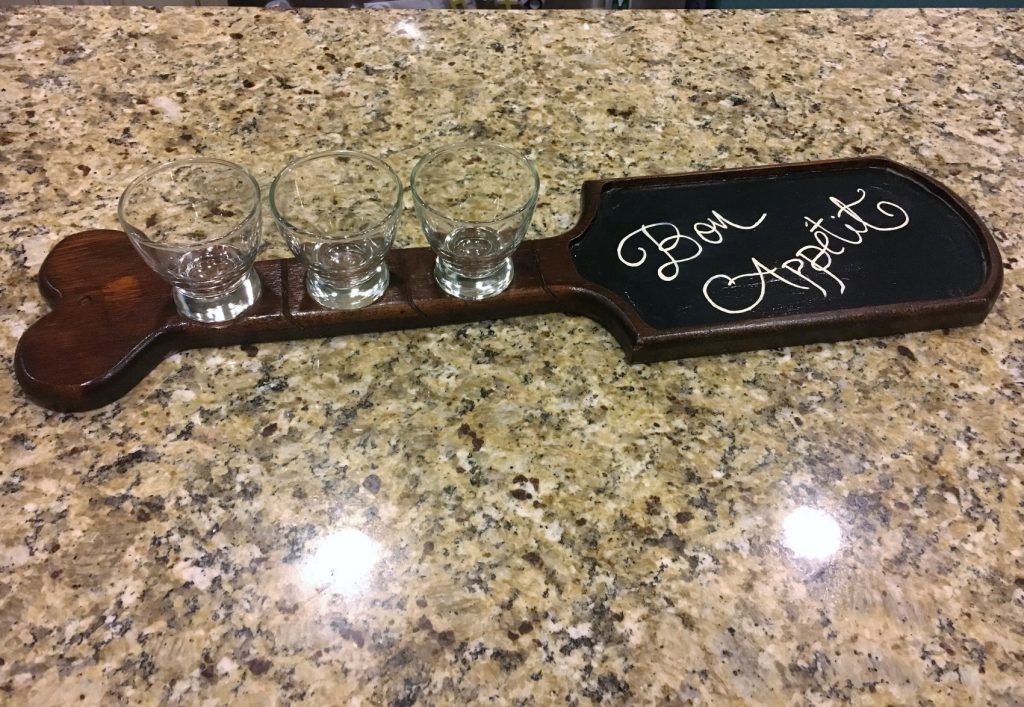
I put a twine hoop on the oar server for hanging to make it a multipurpose server and decor item.

Wood Serving Platter: Putting it to Use
Around the time I was working on this, I was attending monthly moms’ dinner nights. If you haven’t participated in these, it’s best described as one mom hosting and choosing a theme to create the main dish around. The rest of the attending moms/friends bring a dish to match the theme. This particular night was Mexican-themed, so I went with homemade churros and three different dipping sauces. It all worked perfectly together as you can see below! It just goes to show that random finds can be made into something completely fun and useful. Here’s to inspiration finding you soon!

*This page contains affiliate links. This means if you use one of my links to make a purchase, I will receive a small commission at no additional cost to you. Thank you for supporting Cathartic Crafting!


4 Comments on DIY Wood Serving Platter for your Next Gathering