Tag: Coffee Table

DIY Resin Coffee Table Anyone Can Do

In the spring, I went to scavenge at a lumber yard at their free scrap day with my oldest daughter. I had been hoping to find some boards to use for a tree house for my three girls. Instead, I found some other boards to use for various other future projects. There were two boards that inspired me to want to try a wood and resin coffee table. I’d also been following Black Diamond Pigments on Instagram and couldn’t wait to try their powder dyes with the resin. After finishing my deck sectional, it was time to try my pigment dyed resin coffee table!

Supplies and Tools

  • Scrap wood for frame
  • Wood for table top
  • Resin kits
  • Black Diamond Pigments
  • 2 – 2″ x 2″ x 8′ wood
  • wood glue
  • Tape
  • Clamps
  • Screwdriver
  • Saw
  • Router & router bit
  • Sander
  • Heat gun or hair dryer
  • 3/4″ drill bit
  • Wood button inserts
  • Stain

Board Prep

The one board was a bit warped, so I tried a technique I’d tried before to straighten it out. To be honest, I didn’t do it all the way correctly, which is likely why it didn’t work well. If you put a wet towel before a straight board and warped board, then clamp them together for a day, it will help to straighten the warped board. I sprayed the bottom of my warped board instead of using a wet towel.

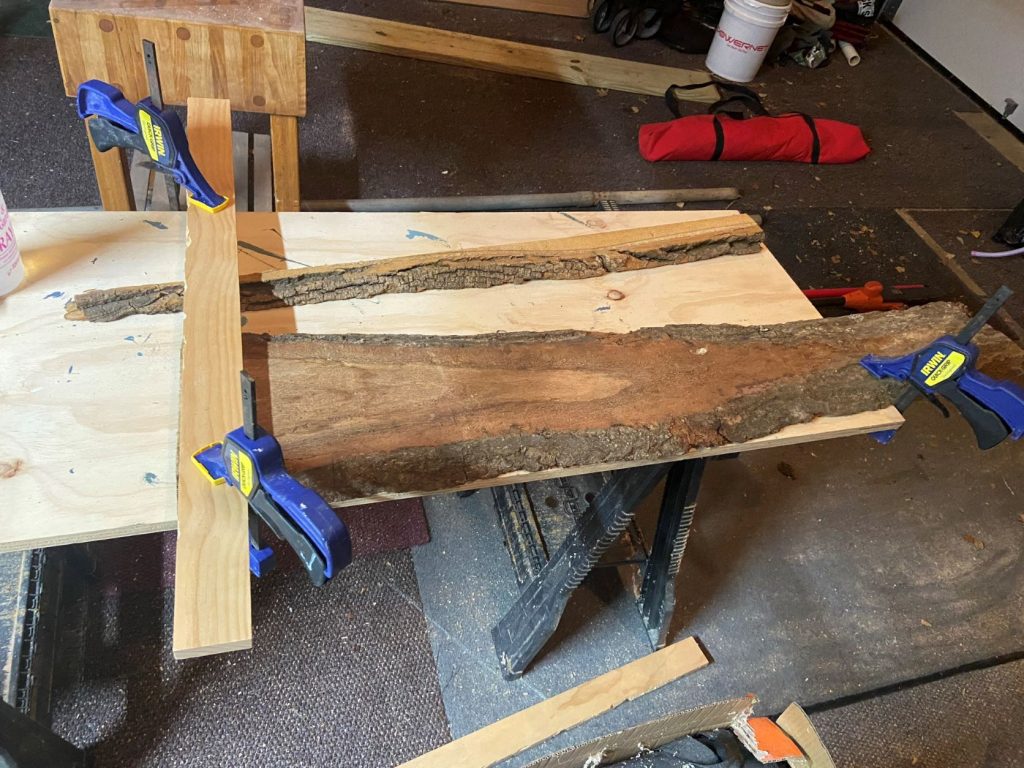
After trying to straighten the board, I sanded the front and back of the boards with a hand sander to smooth them out a bit and clean the grit off. I wasn’t set on which side I would use face up. The sanding solidifed my decision to show more of the bark. From there, it was time to build the resin reservoir with scrap wood. 

Resin Coffee Table “Mold”

I did a fair bit of internet searching to find out what materials wouldn’t stick to the epoxy resin. Wax paper, packing tape, and Tyvek Tape were some of the top recommendations. I wanted to give Tyvek a try but ended up finding it difficult to locate in local hardware stores. I was about to order the Tyvek from the internet when I decided to save the money. During my search, I also found this Epoxy tape which I thought was interesting. I already had packing tape on hand, as well as wax paper, and was nervous about the wax paper covering the large area evenly. 

With the packing tape dispenser in hand, I lined the bottom and sides of all the mold pieces. From there, it was just a matter of attaching the side boards to the bottom. I noticed some separation and the seams, so I covered them with tape as well. 

Time for Resin Fun!

I grossly underestimated the amount of resin I would need to fill the reservoir. I started off with two smaller resin kits from Hobby Lobby and Michaels. After figuring out that wouldn’t be enough, I ordered a large kit from Amazon. I quite liked the kit, because it came with the mixing cups, stirrer, and spreader. As I said at the beginning, I was excited to try the Black Diamond iridescent pigments with the resin. I opted to go with a variety set for future projects.

The instructions are pretty explicit with all the kits, so I won’t go deep into that. The best way to get it done is to use the right size cup with the measurements on the side and use a timer. I used roughly a teaspoon of silver pearl powder.

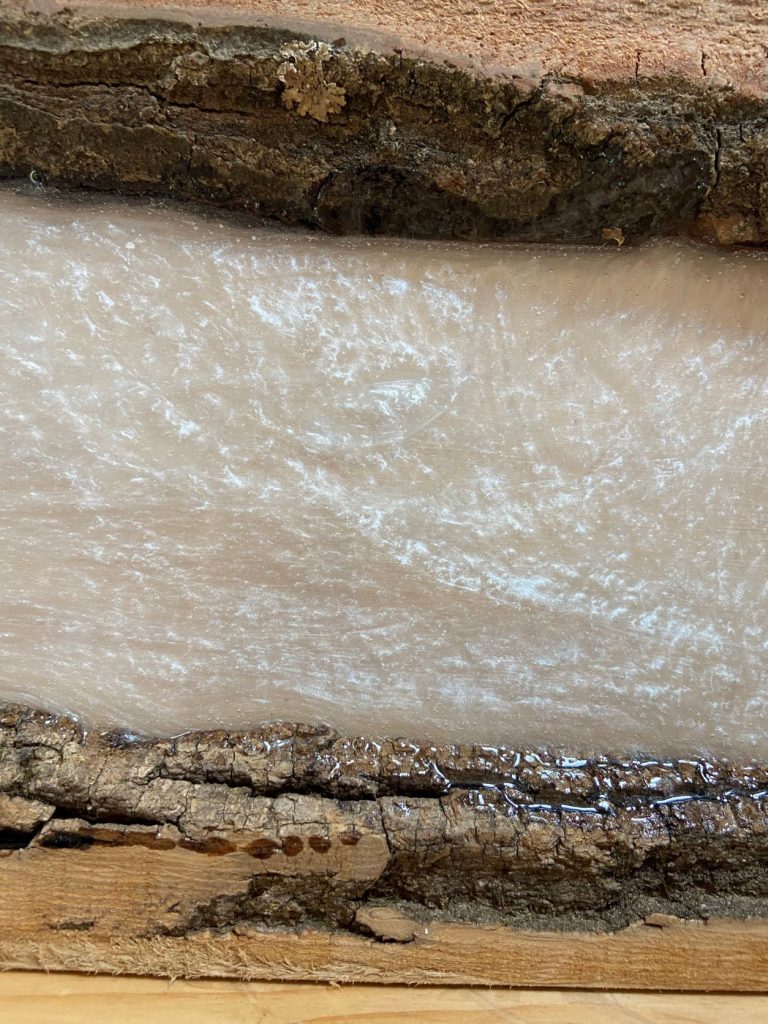
After pouring the silver pearl, I had to quickly mix the next batch to stir in the jungle green.

I swirled the green in with the silver pearl and left it to settle. Then, I popped the presenting bubbles with the heat gun and let it dry overnight. 

After the layer with the powder dyes, it was time for the clear resin. I used the larger kit for the first layer and found that it was not enough. Back to Amazon I went to order another kit. The heat gun removed the air bubbles, but I had to check every 20 to 30 minutes to make sure there weren’t anymore bubbles appearing.  I learned a little (or rather big) lesson with this project. The wood continues to release air as the resin hardens. To preventing having to check it repeatedly, it’s best to cover the wood surface in a thin layer first. After it’s hardened, pour the majority of the resin into the reservoir. 

Table Legs

It took a bit for me to figure out how I wanted the legs to look. My initial plan was to use limbs or half stumps, but I didn’t fully like that idea. I ended up going with 2″x 2″ wood boards for crossing legs. Eventhough these legs were going to consist of only two cross sections, it was much harder to configure than I anticipated. I knew I wanted the height to match with the couch it was going to sit in front of, which would be 16 inches from floor to bottom of the table. 

I did quite a bit of measuring and re-measuring to ensure the angels would be correct and then that my cross section would be routered at the right angle. It was also important for the base to be wider then where it connected to the resin coffee table top. I was trying to avoid the screws showing through the resin by trying on to screw into the wood sections. This was really the most daunting part of the whole project. The arm saw was used to cut the table legs angles. I mostly eyeball but should really be better about using those equations my kids are learning in school. It’s a lovely way to be able to reinforce with them that math is important. 

Time to Break out the Router

The router is really becoming my best friend with all the recent projects. I used a half inch trimming bit to cut the groove for the cross section. When making these cuts, you should cut half of the depth into both pieces so they will be flush on the outside. I measured from the top of the router plate to the top of the bit to make sure. 

With the cross sections glued in place, it was time to drill a 3/4″ hole on the outside of legs for a decorative wooden button to cover the screw that would connect the legs to the connecting beam. 

Leg Mounts

I cut three connecting horizontal beams to connect the cross legs to each other for more stability. These were fixed in place with wood glue and wood screws. To ensure the legs would be securely affixed to the tabletop to support the weight of the resin and wood, I made wood rectangle mounts. Using wood glue and screws, I attached the mount to the legs by screwing from the top. 

Then it was just a matter of staining the legs and coating them with clear polyurethane to match some of the shine of resin. 

I didn’t get pictures of the last step, but it was to affix the leg mounts to the bottom of the table. With the tabletop lying face down, I drilled holes into the wood and resin to ensure I wouldn’t crack the resin. Then, I used 3 to 4 screws in each mount to secure the mounts to the table top. 

Wood and Resin Coffee Table Completion

I was really quite excited to be able to put this coffee table in it’s place in my enclosed porch! Every since we’d purchased the couch from Lowe’s and pillows from Amazon, I was itching to make a coffee table for the space. Also on this porch is my refinished antique hutch, which includes a shade of teal/green. That was one of the reason I chose the jungle green from the variety pack. It was the closest I could get. I hope you found the walk through useful and it gives you courage to try your own!

*This page contains affiliate links. This means if you use one of my links to make a purchase, I will receive a small commission at no additional cost to you. Thank you for supporting Cathartic Crafting!

Capture Nature’s Beauty with a DIY Live Edge Coffee Table

As we were starting to furnish our new living room, I was really hoping to create something more unique. I refinished my grandmother’s antique trunk to use as the coffee table but ended up using it as a side table due to its height. I happened to come into possession of a thick cut of large tree trunk that became the inspiration for this Live Edge Coffee Table. The first step in the monster process of leveling out the thick-cut can be found in my other post. This post is about creating the base and top finish.

Live Edge Coffee Table Steps

Materials

  • 2×4’s (likely only 1 is needed but depends on your slab)
  • Decorative Metal sheeting
  • Pocket Screws & Kreg Jig
  • Spray paint
  • Resin
  • Wood screws
  • Stain (if desired)
  • Wood glue

Live Edge Coffee Table Finish Options

Version One

After much belt sanding and subsequent backache on my first slab, I was ready for putting on the finishing touch. For this one, the finishing touch was going to be the polyurethane coating.

When doing a clear coating, one coat is almost never going to suffice. For this slab, I believe I did 5 or 6 coats. The more you do, the more durable it becomes. Obviously, this means you’re in for a waiting game. No special tricks needed here; brush on the poly and wait the appropriate time to dry. Then, do a light sanding and another coat. Repeat.

I used to think it would be necessary to stain to get more color out of the wood. Unless you desire a totally different color, staining is not necessary. The polyurethane brings out the natural tones in the wood. Below you see the difference in the raw wood and the poly-coated wood.

After the polyurethane dried, the top was at long last complete. I can’t begin to describe the pride and relief in finally completing it. After having the huge slab resting against the wall for well over a year, while I tried to figure out how to tackle it, I didn’t know if I’d ever get it done. My husband had asked when we could get rid of it and I had told him I was giving myself one more month to find a way to do it. That was what I needed to kick myself into gear.

Version Two

By live edge coffee table number two come onto my must-do project list, I was ready to try a “brand new to me” technique, EPOXY! Epoxy (or resin) is essentially like doing 40 coats of polyurethane. I was admittedly a bit scared thinking about how it could go astray. After completing it, I can tell you it’s not that scary if you simply follow the directions. As the instructions will tell you, you have to mix exact amounts of the two chemicals and have two containers to use for mixing. The silly struggle for me was finding the containers because I didn’t feel like running to the store for something minuscule yet again. FYI, it’s much easier if you get these: 

My other unknown was how much would be needed. I decided it’d be better to have too much than too little so used the whole kit. Then, it was on to my very first pour!

The anxiously anticipated epoxy pour….

It was definitely necessary to use a flat scraper to spread it around the full surface. Speed is important here folks. The epoxy doesn’t take long to start drying on you. It’s also important to cover your floor to prevent it from adhering as it drips. I wanted it to go over the live edge to protect the bark. 

A smile because it was going well!

After the pour, it was necessary to blow on the air bubbles to get rid of them. A heat gun or hairdryer works, as does going “ha” on them with your breath. I went with the last method. My girls were perplexed by what I was doing. Thank goodness this project was prior to the pandemic!

The biggest issue I ended up having with version two was the extra porous edges. The epoxy completely absorbed into the edges. I ended up having to do another layer of epoxy to finish it off. FYI, epoxy is not cheap, so I was not thrilled by having to do another layer. My other recommendation (based on this experience) is not to do it in the garage where there are gnats. I kept having to fish those little buggers out of the sticky epoxy. 

Version 2: Beautifully Glassy Finish

The Base

I made two tables that needed slightly different bases based on the uneven bottom of one of them. The basic idea here was to create two interlocking rectangles.

Version One

The height of the leg is dependent on the thickness of the slab of wood and the desired height of the table. I wanted a height of 19 inches, so it would be at the height of the couch seat. The measurement of the ‘leg’ should be from floor to tree slab to hide the ‘base’ 2×4’s. The base 2×4 measurements depend on the width of the tree slab. I decided to make it about 4 inches less than the slab diameter, so it provided enough support for how heavy it was and the top of the legs would be slightly hidden. 

Although the four legs will be the same height, the four base pieces will not be the same. Two will be the full length. Then there will be four short pieces. In the photo above, you can see I have the right length of the short pieces when I place a test piece in the gap. With all the cuts complete, the next step is to create the pocket holes with the Kreg jig in the base pieces and drill in the pocket screws. Below, you can see I measured the midpoint on the cross-sections to ensure it would be square before screwing in the pocket screws.

With the pocket screws in place, this table base build was complete! It was so much easier than having to level the tree slab with a router; to that I’m certain. It was then just a matter of attaching it to the tree slab with long wood screws.

Version Two

Since my other slab was thicker on one side than the other from the chain saw cut, I used a board from a crate table I had made and repurposed. I had to adjust the height of the table lengths based on that difference to ensure the top would be level. (Talk about a pain in the behind.) Then, I built the base in the same way as version one.

Gotta make sure that table is level before you screw it all in!

Version two was actually the one I started with, so I thought the legs would be just as they were. I stained the base with a dark stain and thought I might have been complete. It looked quite blah, and my husband said he thought it would be better to have more of a solid base. That comment inspired me to consider decorative metal sheeting and away I went to the hardware store. Metal sheeting; another first!

Metal Sheeting

The first time I did this, I used metal cutting sheers (borrowed from a coworker) to cut to the appropriate height for coverage of all legs. It worked alright, but it was definitely difficult to keep from catching my skin on the cut metal. I cut three sides to fit the width of space leaving the stained wood leg exposed.  

The second time around, I learned my lesson with the sheers and used this handy dandy little tool to saw through the metal. I also decided on a different method for the edges of the metal sheeting. Given there was a border on the metal sheet, I didn’t want to cut more than one side. This desire gave me the idea to use the whole width of the sheet as-is for each space between legs and wrap around the leg.

Using glue epoxy and clamps, I held the sheeting in place while I screwed wood screws into the available holes to secure it to the legs.   

I hammered the edges of the metal edging so it wouldn’t be a hazard.

Metal Sheeting Version 1: Exposed Wood

Metal Sheeting Version 2: Covered Wood Leg

I hammered the overhang to fold over the edge to meet in the middle with the other side. I tried using some epoxy glue here. It didn’t work very well, so I recommend skipping it. My last step was to hammer in flat head nails on the outside edge to keep it from flaring out. 

Last of all, it was time to spray paint the metal sheeting for my desired bronze look to compliment the bark. It took two coats and then I was finished. Thank the LORD!!

Two Completed Live Edge Coffee Tables

I hope you enjoyed the rundown on how I created these two tables and it inspires you to overcome some of your own fears of taking on bigger projects. As you overcome those little fears, you are sure to build that self-confidence in yourself and your growing skills. For me, it expanded my creativity as well to think of new ways to get to a great end product.

*This page contains affiliate links. This means if you use one of my links to make a purchase, I will receive a small commission at no additional cost to you. Thank you for supporting Cathartic Crafting!

RSS
Follow by Email
Pinterest
Pinterest
fb-share-icon
Instagram

Are you interested in getting alerts and information on all things coming out of Cathartic Crafting?! Then go ahead and submit your info below:

Verified by MonsterInsights