Tag: Easy

Super Simple to make DIY Hexagon Shelf for Personalized Decor

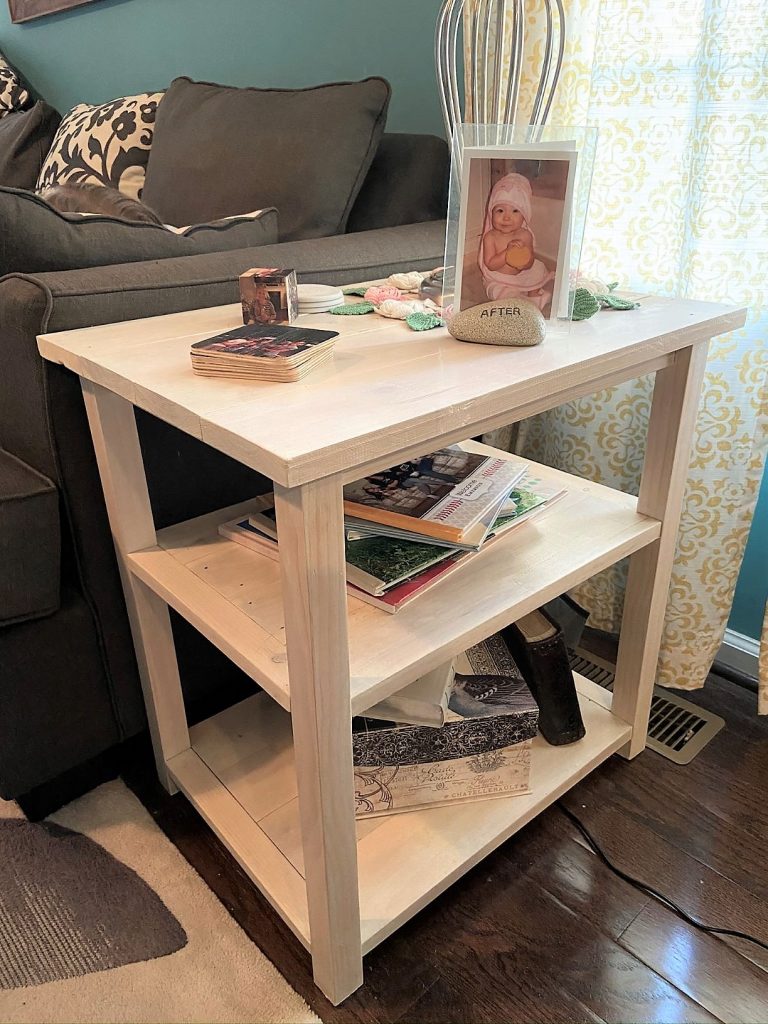
Hexagons are in and squares are out! It’s time to jump on the new trend wave with this DIY Hexagon Shelf. After updating my oldest daughter’s room, I knew this shelf would be the perfect compliment to her freshly painted wall. Don’t you think?!  You could certainly buy one for $30 plus, but I’m sure you’ll agree with me that this easy $10 project is the way to go.

Super Simple Supplies
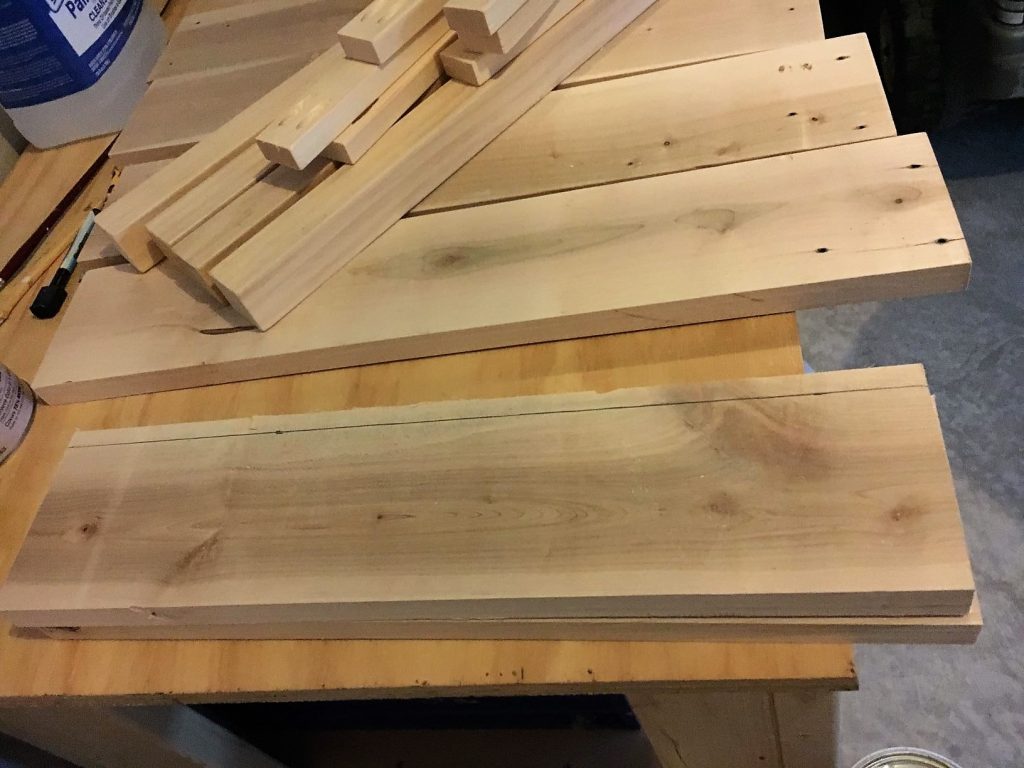
These pre-sanded boards were ready for cutting. Doesn’t get much better than not having to stand.

If you’ve read some of my other woodworking posts, you’ve likely seen that I tend to use some older tools or am making do with what is available. This project is no exception. I’d love to get a new miter saw with all the bells and whistles but just can’t bring myself to spend money on it yet. This used radial arm saw was cheap and available, so that is how I came to have it. Anyway, it does the job. If you are new to woodworking and/or the whole tool game, you can be reassured you don’t have to have all the newest fancy gadgets to make neat functional projects.

Time to cut some wood!

First up, was figuring out how to utilize the size of the board. In order to maximize the boards at their current length, I decided to make each side 12 inches long. That meant I was cutting 3 of the boards in half and the other two would be cut for the shelves. 

The sides need to be cut at a 30-degree angle on each end of the boards. I’ll be totally honest here when I admit I couldn’t bring forth enough of my geometry memory to figure out the angle. Google was my friend in this instance. It makes me feel like I need to brush up along with my children as they learn it! While making the angled cuts, just make sure you’re not cutting off any length by cutting only the squared edge off.

I made the shelves 17 1/2 inches long to give more space to the middle shelf. The shelf boards also need to be cut at a 30 degree angle on both ends. It’s an option to save the hassle of angled cuts and nailing at an angle by cutting the shelves at a straight edge to attach to have hexagon with straight sides.
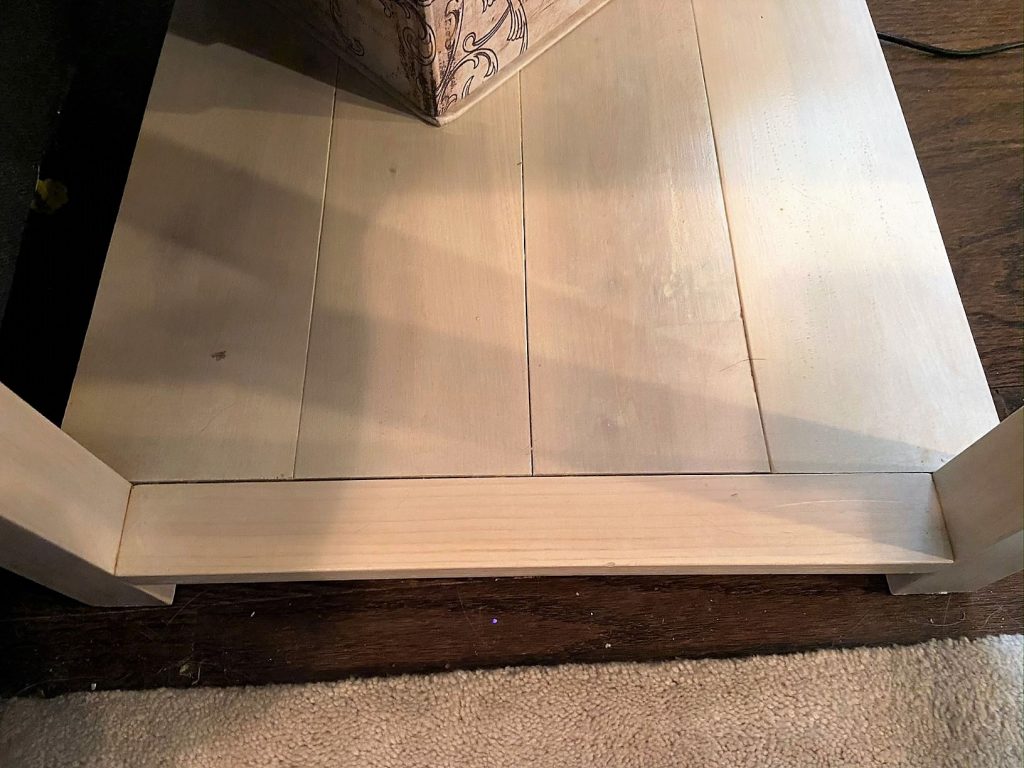
Testing out my angles. Looks good!

Hexagon Shelf Trick

Here’s a fun little trick to keep it all together. It’s not as strong a method as using something like ratchet straps, but I think more people have painter’s tape at the ready. Stretch out the painter’s tape, then line up the boards in a row. Put some wood glue into the crack and pull up the end. It’ll pull together as you go.

For those with little experience with glue and staining, I’ll let you in on a little secret. If you plan on staining the wood, you’d better take a wet cloth to the wood to clean off any trace of wood glue. If you don’t, it won’t stain properly. So, after you wipe the glue off, you’re best to leave the octagon to dry. I will tell you that I didn’t wait for it to dry, so it was a tad difficult to nail it firmly because of the shifting angles.

Time to bring out the nail gun

After the limited sawing and gluing, it’s time to nail it all together. My nail gun was jammed, so I borrowed my neighbor’s. His was better than mine because it had an arrow pointing at where the nail would come out. Mine doesn’t have that lovely little feature…because…mine is cheap. I’m very near buying a better one. I seem to use a nail gun a lot more than I’d ever anticipated so seems like a worthwhile purchase to me.

The hardest part was nailing the shelves in the right spot. Honestly, I didn’t want to wait for the glue to dry at the time. It would have been easier to have waited to nail it after it was set with glue.

Final Stretch for the Hexagon Shelf

All that’s left to do is paint it. My daughter picked pink out of my spray paints. It ended up not matching well with the pink on her wall, so we ended up spray painting it gray.

Shelf brackets nailed into the back were the finishing touch. I have found the easiest way to hold the tiny nails is with needle-nose pliers. You just hold them there while you hammer.

Little Mermaid Birthday Party for your Ocean Loving Princess

Princesses, princesses, princesses. All three of my daughters were entirely enthralled with them around the ages of 3-6. When we started talking about themes for her 5th birthday, a Little Mermaid themed party was a logical choice. I love a good theme and coordinating party activities. I was excited to take on this party planning. Coming from a child development background, I know there’s a fine balance of free play and structured activity time at a party for young children. Even knowing that, I still struggle to tone done my creative energies. Based on the sentiments spoken in the end, I struck the appropriate balance for those 5-year-olds. 

Snacks and Decor made Sea Simple

Easy table decor in the way of shells and Little Mermaid doll
Veggie corral: a big pile of veggie dip and an arrangement of veggies
A Boat server (a Homegoods clearance find)

Cake

Our typical cake planning method has been me asking the birthday girl what she wants her cake to look like. Sometimes, she plans it all herself, but other times, we peruse Pinterest for ideas. This Little Mermaid cake was my replicated Pinterest selection with the birthday girl’s desired cake and icing flavors. 

I was finishing this cake just before the party started. It’s never how I intend for things to go, but I seem to have a tendency to let my procrastinator habits get to me during the workweek. When making these special cakes, I try to make the layers 3 days ahead. My hope is to give myself a day or two to create the decorations. I, unfortunately, end up staying up late the night before to get the bulk of them finished. Then it turns out the kids only eat the icing and a few bites of the cake, and a little piece of me dies inside.

Ocean Obstacle Course

Crafting

The crafting for this party was minimal and made for a more relaxed party prepping experience. Streamers, a cut-up blue table cloth to serve as the water entryway to the ocean, a punch-out board and homemade jellyfish. For the jellyfish, you can make your own using paper lanterns and streamers or there’s a premade version available.

Option 1: Cut a paper lantern in half and glue streamers to the the inside of it. This is obviously the cheaper method.

Option 2: Buy them! These are super cute, but not sure I’d want to pay $50+ for as many I had.

Punch Board

This took a bit of time. You have to cut the circles out of the poster board before gluing the tissue paper to the board. After it dries, glue folded paper bags to the board with something inside. For this obstacle course, the goal was to get to Ariel’s Grotto and find the shell containing Ariel’s voice. 

Green streamers served as the seaweed. The jellyfish were hung with fishing wire at different heights. After that, I just used whatever I had available to make a fun 5-year-old course.

I had them crawl through the tunnel and stay within the jump rope lines. Masking tape would have made for a better path. While traversing the path to cave, they had to avoid touching the jellyfish tentacles.
Then the kids took turns to find the sea shell.

And that’s all it took for those 5-year-olds to have a mermaid fun time. If you’re looking for some other ideas, you could try a Pirate Party or a Detective Party.

A Straightforward DIY Living Room Table Set just for You

While trying to decide on the direction for our new living room that wouldn’t break the bank, I was inspired by pins on Ikea furniture hacks. One, in particular, struck my fancy because of its simplicity and look. I ended up finding a discounted Hemnes white coffee table which was the start of this living room table set project. If you’re looking for a simple project that will impress your friends, then follow along with me.

Personalizing Ikea

Supplies for Ikea top:

  • 3- 1x6x8
  • 1- 1x3x6
  • 1″ Wood Screws

Supplies for Side Table:

  • 1- 1x2x6
  • 1- 2x2x8
  • 3- 1x6x8
  • Stain
  • 1 1/2″ Wood Screws 
  • Kreg jig & screws
  • Wood Glue

I assume you know how wood measurements work, but just in case, here’s a nice breakdown at Arch Toolbox. Wouldn’t it be so much easier if the name matched the actual size?! I was given some poplar boards from our builder that were perfect for the coffee table and as the main part of a coordinating side table. I used pine for the store-bought wood for it’s affordability. In general, pine is a softer wood, so choosing this option could mean finding nicks and scraps in the wood at some point. Poplar is a harder wood that will take more of a beating.  

Getting started on this Living Room Table Set

This portion of the project involved ripping the boards into 6 equal pieces at 4 3/4″ x 41 1/4″. You have two options on how to connect them side by side; doweling and pocket holes. Pocket holes are easier to do but can be tricky to ensure the boards stay completely flush. Doweling needs to be pretty precise, so it can be tedious and slightly difficult to do by yourself. I chose to go with the pocket holes route for both tables here. I also decided to sand down the corners of each board to ensure there was a distinction between the boards after they were secured together.

living room table set: ikea update

After the long middle boards were screwed together, I cut the end boards to size at 2 3/8″ and 29 1/4″. I used the Kreg jig to create the pocket holes to attach the ends. With the top together, I stained it and the sides with a white stain followed by three coats of clear polyacrylic. I wanted to keep the top white to match the table and go with the white, gray, yellow, and teal color scheme of the room.

living room table set: new top

To finish this easy table upgrade, I just needed to screw the wood top to the coffee table. This was simply done by turning the coffee table over to expose the bottom. It was best to clamp the top to the table to avoid a gap between the boards. I chose not to use glue and stick with just the screws. To make sure the wood wouldn’t splinter with the wood screws, I pre-drilled the holes.

Side Table

Cuts

  • 8 – 1″ x 4″ x 19″
  • 4 – 1″ x 4 1/2″ x 24″
  • 6 – 1″ x 2″ x 13 1/4″
  • 2 – 1″ x 2″ x 19″
  • 4 – 2″ x 2″ x 24″

The width of the legs and shelves is 14 3/4″ and the height of the side table is 24 3/4″.

The side table consisted of cutting the wood to size and using the kreg jig. I didn’t care to have to do more cuts than necessary, so my schematic limited the need for notched cuts by utilizing the 1×2’s.

living room table set: boards for side table

The poplar boards I used also needed to be ripped to size for the two shelves. I used a circular saw with a guide to cut the four boards, which works well enough. I would actually much rather have a table saw to use that would ensure an absolutely straight cut. My woodworking projects would be so much easier with a few extra tools, that’s for sure, but it just goes to show you don’t need all the special tools to complete a project. After cutting all the boards, sanding them smooth and making the pocket holes with the kreg jig was up next. 

Almost finished

Pocket holes galore. I used pocket holes to connect all the pieces together as you can see below, making sure to screw the shelf into all four legs and the 1×2’s. With all the hard work done, it was finally time to stain it. Rust-o-leum Antique White stain applied with a white rag gave it the finish I was trying to achieve. It needed three coats of stain to give it a consistent white. You generally shouldn’t need to do that many coats, but I felt it was warranted with this one. The most important point when staining is to go with the grain and not to allow it to pool in any one spot. 

And that’s all that is involved with creating a simple side table and giving an Ikea table an upgrade. If you’re looking for another easy project, check out Revamp a Composite Bookcase. It uses 1×2 pine boards just like some of this one.

living room table set top
living room table set bottom shelf

Completed Living Room Table Set Project

living room table set finished side table
living room table set: finished idea table

*This page contains affiliate links. This means if you use one of my links to make a purchase, I will receive a small commission at no additional cost to you. Thank you for supporting Cathartic Crafting!

Composite Bookcase Revamp into Unique Upscale Decor

Have you been hanging on to the affordable furniture you got when you were first married or moved into your first space? Is money still a bit to tight to buy nice stuff? The affordable option is to give that furniture an overhaul. In this post, I’ll show how to revamp a composite bookcase with just a few supplies. My bookcase was one of those items from good old Walmart. I’m sure I’m not the only one to have something like it. After use, these composite furniture items can even be hard to give away since many donation companies won’t take them. That leaves only a few options; the dump, a plea for someone to take it for free or to get into that happy mental space to give it a pleasing boost.

Getting to Work

First step is to give that shiny finish a really rough sanding with some low number grit sandpaper. I give a little more detail about the types of sandpaper in my wood paddle platter post as a reference. If you have an electric sander, you could use it for the outside and shelves. The inside corners will likely need hand sanding. I like the sanding blocks they sell now in stores, but in a pinch, you can use the method my dad always used. Fold the sandpaper sheet around a hand size scrap piece of wood. This makes it easier to hold and to sand. 

Supplies

  • 1/4″ plywood
  • 1×2 boards
  • Paint
  • Stencil
  • Paintbrushes
  • Wood filler
  • Wood glue

Tools

  • Nail gun and compressor (or nails and a hammer)
  • Kreg jig & screws
  • Wood glue
  • Dremel
  • Saw
  • Scraper

New Back Panel

Cardboard backs are pretty much a given with these composite bookcases, so it’s a given that it should be replaced. Cut the 1/4″ plywood to size before starting to paint. Then paint your base color. I wanted to give mine a fun feature, so I went with key stencils in the same color I chose for the outside. I was slightly disappointed about how hard it was to see. If I were to do it again, I would do the stenciling in a slightly darker shade.

Next up is to use the nail gun to attach the plywood to the back of the bookcase. To ensure it stays secure, put wood glue on before nailing the back.


Well on your way now

Composite bookcase painted interior

If you look below, you might be confused as to why it’s painted here and not painted later. That is simply because I didn’t start with the sanding part. I sadly admit to you that I take the lazy way out at times and it normally comes back to bite me in the end. You’d think I’d learn better than I do. This ended up meaning that the paint was scratching off when I started to work with it. I also needed to fill the peg holes with wood filler to create a flat surface. You should definitely do both of those things if you will be securing the shelves in place.

The Wood Frame for this Composite Bookcase

The measurements for the cuts of the 1×2’s really depends on the size of the bookcase. My cuts were:

  • 2   28″ pieces for the front horizontal bars
  • 4   31 3/4″ pieces for the vertical beams
  • 4   8 5/8″ pieces for the horizontal beams on the side

Cut them to size and drill holes with a Kreg jig. When connecting them together, you should start with creating the front square and the side rectangles. After those are together, it’s time to connect the sides with the front through the pocket holes. 

After the frame is completely built, it can be attached with glue and a nail gun. You should also attach the shelves with glue and a nail gun from the outside. There are a variety of nail guns out there. Mine is on the cheap side so doesn’t have any bells or whistles.

Even though I tried to keep the gun straight as can be, there were a few of the 1.5 inch nails that went askew. It meant they were sticking out of the shelves and needed to be cut. Talk about wanting to pull your hair out, I was completely annoyed. So be warned that it doesn’t always go smoothly. I chose to add vertical boards to support the sagging shelves, but you can leave without them if you like. Mine had experienced years of holding kids books. I used wood glue and nailed the boards from both the top and the bottom.

revamped composite bookcase with new frame
You can see here that the bottom board is not flush to the ground. That is with the intention of being flush with the bottom shelf and giving a bit of a gap with the floor. Be sure to measure where your bottom shelf falls before securing the horizontal beams to the vertical.
Composite bookcase with new frame

Time to Dremel for a Unique Touch

At the time, I hadn’t had a lot of experience with a dremel. I chose to add this touch to practice the skill. Obviously, you don’t have to go the same route, if you don’t have a dremel. If you are opting in, trace the stencil with pencil onto the wood before starting to cut it out. Take your time, go at it at a bit of an angle and you’ll be fine.

Paint

After all the cutting and drilling, it’s time to move into the home stretch with paint. I chose affordable paint from Michaels in Sea Glass. It went on easy and has held up perfectly well over the years.

For the top, cut a piece of wood or plywood that is an inch bigger on the sides and 1/4″ extra on the front than the bookcase measurements. The back of the top is flush (aka even) with the back. I used a white stain applied with a clean white rag on my piece to match more with my paint. If you don’t have much experience with stain, don’t worry. The important thing to remember is to go with the grain of the wood and not to allow large pools of stain to sit on the surface. Doing so will leave you with a spotty uneven look that can only be corrected with significant sanding. You can end it there with the stain or keep going as I did. 

DIY Rub-On Words

I came across this awesome tutorial on Pinterest on how to transfer images using wax paper and was pumped to try it with this project. If you are looking for a way to accomplish the task with materials you have at home, this is it. The hardest part is getting the printer to feed the wax paper without crumpling it. It was another one of those screaming in frustrating experiences. I found the best method was to tape the wax paper to a piece of computer paper to ensure 100% success every time.  I also had to learn how to get the words to be reversed for printing. This can be accomplished with 3-D Rotation of a text box in Microsoft Word. 

Reference below:


“Kind words are keys that fit in all locks.”

Revamped Composite Bookcase

The Final Look


It’s a bit hard to see here, but I added a white key and 2 lock stencils to the outside panels as well. 


Empty composite bookcase
I made the FAMILY hanger and placed the initials of my three girls to finish off the space.

Filled with Family:

Finished composite bookcase

That’s it! Not a terribly difficult project to take that humdrum composite bookcase to a new posh look. I hope you are happy with how yours turns out!

RSS
Follow by Email
Pinterest
Pinterest
fb-share-icon
Instagram

Are you interested in getting alerts and information on all things coming out of Cathartic Crafting?! Then go ahead and submit your info below:

Verified by MonsterInsights