Tag: Shutters

A Window and Shutter Refinishing Combo Must Do

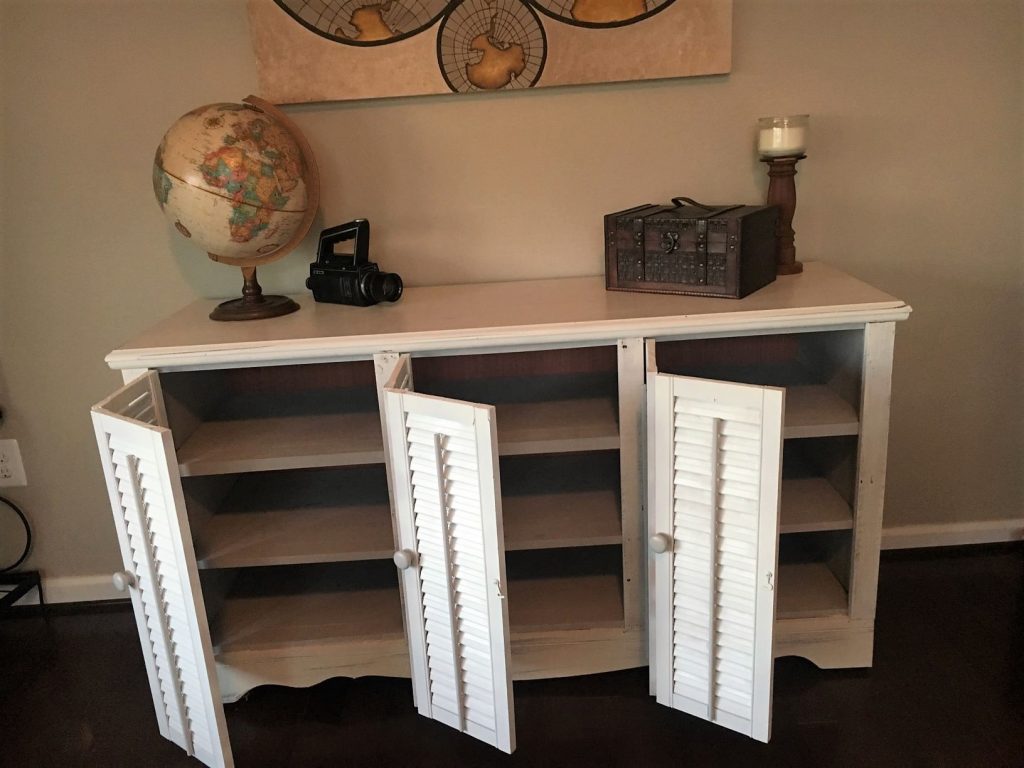
With three girls in my house, the bows and headbands were getting out of control in their shared bathroom. Previously, I made some headband holders and bow holders. They were overloaded and a bit unsightly. I had several windows and shutters in my garage waiting for a good project idea to hit me. With the desire to spruce up their bathroom, I came up with the idea to use a window and shutter to create an organizer for their hair paraphernalia. I was super excited by the idea as it served as cute décor with purpose. It was definitely a win-win situation; I got a larger window and a set of shutters out of my garage stockpile and created a quick organizer for all the bows, headbands,  earrings, and misc items. My girls thought it was a hit, so I hope you enjoy it as well!

The very sad looking before photo: a ribbon frame bow holder and an owl earring holder.

Bathroom Window and Shutter 411

The window started out as a single pane old window without the crossbars. My initial plan was to use a Cricut to cut a message to stick on the window. After an accidental slip causing the pane to break, I decided to go with a Plan B for the glass area. Plan B included constructing my own crossbars using a router and glue. More on that later…

This is what I was working with at the start.
Incidentally, this is around where it slipped off the bench and cracked the glass. It was a happy accident.

Easy Refinishing Step: Painting

The shutters were in need of a color correction from the cherry red. After separating the shutters into two pieces, I spray painted them with gray. Then, the window frame needed some refreshing with some white chalk paint.

Attaching the Shutters

Then, I attached the shutters to the window frame by attaching one side with the remaining hinges and the other shutter with pocket holes. (FYI: pocket holes are created with a Kreg jig. (If you need more info check out some of my other posts: Shutter Buffet, Living Room Set)

It was after this picture that the windowpane broke. After that mishap, it was on to plan B. I used 1/2″ square dowels and a router to cut out notches for the cross beams to fit together. Essentially, you are notching a 1/4 inch into the dowels in the spots you want the dowels to fit into each other. When they are pieced together, they should remain at 1/2″ width glued together. Four dowels and 8 notches. This requires starting with a square and tape measure to ensure your notches are going to line up correctly. 
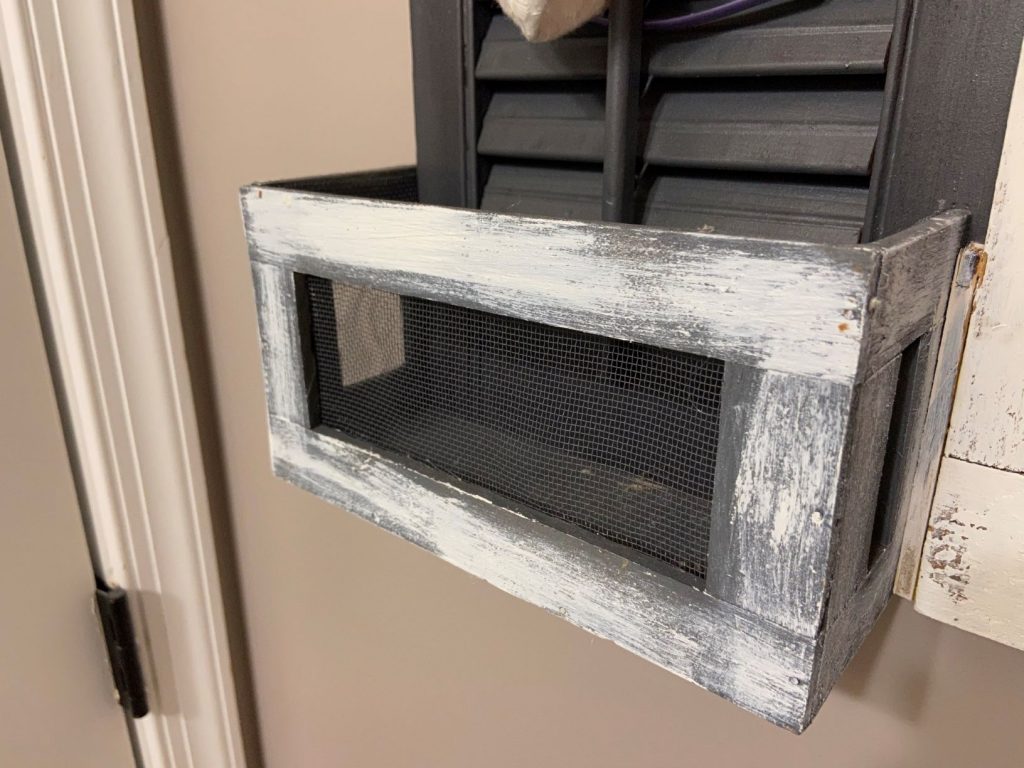
Shelves:

Using 1/4″ board scraps, I made some framed shelves for the bottom of the shutters. I thought of them like window flower boxes. Then, I used a metal screen to cover the openings of the shelves. It was easy to cut them to size and hot glue them onto the inside of the 1/4″ wood. Wood, glue, and screws attached the shelves to the shutters.

Pop-out Earring Holders:

With plan B in play, I was inspired to utilize the empty space for additional purposes. I decided to replace the hanging owl earring holder with an earring holder window square. The same square dowels were used for the frames as for the crossbars. In case you are interested, I include a tutorial on constructing an earring holder with a frame and metal screening on my picture frame post


Shutter Headband Holder:

To say it simply, my 6-year-old has A LOT of headbands. The shutter pull bar was a perfect way to hold them in place.

Towel Hooks to Finish it Off:

The builders of our home put one long bar towel holder in this bathroom, which sufficed for the last 5 years. I was tired of not having a place to hang multiple towels separately. With that notion in mind, I decided to put up towel hooks on the bottom of the window frame. I’m really happy about the added options the double hooks now provide.

Bathroom Window and Shutter Finishing Touch

Using a fairly thick wire I had on hand and some fabric, I made a wreath for the window and shutter decor. I used the wire to “sew” (aka poke holes) into the material. 

Then, the bows could then be easily clipped around the wreath. 

With the placement of the headbands, bows, towels, and earrings, this window and shutter bathroom organizer was complete. After all the work was said and done, it was so much more beautiful than the previous version. Thankfully, my daughters corroborated that belief.

*This page contains affiliate links. This means if you use one of my links to make a purchase, I will receive a small commission at no additional cost to you. Thank you for supporting Cathartic Crafting!

Dresser Makeover into a Surprising Shutter Buffet

So one day I was surfing the Facebook marketplace as I often do and saw a free dresser posted nearby. I already had an antique kitchen hutch, old windows, a bunch of shutters from my mother-in-law, a tall dresser, and a huge log taking up property in my garage. The picture wasn’t great but it looked worth a dresser refinish project since it was free. My husband agreed to pick it up for me while I was at work. The next text I got was that he had indeed gotten it, but the dresser was in terrible shape.

free dresser ready for dresser refinish

I figured he was being a bit overdramatic, but when I got home to look, saw he wasn’t kidding. The previous owner’s cats had taken up residence inside the drawer, shredding many of them and leaving behind a lovely aroma. It was gross and I didn’t feel like having to get the scent out and replace the drawer bottoms. He asked if I was going to toss it, but I decided to gut it instead.

Start of this Dresser Refinish

Time to Gut It

dresser refinish after gutting

I pulled out the drawers and tossed all but one, which now holds roller skates in my garage. I pulled off the disgusting back panel, the drawer bars and was left with a fresh canvas. The stack of small shutters inspired me and lead the whole dresser refinish after I decided to nix the drawers.

Dresser refinish gutted
Dresser refinish in progress
My messy garage only seems to stay clean for short periods of time.

After gutting it, it was time to cover the inside and add the shelves. I used 1/4″ plywood for the sides. (As seen below) I used a circular saw and a jigsaw to cut it to size and make the notches for the front crossbars.

Next up: Shelves

Dresser refinish with shelves

For the shelves, I used some 3/4″ plywood that I already had leftover from another project. After measuring it to size, I used a circular saw with a guide to cut it more easily. As I said in another post, I lack a lot of the tools to make tasks easier. I would love to get a new table saw at some point, because I find cutting a completely straight line with a circular saw quite difficult.

I used a Kreg jig I ‘borrowed’ from my parents years ago to create the screw holes to be able to attach the shelf to the supports.

This is what a kreg jig looks like for those who don’t know. Thought I’d save you a google search. 😉

Dresser refinished with all shelves
Yep, in the background are the shutters and log I referenced. I had been desperately trying to find someone who would be able to cut it into two pieces and coming up empty.
After getting all three shelves screwed into place, it was time to paint the shelves and outside. I used a light gray chalk paint I had leftover from a dresser refinish for the inside. I liked the slight variation in the gray and white. (Anyone recognize that carpenter benchtop?! Referenced here in my platter post . I get tons of use out of it.)
To begin with, the shutters were too long. I used an arm saw to cut off length on the end. I ended up having to wood glue and nail the middle bottom wood pieces back into place. Time to use some white Rustoleum to spray paint those bright red shutters. It took 3ish coats of spray paint to get an even finish.

Time to Include Pallet Wood

For the Shutter anchors/separators, I used pallet wood cut to size. I had four cut and ready to attach another day. When I came back out the next day to complete it, I’d found that the fourth board on the right end had been taken. None of my girls confessed to it, so I had to assume it was a neighbor boy who tended to find his way into my garage…or backyard. I was pretty annoyed because of the extra work to rip a new board.


What I don’t seem to have taken a picture of was the routering I had to do on the top edge of that bottom front panel. The dresser had a rounded edge that needed to be flat for the shutters to rest on for a finished look. If I hadn’t cut it off, it would have looked quite odd. One of my first routering projects was an Wood Platter. I’ve come a long ways since then.


After I attached the pallet wood strips with wood glue and a nail gun, I was ready to paint.

Bring on the Paint

Typically, I use Fusion Paint, but decided to give this milk paint a try. I used my Michael’s coupons to get a good deal (I can’t not) on a surface primer and a white milk paint for the outside. I wasn’t impressed with the way it coated, so I haven’t used it again.

Hinges from good ole Lowes came only in gold and silver. I decided to use some spray paint I had on hand for a more bronzey brown color.

Not pictured was the drilling of holes in the shutters to place the spray-painted dresser knobs. I had old knobs from a previous dresser refinish that were perfect for this look. You can see them in the photos below.

After hours and hours of work, there came a day that I was ready FINALLY ready to finish by screwing the hinges into the last two shutters.
All there was left to do was bring it in and set it up! I was really surprised by how much my girls liked it and pleased with how impressed my husband was with the end result.
Dresser refinished into shutter buffet with doors open
Refinished Dresser
I made a shutter shelf to match but we kept the map up there for a more polished look.

Dresser Refinish Before and After

Isn’t it crazy how much you can transform an object just by generating an idea in your mind and putting your body into action?! The added bonus of woodworking and crafting is that it’s helping your mind escape and practice focus. It’s flexing those mental muscles you may not get to use at work or when you’re running around with your kids. If you are anything like me, you also feel more at peace when you are able to check out in this way. Here’s to finding inspiration and time to ‘check out’ for some you time. You’ll be happier when you do.

*This page contains affiliate links. This means if you use one of my links to make a purchase, I will receive a small commission at no additional cost to you. Thank you for supporting Cathartic Crafting!

RSS
Follow by Email
Pinterest
Pinterest
fb-share-icon
Instagram

Are you interested in getting alerts and information on all things coming out of Cathartic Crafting?! Then go ahead and submit your info below:

Verified by MonsterInsights